Canon XF605 Instruction Manual - Page 27
Removing Menu Settings, Resetting All the My Menu Sets, Renaming My Menu Sets
 |
View all Canon XF605 manuals
Add to My Manuals
Save this manual to your list of manuals |
Page 27 highlights
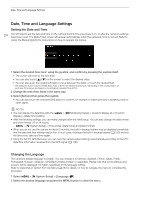
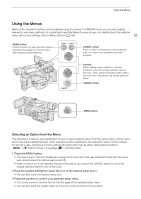
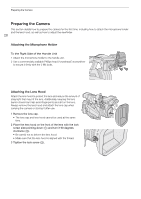
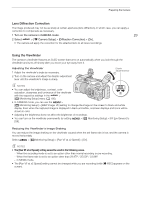
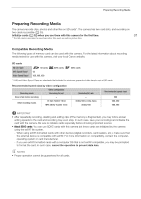
Using the Menus 3 Move the menu setting to the desired position and press SET. Removing Menu Settings 1 Select > [¥ My Menu] > Desired menu page > [Edit] > [Delete]. 27 2 Select the menu setting you want to remove and then select [OK]. Resetting All the My Menu Sets Reset all the menu settings registered to the currently selected My Menu set. Select > [¥ My Menu] > Desired menu page > [Edit] > [Reset All] and then select [OK]. Renaming My Menu Sets You can give each of the 5 My Menu sets a more descriptive name to make them easier to identify. 1 Select > [¥ My Menu] > Desired menu page > [Edit] > [Rename]. 2 Enter the desired name (8 characters long) using the keyboard screen (see the following sidebar). Entering text and numbers There are two types of screens used to enter text and numbers - the keyboard screen, and the data entry screen. Which screen is used, as well as the available characters will depend on the menu setting. Keyboard screen 1 Touch the character you wish to enter. • The characters you entered will appear in the input area at the top of the screen. Key / / Function Moves the cursor in the input area. Shift key Switches between letters, numbers and special characters. Space key Backspace key • You can also move the cursor with the joystick, and select the desired character by pressing SET. 2 After entering the desired text, touch [OK] to confirm. Data entry screen Use the joystick to select characters. 1 Select a character and then press SET to confirm. • The cursor will move to the next field. • You can also push the joystick left/right to move between the fields. • You can also touch the Í/Î buttons on the screen to select the desired character, or move the cursor by touching the character itself. • Change the rest of the characters in the same way. 2 Select [Set] to confirm the text or value. • You can also confirm your selection by touching the onscreen SET button. • Press CANCEL to stop entering text.
-
 1
1 -
2
-
3
-
4
-
5
-
6
-
7
-
8
-
9
-
10
-
11
-
12
-
13
-
14
-
15
-
16
-
17
-
18
-
19
-
20
-
21
-
 22
22 -
 23
23 -
 24
24 -
 25
25 -
 26
26 -
 27
27 -
 28
28 -
 29
29 -
 30
30 -
 31
31 -
 32
32 -
33
-
34
-
35
-
36
-
37
-
38
-
39
-
40
-
41
-
42
-
43
-
44
-
45
-
46
-
47
-
48
-
49
-
50
-
51
-
52
-
53
-
54
-
55
-
56
-
57
-
58
-
59
-
60
-
61
-
62
-
63
-
64
-
65
-
66
-
67
-
68
-
69
-
70
-
71
-
72
-
73
-
74
-
75
-
76
-
77
-
78
-
79
-
80
-
81
-
82
-
83
-
84
-
85
-
86
-
87
-
88
-
89
-
90
-
91
-
92
-
93
-
94
-
95
-
96
-
97
-
98
-
99
-
100
-
101
-
102
-
103
-
104
-
105
-
106
-
107
-
108
-
109
-
110
-
111
-
112
-
113
-
114
-
115
-
116
-
117
-
118
-
119
-
120
-
121
-
122
-
123
-
124
-
125
-
126
-
127
-
128
-
129
-
130
-
131
-
132
-
133
-
134
-
135
-
136
-
137
-
138
-
139
-
140
-
141
-
142
-
143
-
144
-
145
-
146
-
147
-
148
-
149
-
150
-
151
-
152
-
153
-
154
-
155
-
156
-
157
-
158
-
159
-
160
-
161
-
162
-
163
-
164
-
165
-
166
-
167
-
168
-
169
-
170
-
171
-
172
-
173
-
174
-
175
-
176
-
177
-
178
-
179
-
180
-
181
-
182
-
183
-
184
-
185
-
186
-
187
-
188
-
189
-
190
-
191
-
192
-
193
-
194
-
195
-
196
-
197
-
198
-
199
-
200
-
201
-
202
-
203
-
204
-
205
-
206
-
207
-
208
-
209
-
210
-
211
-
212
-
213
-
214
-
215
-
216
-
217
-
218
-
219
-
220
-
221
-
222
-
223
-
224
-
225
-
226
-
227
-
228
-
229
-
230
-
231
-
232
-
233
-
234
-
235
-
236
-
237
-
238
 |
 |