Canon XF605 Instruction Manual - Page 164
Other Connection Methods, Transferring Recordings to a Smartphone
 |
View all Canon XF605 manuals
Add to My Manuals
Save this manual to your list of manuals |
Page 164 highlights
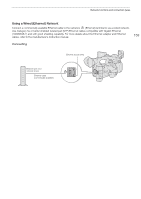
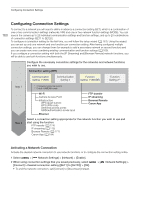
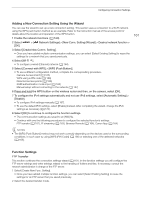
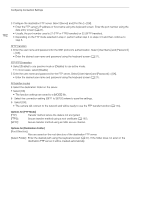
Configuring Connection Settings * A decoder compatible with FEC error correction is required. 164 Browser Remote This section continues the connection settings wizard (A 161). A user name and password are required to log in to the Browser Remote application. In the function settings you will configure up to three different users for single-user or two-user operation. 1 Select [Create New Func. Setting]. • Once you have added multiple function settings, you can select [Select Existing Setting] to reuse Browser Remote settings that you saved previously. 2 Enter the user names and passwords as necessary. 3 Select [OK] twice. • The function settings are saved to a [MODE] file. 4 Select the connection setting (SET1 to SET20) where to save the settings. 5 Select [OK]. • The camera will connect to the network and will be ready to accept commands from the Browser Remote application (A 177). Canon App (Connecting to a Smartphone) This section details the necessary settings to connect the camera to a smartphone through a network. Be sure to connect both the smartphone and the camera to the same network in advance. A smartphone application is necessary to connect the camera to a smartphone. For details on downloading the necessary smartphone application, refer to Transferring Recordings to a Smartphone (A 184). For more details, refer to the smartphone's instruction manual. 1 Select [Create New Func. Setting]. • Once you have added multiple function settings, you can select [Select Existing Setting] to reuse Canon App settings that you saved previously. 2 Select [OK]. 3 As indicated on the screen, open the application on the smartphone. 4 Select the camera using the smartphone application. • If the camera and the smartphone are connected to the same network, the camera will be detected automatically. 5 Select [OK]. • The connection will be completed. • The function settings are saved to a [MODE] file. 6 Select the connection setting (SET1 to SET20) where to save the settings. 7 Select [OK]. • The connection will be completed and the camera will be ready to operate with the connected smartphone (A 184). Other Connection Methods This section explains how to configure communication settings using methods other than the WPS push button. Ethernet Settings 1 In the [Network Type] screen, select [Ethernet ].
-
 1
1 -
2
-
3
-
4
-
5
-
6
-
7
-
8
-
9
-
10
-
11
-
12
-
13
-
14
-
15
-
16
-
17
-
18
-
19
-
20
-
21
-
22
-
23
-
24
-
25
-
26
-
27
-
28
-
29
-
30
-
31
-
32
-
33
-
34
-
35
-
36
-
37
-
38
-
39
-
40
-
41
-
42
-
43
-
44
-
45
-
46
-
47
-
48
-
49
-
50
-
51
-
52
-
53
-
54
-
55
-
56
-
57
-
58
-
59
-
60
-
61
-
62
-
63
-
64
-
65
-
66
-
67
-
68
-
69
-
70
-
71
-
72
-
73
-
74
-
75
-
76
-
77
-
78
-
79
-
80
-
81
-
82
-
83
-
84
-
85
-
86
-
87
-
88
-
89
-
90
-
91
-
92
-
93
-
94
-
95
-
96
-
97
-
98
-
99
-
100
-
101
-
102
-
103
-
104
-
105
-
106
-
107
-
108
-
109
-
110
-
111
-
112
-
113
-
114
-
115
-
116
-
117
-
118
-
119
-
120
-
121
-
122
-
123
-
124
-
125
-
126
-
127
-
128
-
129
-
130
-
131
-
132
-
133
-
134
-
135
-
136
-
137
-
138
-
139
-
140
-
141
-
142
-
143
-
144
-
145
-
146
-
147
-
148
-
149
-
150
-
151
-
152
-
153
-
154
-
155
-
156
-
157
-
158
-
 159
159 -
 160
160 -
 161
161 -
 162
162 -
 163
163 -
 164
164 -
 165
165 -
 166
166 -
 167
167 -
 168
168 -
 169
169 -
170
-
171
-
172
-
173
-
174
-
175
-
176
-
177
-
178
-
179
-
180
-
181
-
182
-
183
-
184
-
185
-
186
-
187
-
188
-
189
-
190
-
191
-
192
-
193
-
194
-
195
-
196
-
197
-
198
-
199
-
200
-
201
-
202
-
203
-
204
-
205
-
206
-
207
-
208
-
209
-
210
-
211
-
212
-
213
-
214
-
215
-
216
-
217
-
218
-
219
-
220
-
221
-
222
-
223
-
224
-
225
-
226
-
227
-
228
-
229
-
230
-
231
-
232
-
233
-
234
-
235
-
236
-
237
-
238
 |
 |