Canon XF605 Instruction Manual - Page 29
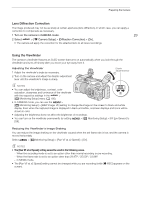
Lens Diffraction Correction, Using the Viewfinder, Turn on the camera in CAMERA mode., elect, Camera
 |
View all Canon XF605 manuals
Add to My Manuals
Save this manual to your list of manuals |
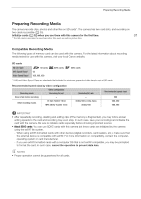
Page 29 highlights
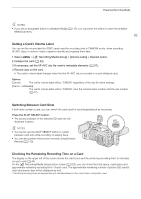
Preparing the Camera Lens Diffraction Correction The image produced may not be as sharp at certain apertures (lens diffraction), in which case, you can apply a correction to compensate as necessary. 1 Turn on the camera in CAMERA mode. 29 2 Select > [v Camera Setup] > [Diffraction Correction] > [On]. • The camera will apply the correction for the attached lens to all future recordings. Using the Viewfinder The camera's viewfinder features an OLED screen that turns on automatically when you look through the viewfinder and turns off shortly after you move your eye away from it. Adjusting the Viewfinder 1 Adjust the viewfinder's angle as necessary. 2 Turn on the camera and adjust the dioptric adjustment lever until the viewfinder's image is sharp. Dioptric adjustment lever ቢ NOTES • You can adjust the brightness, contrast, color saturation, sharpness and luminance of the viewfinder ባ with the respective settings in the > [¢ Monitoring Setup] menu (A 190). • In CAMERA mode, you can use the > [¢ Monitoring Setup] > [B&W Image: VF] setting to change the image on the screen to black and white display. Even when the captured image is displayed in black and white, onscreen displays and icons will be shown in color. • Adjusting the brightness does not affect the brightness of recordings. • You can turn on the viewfinder permanently by setting [Off]. > [¢ Monitoring Setup] > [VF Eye Sensor] to Reducing the Viewfinder's Image Shaking You can reduce the image shaking on the viewfinder caused when the set frame rate is low, and the camera is moved horizontally. Select > [¢ Monitoring Setup] > [Run VF at x2 Speed] > [On]. NOTES • The [Run VF at x2 Speed] setting cannot be used in the following cases. - When the recording mode is set to an option other than normal recording or pre-recording. - When the frame rate is set to an option other than 29.97P / 25.00P / 23.98P. - In MEDIA mode. • The [Run VF at x2 Speed] setting cannot be changed while you are recording (while [Ü REC] appears on the screen).
-
 1
1 -
2
-
3
-
4
-
5
-
6
-
7
-
8
-
9
-
10
-
11
-
12
-
13
-
14
-
15
-
16
-
17
-
18
-
19
-
20
-
21
-
22
-
23
-
 24
24 -
 25
25 -
 26
26 -
 27
27 -
 28
28 -
 29
29 -
 30
30 -
 31
31 -
 32
32 -
 33
33 -
 34
34 -
35
-
36
-
37
-
38
-
39
-
40
-
41
-
42
-
43
-
44
-
45
-
46
-
47
-
48
-
49
-
50
-
51
-
52
-
53
-
54
-
55
-
56
-
57
-
58
-
59
-
60
-
61
-
62
-
63
-
64
-
65
-
66
-
67
-
68
-
69
-
70
-
71
-
72
-
73
-
74
-
75
-
76
-
77
-
78
-
79
-
80
-
81
-
82
-
83
-
84
-
85
-
86
-
87
-
88
-
89
-
90
-
91
-
92
-
93
-
94
-
95
-
96
-
97
-
98
-
99
-
100
-
101
-
102
-
103
-
104
-
105
-
106
-
107
-
108
-
109
-
110
-
111
-
112
-
113
-
114
-
115
-
116
-
117
-
118
-
119
-
120
-
121
-
122
-
123
-
124
-
125
-
126
-
127
-
128
-
129
-
130
-
131
-
132
-
133
-
134
-
135
-
136
-
137
-
138
-
139
-
140
-
141
-
142
-
143
-
144
-
145
-
146
-
147
-
148
-
149
-
150
-
151
-
152
-
153
-
154
-
155
-
156
-
157
-
158
-
159
-
160
-
161
-
162
-
163
-
164
-
165
-
166
-
167
-
168
-
169
-
170
-
171
-
172
-
173
-
174
-
175
-
176
-
177
-
178
-
179
-
180
-
181
-
182
-
183
-
184
-
185
-
186
-
187
-
188
-
189
-
190
-
191
-
192
-
193
-
194
-
195
-
196
-
197
-
198
-
199
-
200
-
201
-
202
-
203
-
204
-
205
-
206
-
207
-
208
-
209
-
210
-
211
-
212
-
213
-
214
-
215
-
216
-
217
-
218
-
219
-
220
-
221
-
222
-
223
-
224
-
225
-
226
-
227
-
228
-
229
-
230
-
231
-
232
-
233
-
234
-
235
-
236
-
237
-
238
 |
 |