Canon XF605 Instruction Manual - Page 96
Advanced Audio Input Settings, etup] > [INPUT 1 Mic Trimming] or [INPUT 2 Mic Trimming] > De
 |
View all Canon XF605 manuals
Add to My Manuals
Save this manual to your list of manuals |
Page 96 highlights
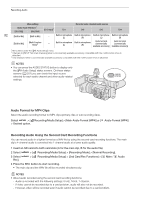
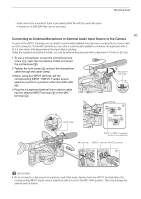
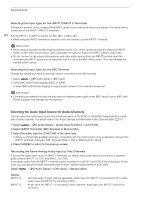
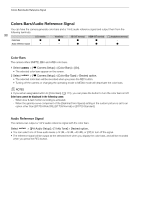
Recording Audio Automatic Level Control (ALC): Linking the audio level adjustment of CH1/CH2 or CH3/CH4 • When both CH1 and CH2 are set to the MIC terminal or INPUT terminals and to the same type of analog audio source (external line input or external microphone), you can use the > [¡ Audio Setup] > 96 [CH1/CH2 ALC Link] or [CH3/CH4 ALC Link] setting to link the audio level adjustment of both channels. • When linked, different channels can be adjusted together. Adjust the CH1 audio levels to affect both CH1 and CH2 or adjust the CH3 audio levels to affect both CH3 and CH4. Audio peak limiter • You can set > [¡ Audio Setup] > [INPUT Limiter] to [On] to activate the audio limiter to limit the amplitude of audio input signals when they start to distort. NOTES • We recommend using headphones when adjusting the audio level. If the input level is too high, audio may become distorted even if the audio level indicator shows an appropriate level. • If you set an assignable button to [Audio Level Indicator] (A 115), you can press the button to turn the onscreen audio level indicator on and off. Advanced Audio Input Settings You can adjust the audio input settings for the INPUT terminals, MIC terminal, and the built-in microphone. The corresponding menu settings become available only when the respective audio input is active and the following conditions are met: INPUT terminals: INPUT 1 or INPUT 2 switch is set to MIC or MIC+48V MIC terminal: [MIC Input] is set to [MIC] or [MIC (with Power Supply)] Microphone Sensitivity (INPUT Terminals) You can select the external microphone's sensitivity. Select > [¡ Audio Setup] > [INPUT 1 Mic Trimming] or [INPUT 2 Mic Trimming] > Desired sensitivity level. • You can select one of 5 sensitivity levels from -12 dB to +12 dB. Microphone Attenuator (INPUT Terminals) You can activate the external microphone's attenuator (20 dB). Select > [¡ Audio Setup] > [INPUT 1 Mic Att.] or [INPUT 2 Mic Att.] > [On]. External Microphone Characteristics (INPUT Terminals) Select > [¡ Audio Setup] > [INPUT 1 Mic Low Cut] or [INPUT 2 Mic Low Cut] > Desired option. Options [Off]: [LC1]: [LC2]: For recording audio under usual conditions. For recording mainly people's voices. For reducing the background sound of wind when recording outdoors in windy surroundings (for example, on a beach or close to buildings). Note that when you use this setting some lowfrequency sounds may be suppressed along with the sound of wind.
-
 1
1 -
2
-
3
-
4
-
5
-
6
-
7
-
8
-
9
-
10
-
11
-
12
-
13
-
14
-
15
-
16
-
17
-
18
-
19
-
20
-
21
-
22
-
23
-
24
-
25
-
26
-
27
-
28
-
29
-
30
-
31
-
32
-
33
-
34
-
35
-
36
-
37
-
38
-
39
-
40
-
41
-
42
-
43
-
44
-
45
-
46
-
47
-
48
-
49
-
50
-
51
-
52
-
53
-
54
-
55
-
56
-
57
-
58
-
59
-
60
-
61
-
62
-
63
-
64
-
65
-
66
-
67
-
68
-
69
-
70
-
71
-
72
-
73
-
74
-
75
-
76
-
77
-
78
-
79
-
80
-
81
-
82
-
83
-
84
-
85
-
86
-
87
-
88
-
89
-
90
-
 91
91 -
 92
92 -
 93
93 -
 94
94 -
 95
95 -
 96
96 -
 97
97 -
 98
98 -
 99
99 -
 100
100 -
 101
101 -
102
-
103
-
104
-
105
-
106
-
107
-
108
-
109
-
110
-
111
-
112
-
113
-
114
-
115
-
116
-
117
-
118
-
119
-
120
-
121
-
122
-
123
-
124
-
125
-
126
-
127
-
128
-
129
-
130
-
131
-
132
-
133
-
134
-
135
-
136
-
137
-
138
-
139
-
140
-
141
-
142
-
143
-
144
-
145
-
146
-
147
-
148
-
149
-
150
-
151
-
152
-
153
-
154
-
155
-
156
-
157
-
158
-
159
-
160
-
161
-
162
-
163
-
164
-
165
-
166
-
167
-
168
-
169
-
170
-
171
-
172
-
173
-
174
-
175
-
176
-
177
-
178
-
179
-
180
-
181
-
182
-
183
-
184
-
185
-
186
-
187
-
188
-
189
-
190
-
191
-
192
-
193
-
194
-
195
-
196
-
197
-
198
-
199
-
200
-
201
-
202
-
203
-
204
-
205
-
206
-
207
-
208
-
209
-
210
-
211
-
212
-
213
-
214
-
215
-
216
-
217
-
218
-
219
-
220
-
221
-
222
-
223
-
224
-
225
-
226
-
227
-
228
-
229
-
230
-
231
-
232
-
233
-
234
-
235
-
236
-
237
-
238
 |
 |
