Canon XF605 Instruction Manual - Page 50
Direct Setting Mode (FUNC Button), Changing Camera Settings, Using Assistance Functions
 |
View all Canon XF605 manuals
Add to My Manuals
Save this manual to your list of manuals |
Page 50 highlights
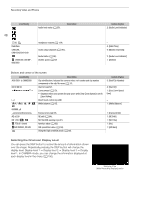
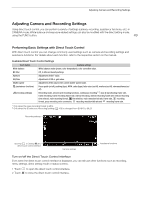
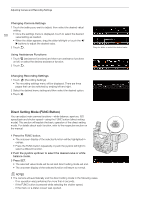
Adjusting Camera and Recording Settings Changing Camera Settings 1 Touch the setting you want to adjust, then select the desired value/ setting. 50 • Once the settings menu is displayed, touch to select the desired value/setting as needed. • When the slider appears, drag the slider left/right or touch the / buttons to adjust the desired value. 2 Touch K. Using Assistance Functions 1 Touch A (assistance functions) and then turn assistance functions on/off, or select the desired assistance function. 2 Touch K. Drag the slider to select the desired value Changing Recording Settings 1 Touch Æ (Recording Settings) • The recording settings menu will be displayed. There are three pages that can be switched by swiping left and right. 2 Select the desired menu setting and then select the desired option. 3 Touch X. Direct Setting Mode (FUNC Button) You can adjust main camera functions-white balance, aperture, ISO speed/gain and shutter speed-using the FUNC button (direct setting mode). This section will explain the basic operation of the direct setting mode. For details about each function, refer to the respective section on the manual. 1 Press the FUNC button. • The onscreen display of the selected function will be highlighted in orange. • Press the FUNC button repeatedly or push the joystick left/right to select a different function. 2 Push the joystick up/down to select the desired value or white balance mode. 3 Press SET. • The selected value/mode will be set and direct setting mode will end. • The onscreen display of the selected function will return to normal. NOTES • The camera will automatically end the direct setting mode in the following cases. - If no operation was performed for more than 6 seconds. - If the FUNC button is pressed while selecting the shutter speed. - If the menu or a status screen was opened.
-
 1
1 -
2
-
3
-
4
-
5
-
6
-
7
-
8
-
9
-
10
-
11
-
12
-
13
-
14
-
15
-
16
-
17
-
18
-
19
-
20
-
21
-
22
-
23
-
24
-
25
-
26
-
27
-
28
-
29
-
30
-
31
-
32
-
33
-
34
-
35
-
36
-
37
-
38
-
39
-
40
-
41
-
42
-
43
-
44
-
 45
45 -
 46
46 -
 47
47 -
 48
48 -
 49
49 -
 50
50 -
 51
51 -
 52
52 -
 53
53 -
 54
54 -
 55
55 -
56
-
57
-
58
-
59
-
60
-
61
-
62
-
63
-
64
-
65
-
66
-
67
-
68
-
69
-
70
-
71
-
72
-
73
-
74
-
75
-
76
-
77
-
78
-
79
-
80
-
81
-
82
-
83
-
84
-
85
-
86
-
87
-
88
-
89
-
90
-
91
-
92
-
93
-
94
-
95
-
96
-
97
-
98
-
99
-
100
-
101
-
102
-
103
-
104
-
105
-
106
-
107
-
108
-
109
-
110
-
111
-
112
-
113
-
114
-
115
-
116
-
117
-
118
-
119
-
120
-
121
-
122
-
123
-
124
-
125
-
126
-
127
-
128
-
129
-
130
-
131
-
132
-
133
-
134
-
135
-
136
-
137
-
138
-
139
-
140
-
141
-
142
-
143
-
144
-
145
-
146
-
147
-
148
-
149
-
150
-
151
-
152
-
153
-
154
-
155
-
156
-
157
-
158
-
159
-
160
-
161
-
162
-
163
-
164
-
165
-
166
-
167
-
168
-
169
-
170
-
171
-
172
-
173
-
174
-
175
-
176
-
177
-
178
-
179
-
180
-
181
-
182
-
183
-
184
-
185
-
186
-
187
-
188
-
189
-
190
-
191
-
192
-
193
-
194
-
195
-
196
-
197
-
198
-
199
-
200
-
201
-
202
-
203
-
204
-
205
-
206
-
207
-
208
-
209
-
210
-
211
-
212
-
213
-
214
-
215
-
216
-
217
-
218
-
219
-
220
-
221
-
222
-
223
-
224
-
225
-
226
-
227
-
228
-
229
-
230
-
231
-
232
-
233
-
234
-
235
-
236
-
237
-
238
 |
 |
