Canon XF605 Instruction Manual - Page 197
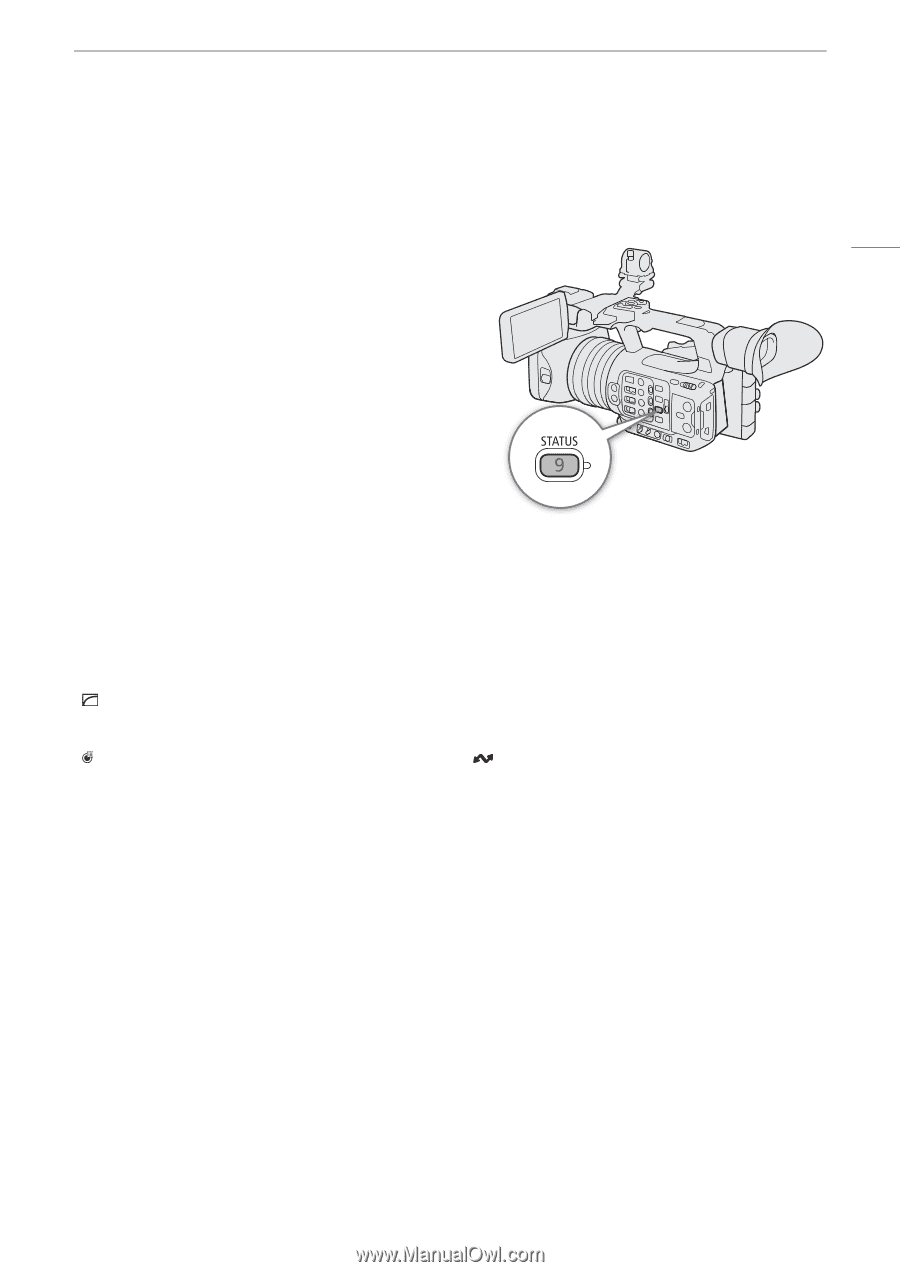
Displaying the Status Screens, button to open the, creen, croll through the, to chec, etting
 |
View all Canon XF605 manuals
Add to My Manuals
Save this manual to your list of manuals |
Page 197 highlights
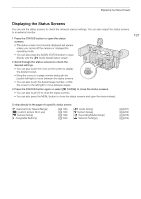
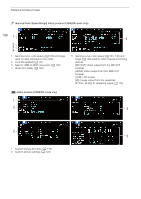
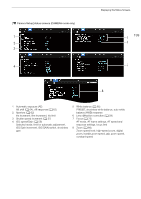
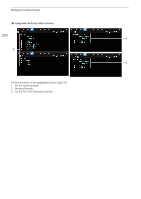
Displaying the Status Screens Displaying the Status Screens You can use the status screens to check the camera's various settings. You can also output the status screens to an external monitor. 1 Press the STATUS button to open the status screens. • The status screen most recently displayed will appear unless you turned off the camera or changed the operating mode. • You can also press the AUDIO STATUS button to open directly only the [¡ Audio Setup] status screen. 2 Scroll through the status screens to check the desired settings. • You can also touch the icons on the screen to display the desired screen. • Bring the cursor to a page number and push the joystick left/right to move between the status screens. • You can also touch the desired page number, or flick the screen to the left/right to move between pages. 3 Press the STATUS button again or select [X CLOSE] to close the status screens. • You can also touch [X] to close the status screens. • You can also press the MENU button to close the status screens and open the menu instead. 197 To skip directly to the page of a specific status screen: [ Gamma/Color Space/Range] [/] (custom picture file in use) [v Camera Setup] [ Assignable Buttons] (A 198) (A 198) (A 199) (A 200) [¡ Audio Setup] [B System Setup] [Æ Recording/Media Setup] [ Network Settings] (A 201) (A 202) (A 203) (A 204)
-
 1
1 -
2
-
3
-
4
-
5
-
6
-
7
-
8
-
9
-
10
-
11
-
12
-
13
-
14
-
15
-
16
-
17
-
18
-
19
-
20
-
21
-
22
-
23
-
24
-
25
-
26
-
27
-
28
-
29
-
30
-
31
-
32
-
33
-
34
-
35
-
36
-
37
-
38
-
39
-
40
-
41
-
42
-
43
-
44
-
45
-
46
-
47
-
48
-
49
-
50
-
51
-
52
-
53
-
54
-
55
-
56
-
57
-
58
-
59
-
60
-
61
-
62
-
63
-
64
-
65
-
66
-
67
-
68
-
69
-
70
-
71
-
72
-
73
-
74
-
75
-
76
-
77
-
78
-
79
-
80
-
81
-
82
-
83
-
84
-
85
-
86
-
87
-
88
-
89
-
90
-
91
-
92
-
93
-
94
-
95
-
96
-
97
-
98
-
99
-
100
-
101
-
102
-
103
-
104
-
105
-
106
-
107
-
108
-
109
-
110
-
111
-
112
-
113
-
114
-
115
-
116
-
117
-
118
-
119
-
120
-
121
-
122
-
123
-
124
-
125
-
126
-
127
-
128
-
129
-
130
-
131
-
132
-
133
-
134
-
135
-
136
-
137
-
138
-
139
-
140
-
141
-
142
-
143
-
144
-
145
-
146
-
147
-
148
-
149
-
150
-
151
-
152
-
153
-
154
-
155
-
156
-
157
-
158
-
159
-
160
-
161
-
162
-
163
-
164
-
165
-
166
-
167
-
168
-
169
-
170
-
171
-
172
-
173
-
174
-
175
-
176
-
177
-
178
-
179
-
180
-
181
-
182
-
183
-
184
-
185
-
186
-
187
-
188
-
189
-
190
-
191
-
 192
192 -
 193
193 -
 194
194 -
 195
195 -
 196
196 -
 197
197 -
 198
198 -
 199
199 -
 200
200 -
 201
201 -
 202
202 -
203
-
204
-
205
-
206
-
207
-
208
-
209
-
210
-
211
-
212
-
213
-
214
-
215
-
216
-
217
-
218
-
219
-
220
-
221
-
222
-
223
-
224
-
225
-
226
-
227
-
228
-
229
-
230
-
231
-
232
-
233
-
234
-
235
-
236
-
237
-
238
 |
 |