Canon XF605 Instruction Manual - Page 45
Right, ide of the, creen, R, P, F, E
 |
View all Canon XF605 manuals
Add to My Manuals
Save this manual to your list of manuals |
Page 45 highlights
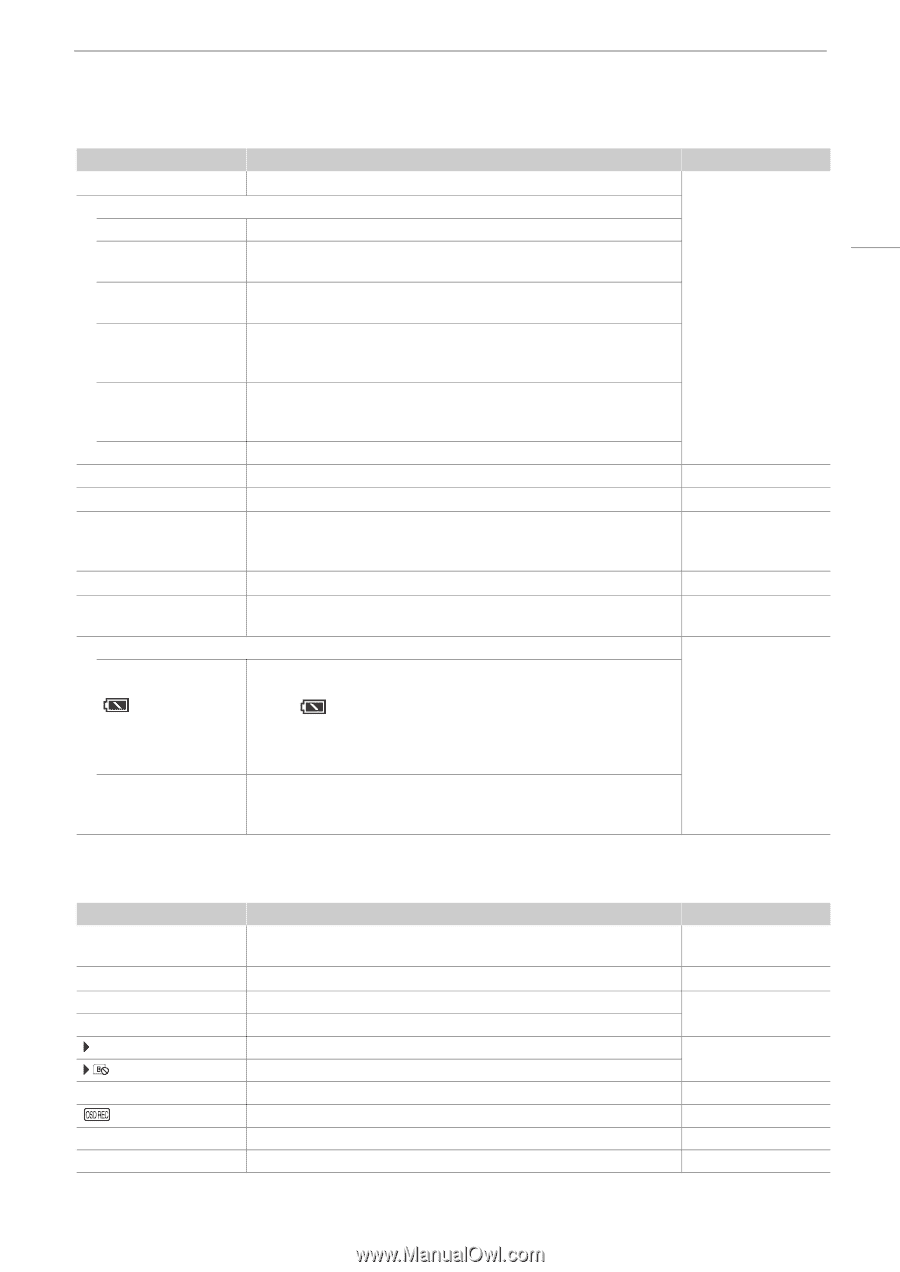
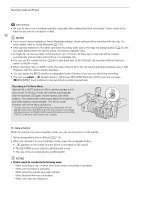
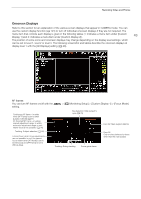
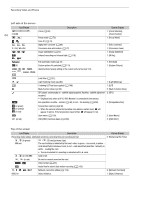
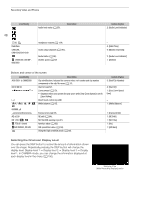
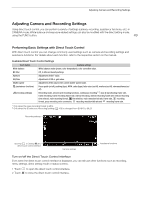
Recording Video and Photos Icon/Display 4 Description Double slot recording (A 35). Custom Display 2: [Recording Mode] Recording operation STBY, ÜREC Clip recording: record standby, recording. 45 S&F STBY, S&F ÜREC Slow & fast motion recording (A 105): record standby, recording. PRE STBY, PRE ÜREC Pre-recording (A 107): record standby, recording. FRM STBY, FRM ÜREC, FRM ÜSTBY Frame recording (A 107): record standby, recording. INT STBY, INT ÜREC, INT ÜWAIT CONT, ÜCONT Interval recording (A 108): record standby, recording. Continuous recording (A 109) 1s to 10m00s Interval counter. 2: [Interval Counter] ` Recording command (A 145). 2: [Rec Command] 00.00P, 00.00i C Frame rate (A 53). When slow & fast motion recording is activated, the shooting frame rate is also displayed (000/00.00P). Key lock (A 15). 2: [Frame Rate] 1: [Key Lock] 00:00:00.00 / 00:00:00:00 R, P, F, E Time code (A 85). Time code status (A 86). 2: [Time Code] Power supply level indicator (in red) 000 min Remaining battery charge of a BP-A30 or BP-A60 Battery Pack and estimated remaining usage time (in minutes). • When is displayed, replace the battery pack with a fully charged one. • Depending on the conditions of use, the actual battery charge level may not be indicated accurately or may not match the levels shown on the [B System Setup] status screen or the indicators on the battery pack. 2: [Remaining Battery] DC IN 00.0V Power supply voltage when using an AC adapter. • When the voltage falls below the selected low-power warning level (A 196), the voltage will be displayed in red. Right side of the screen Icon/Display 60(24)fps, 60(30)fps U Video output (A 118). Genlock (A 89). Description 0000x0000 YCC000 00 bit 7 (in green) (in red) T (in yellow) (in yellow) ^ (in yellow) J, K (in yellow) Resolution (A 53). Color depth, color sampling (A 53). Photo recorded on the SD card (A 42). No SD card or cannot record photos on the SD card. Output onscreen displays (A 145). Record selected onscreen displays with primary clips (A 189). Magnification (A 75). Peaking (A 75). Custom Display 2: [Output Terminals Status] 2: [Genlock] 2: [Resolution/ Color Sampling] 2: [Photo] 2: [OSD Output] 2: [OSD Recording] 1: [Magnification] 1: [Peaking]
-
 1
1 -
2
-
3
-
4
-
5
-
6
-
7
-
8
-
9
-
10
-
11
-
12
-
13
-
14
-
15
-
16
-
17
-
18
-
19
-
20
-
21
-
22
-
23
-
24
-
25
-
26
-
27
-
28
-
29
-
30
-
31
-
32
-
33
-
34
-
35
-
36
-
37
-
38
-
39
-
 40
40 -
 41
41 -
 42
42 -
 43
43 -
 44
44 -
 45
45 -
 46
46 -
 47
47 -
 48
48 -
 49
49 -
 50
50 -
51
-
52
-
53
-
54
-
55
-
56
-
57
-
58
-
59
-
60
-
61
-
62
-
63
-
64
-
65
-
66
-
67
-
68
-
69
-
70
-
71
-
72
-
73
-
74
-
75
-
76
-
77
-
78
-
79
-
80
-
81
-
82
-
83
-
84
-
85
-
86
-
87
-
88
-
89
-
90
-
91
-
92
-
93
-
94
-
95
-
96
-
97
-
98
-
99
-
100
-
101
-
102
-
103
-
104
-
105
-
106
-
107
-
108
-
109
-
110
-
111
-
112
-
113
-
114
-
115
-
116
-
117
-
118
-
119
-
120
-
121
-
122
-
123
-
124
-
125
-
126
-
127
-
128
-
129
-
130
-
131
-
132
-
133
-
134
-
135
-
136
-
137
-
138
-
139
-
140
-
141
-
142
-
143
-
144
-
145
-
146
-
147
-
148
-
149
-
150
-
151
-
152
-
153
-
154
-
155
-
156
-
157
-
158
-
159
-
160
-
161
-
162
-
163
-
164
-
165
-
166
-
167
-
168
-
169
-
170
-
171
-
172
-
173
-
174
-
175
-
176
-
177
-
178
-
179
-
180
-
181
-
182
-
183
-
184
-
185
-
186
-
187
-
188
-
189
-
190
-
191
-
192
-
193
-
194
-
195
-
196
-
197
-
198
-
199
-
200
-
201
-
202
-
203
-
204
-
205
-
206
-
207
-
208
-
209
-
210
-
211
-
212
-
213
-
214
-
215
-
216
-
217
-
218
-
219
-
220
-
221
-
222
-
223
-
224
-
225
-
226
-
227
-
228
-
229
-
230
-
231
-
232
-
233
-
234
-
235
-
236
-
237
-
238
 |
 |