Canon XF605 Instruction Manual - Page 42
Photos cannot be recorded in the following cases, Using Metadata
 |
View all Canon XF605 manuals
Add to My Manuals
Save this manual to your list of manuals |
Page 42 highlights
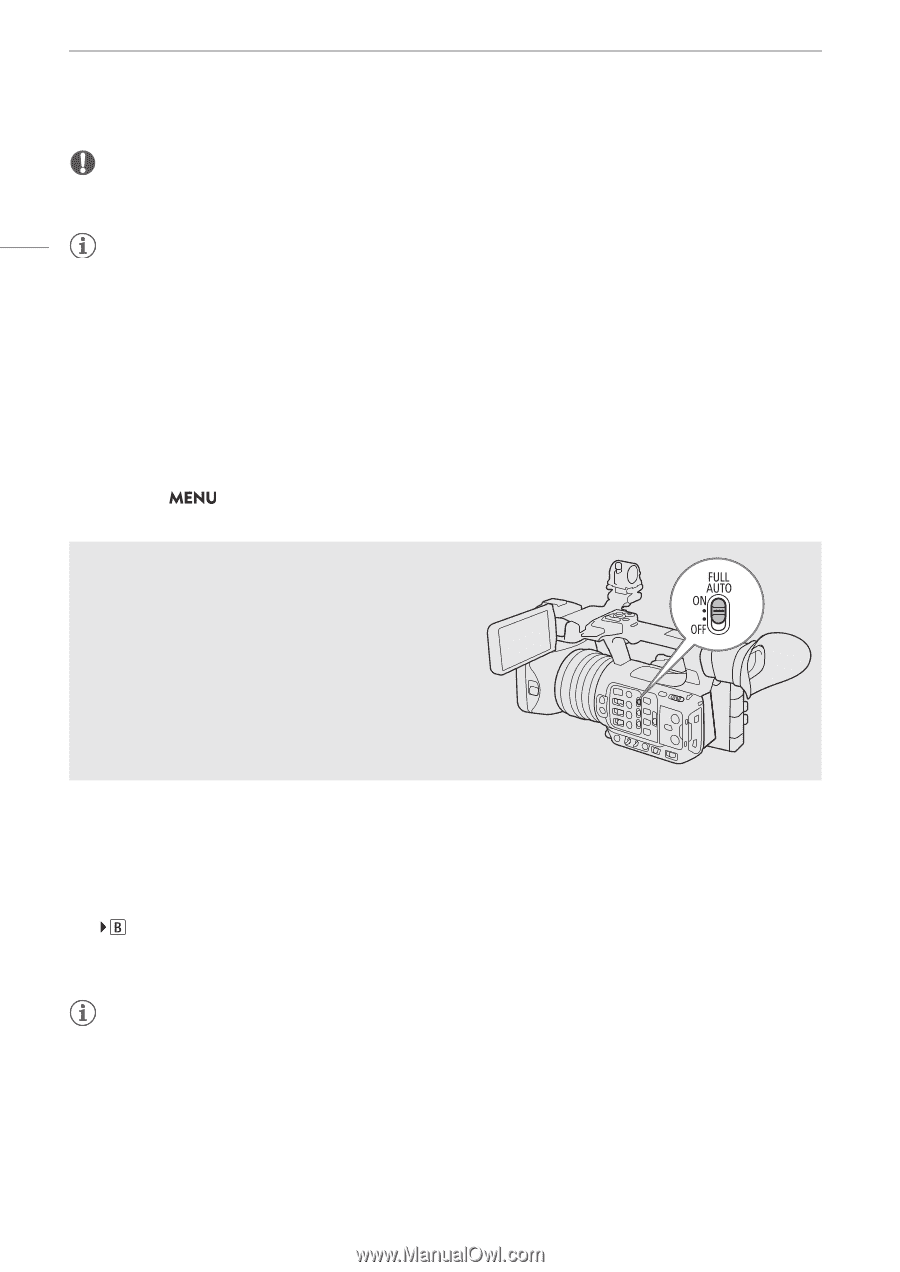
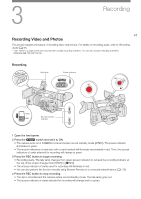
Recording Video and Photos IMPORTANT • Be sure to save your recordings regularly, especially after making important recordings. Canon shall not be liable for any loss or corruption of data. 42 NOTES • If you record using metadata or News Metadata settings, those settings will be recorded with the clip. For more details, refer to Using Metadata (A 102). • If the camera switches to the other card while recording video due to the relay recording function (A 35), the two parts (before/after the switch) will be recorded as separate clips. • A single clip can be recorded continuously for up to 6 hours. At that point, a new clip will be created automatically and recording will continue on a separate clip. • You can use the review function (A 48) to play back part or all of the last clip recorded without having to switch to MEDIA mode. • When recording clips on SDHC cards, the video (stream) file in the clip will be split approximately every 4 GB. Playback with the camera will be seamless. • You can assign the [REC] function to assignable button Camera 4 and use it to start/stop recording. • You can set > [B System Setup] > [Onscreen REC/STBY Button] to [On] to use the onscreen [ÜREC]/[STBY] touch buttons to stop and start recording respectively. Recording in Full Auto Mode Set the FULL AUTO switch to ON to set the camera to full auto mode. In full auto mode, the camera automatically sets the aperture, ISO/gain, shutter speed, and white balance. The camera will continuously adjust the brightness and white balance automatically*. The focus mode, however, will not be set to autofocus. * The light metering mode (A 64) will be set to [Standard], AE shift (A 64) will be set to [±0] and the limit for auto mode if it is activated (A 59) will be set to [Off/ISO 12800] (when [ISO/Gain] is set to [ISO]) or [Off/21.0 dB] (when [ISO/Gain] is set to [Gain]). To take photos While the camera is in record standby mode, you can record photos on SD card B. 1 Set an assignable button to [Photo] (A 115). 2 When the camera is in record standby mode, press the assignable button. • appears on the screen and the photo is recorded on SD card B. • The SD CARD access indicator will illuminate in red. • The size of the recorded photos is 3840x2160. NOTES • Photos cannot be recorded in the following cases - While recording a clip, or when slow & fast motion recording is activated. - When pre-recording is activated. - While using the camera as a web camera. - While Browser Remote is activated. - While color bars are displayed.
-
 1
1 -
2
-
3
-
4
-
5
-
6
-
7
-
8
-
9
-
10
-
11
-
12
-
13
-
14
-
15
-
16
-
17
-
18
-
19
-
20
-
21
-
22
-
23
-
24
-
25
-
26
-
27
-
28
-
29
-
30
-
31
-
32
-
33
-
34
-
35
-
36
-
 37
37 -
 38
38 -
 39
39 -
 40
40 -
 41
41 -
 42
42 -
 43
43 -
 44
44 -
 45
45 -
 46
46 -
 47
47 -
48
-
49
-
50
-
51
-
52
-
53
-
54
-
55
-
56
-
57
-
58
-
59
-
60
-
61
-
62
-
63
-
64
-
65
-
66
-
67
-
68
-
69
-
70
-
71
-
72
-
73
-
74
-
75
-
76
-
77
-
78
-
79
-
80
-
81
-
82
-
83
-
84
-
85
-
86
-
87
-
88
-
89
-
90
-
91
-
92
-
93
-
94
-
95
-
96
-
97
-
98
-
99
-
100
-
101
-
102
-
103
-
104
-
105
-
106
-
107
-
108
-
109
-
110
-
111
-
112
-
113
-
114
-
115
-
116
-
117
-
118
-
119
-
120
-
121
-
122
-
123
-
124
-
125
-
126
-
127
-
128
-
129
-
130
-
131
-
132
-
133
-
134
-
135
-
136
-
137
-
138
-
139
-
140
-
141
-
142
-
143
-
144
-
145
-
146
-
147
-
148
-
149
-
150
-
151
-
152
-
153
-
154
-
155
-
156
-
157
-
158
-
159
-
160
-
161
-
162
-
163
-
164
-
165
-
166
-
167
-
168
-
169
-
170
-
171
-
172
-
173
-
174
-
175
-
176
-
177
-
178
-
179
-
180
-
181
-
182
-
183
-
184
-
185
-
186
-
187
-
188
-
189
-
190
-
191
-
192
-
193
-
194
-
195
-
196
-
197
-
198
-
199
-
200
-
201
-
202
-
203
-
204
-
205
-
206
-
207
-
208
-
209
-
210
-
211
-
212
-
213
-
214
-
215
-
216
-
217
-
218
-
219
-
220
-
221
-
222
-
223
-
224
-
225
-
226
-
227
-
228
-
229
-
230
-
231
-
232
-
233
-
234
-
235
-
236
-
237
-
238
 |
 |