Canon XF605 Instruction Manual - Page 14
Assignable button Camera 5
 |
View all Canon XF605 manuals
Add to My Manuals
Save this manual to your list of manuals |
Page 14 highlights
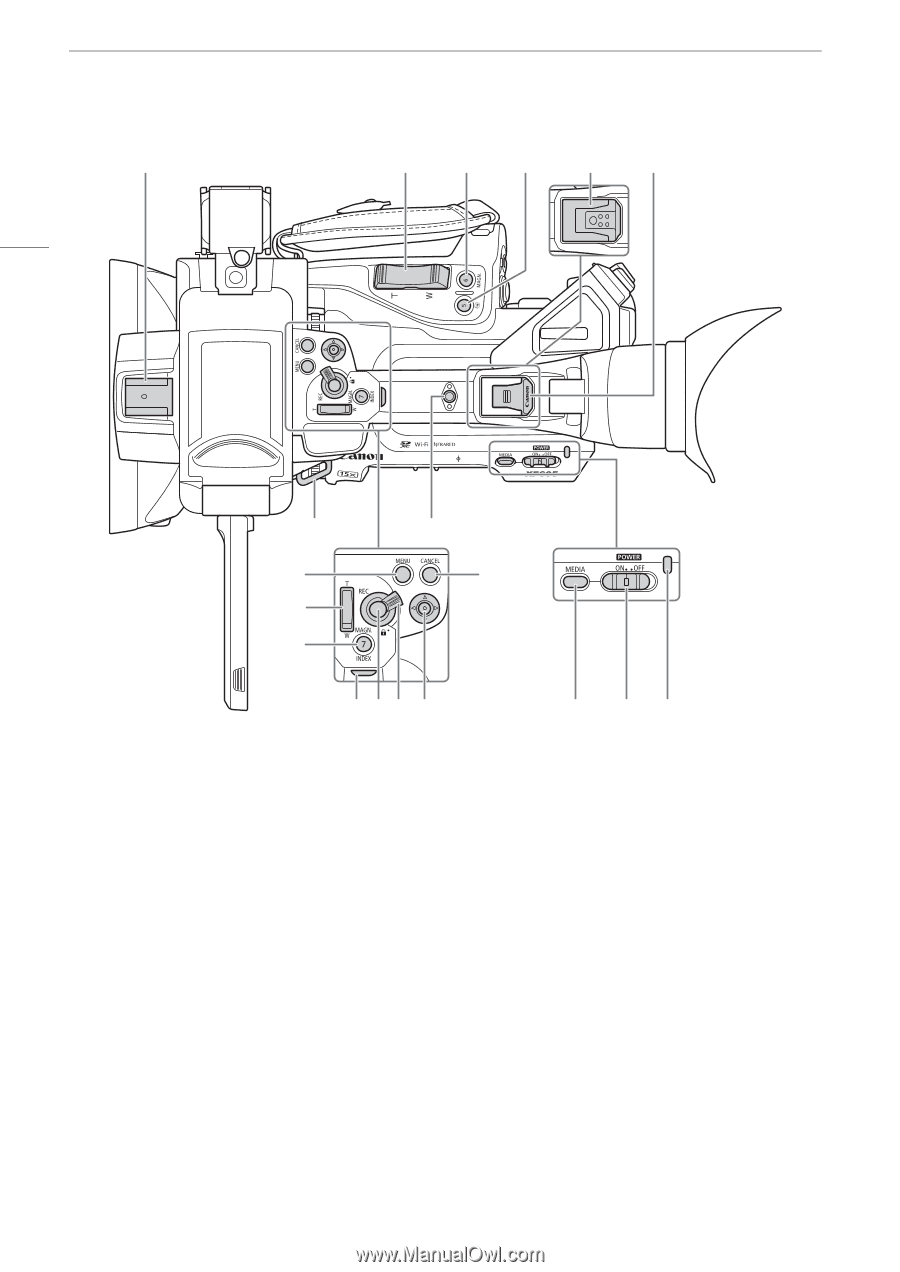
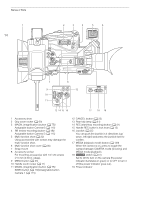
Names of Parts 1 14 2 3 4 5 6 7 8 9 12 10 11 13 14 15 16 17 18 19 1 Accessory shoe 2 Grip zoom rocker (A 69) 3 MAGN. (magnification) button (A 75)/ Assignable button Camera 6 (A 115) 4 u (review recording) button (A 48)/ Assignable button Camera 5 (A 115) 5 Multi-function shoe (A 30) Using accessories with screws may damage the multi-function shoe. 6 Multi-function shoe cover (A 30) 7 Strap mount 8 Accessory socket For mounting accessories with 1/4"-20 screws (7.5 mm (0.30 in.) deep). 9 MENU button (A 25) 10 Handle zoom rocker (A 71) 11 MAGN. (magnification) button (A 75)/ INDEX button (A 130)/Assignable button Camera 7 (A 115) 12 CANCEL button (A 25) 13 Rear tally lamp (A 41) 14 REC (start/stop recording) button (A 41) 15 Handle REC button's lock lever (A 15) 16 Joystick (A 25) You can push the joystick in 4 directions (up/ down, left/right) and press the joystick itself to confirm. 17 MEDIA (playback mode) button (A 129) When the camera is on, press to toggle the camera between CAMERA mode (shooting) and MEDIA mode (playback). 18 Q switch (A 41) Set to ON to turn on the camera (the power indicator illuminates in green) or to OFF to turn it off (the power indicator goes out). 19 Power indicator
-
 1
1 -
2
-
3
-
4
-
5
-
6
-
7
-
8
-
 9
9 -
 10
10 -
 11
11 -
 12
12 -
 13
13 -
 14
14 -
 15
15 -
 16
16 -
 17
17 -
 18
18 -
 19
19 -
20
-
21
-
22
-
23
-
24
-
25
-
26
-
27
-
28
-
29
-
30
-
31
-
32
-
33
-
34
-
35
-
36
-
37
-
38
-
39
-
40
-
41
-
42
-
43
-
44
-
45
-
46
-
47
-
48
-
49
-
50
-
51
-
52
-
53
-
54
-
55
-
56
-
57
-
58
-
59
-
60
-
61
-
62
-
63
-
64
-
65
-
66
-
67
-
68
-
69
-
70
-
71
-
72
-
73
-
74
-
75
-
76
-
77
-
78
-
79
-
80
-
81
-
82
-
83
-
84
-
85
-
86
-
87
-
88
-
89
-
90
-
91
-
92
-
93
-
94
-
95
-
96
-
97
-
98
-
99
-
100
-
101
-
102
-
103
-
104
-
105
-
106
-
107
-
108
-
109
-
110
-
111
-
112
-
113
-
114
-
115
-
116
-
117
-
118
-
119
-
120
-
121
-
122
-
123
-
124
-
125
-
126
-
127
-
128
-
129
-
130
-
131
-
132
-
133
-
134
-
135
-
136
-
137
-
138
-
139
-
140
-
141
-
142
-
143
-
144
-
145
-
146
-
147
-
148
-
149
-
150
-
151
-
152
-
153
-
154
-
155
-
156
-
157
-
158
-
159
-
160
-
161
-
162
-
163
-
164
-
165
-
166
-
167
-
168
-
169
-
170
-
171
-
172
-
173
-
174
-
175
-
176
-
177
-
178
-
179
-
180
-
181
-
182
-
183
-
184
-
185
-
186
-
187
-
188
-
189
-
190
-
191
-
192
-
193
-
194
-
195
-
196
-
197
-
198
-
199
-
200
-
201
-
202
-
203
-
204
-
205
-
206
-
207
-
208
-
209
-
210
-
211
-
212
-
213
-
214
-
215
-
216
-
217
-
218
-
219
-
220
-
221
-
222
-
223
-
224
-
225
-
226
-
227
-
228
-
229
-
230
-
231
-
232
-
233
-
234
-
235
-
236
-
237
-
238
 |
 |