Dell PowerEdge T140 EMC PowerEdge Servers Troubleshooting Guide - Page 71
Troubleshooting RAID, RAID configuration using PERC, using PERC
 |
View all Dell PowerEdge T140 manuals
Add to My Manuals
Save this manual to your list of manuals |
Page 71 highlights
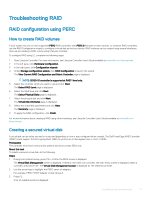
Troubleshooting RAID RAID configuration using PERC How to create RAID volumes If your system has one or more supported PERC RAID controllers with PERC 8 firmware or later versions, or software RAID controllers, use the RAID Configuration wizard to configure a virtual disk as the boot device. RAID volumes can be created using several interfaces. Here we are creating a RAID volume using Lifecycle controller. To configure RAID using LC, complete the following steps: 1 Start Lifecycle Controller. For more information, see Lifecycle Controller User's Guide available at www.dell.com/idracmanuals. 2 In the left pane, click Hardware Configuration. 3 In the right pane, click Configuration wizards. 4 Under Storage configuration wizard, click RAID configuration to launch the wizard. The View Current RAID Configuration and Select Controller page is displayed. NOTE: BOSS-S1 controller is supported at RAID 1 level only. 5 Select the controller which you want to use and click Next. The Select RAID Level page is displayed. 6 Select the RAID level and click Next. The Select Physical Disks page is displayed. 7 Select the physical disk and click Next. The Virtual Disk Attributes page is displayed. 8 Select the virtual disk parameters and click Next. The Summary page is displayed. 9 To apply the RAID configuration, click Finish. For more information about creating a RAID using other interfaces, see Lifecycle Controller User's Guide available at www.dell.com/ idracmanuals Creating a secured virtual disk A virtual disk can be either secured or unsecured depending on how it was configured when created. The Dell PowerEdge RAID Controller (PERC) cards support Self-Encrypting Disks (SED) for protection of data against loss or theft of SEDs. Prerequisite The controller must have a security key present and must contain SEDs only. About this task To create a secured virtual disk, do the following: Steps 1 During host system bootup, press Ctrl + R after the BIOS screen is displayed. The Virtual Disk Management screen is displayed. If there is more than one controller, the main menu screen is displayed. Select a controller, and press Enter. The Virtual Disk Management screen is displayed for the selected controller. 2 Use the arrow keys to highlight the PERC series of adapters. For example, PERC H730P Adapter or Disk Group #. 3 Press F2. A list of available actions is displayed. Troubleshooting hardware issues 71
-
 1
1 -
2
-
3
-
4
-
5
-
6
-
7
-
8
-
9
-
10
-
11
-
12
-
13
-
14
-
15
-
16
-
17
-
18
-
19
-
20
-
21
-
22
-
23
-
24
-
25
-
26
-
27
-
28
-
29
-
30
-
31
-
32
-
33
-
34
-
35
-
36
-
37
-
38
-
39
-
40
-
41
-
42
-
43
-
44
-
45
-
46
-
47
-
48
-
49
-
50
-
51
-
52
-
53
-
54
-
55
-
56
-
57
-
58
-
59
-
60
-
61
-
62
-
63
-
64
-
65
-
 66
66 -
 67
67 -
 68
68 -
 69
69 -
 70
70 -
 71
71 -
 72
72 -
 73
73 -
 74
74 -
 75
75 -
 76
76 -
77
-
78
-
79
-
80
-
81
-
82
-
83
-
84
-
85
-
86
-
87
-
88
-
89
-
90
-
91
-
92
-
93
-
94
-
95
-
96
-
97
-
98
-
99
-
100
-
101
-
102
-
103
-
104
-
105
-
106
-
107
-
108
-
109
-
110
-
111
-
112
-
113
-
114
-
115
-
116
-
117
-
118
-
119
-
120
-
121
-
122
-
123
-
124
-
125
-
126
-
127
-
128
-
129
-
130
-
131
-
132
 |
 |
