Dell PowerEdge T140 EMC PowerEdge Servers Troubleshooting Guide - Page 85
Starting and target RAID levels for virtual disk reconfiguration and capacity expansion
 |
View all Dell PowerEdge T140 manuals
Add to My Manuals
Save this manual to your list of manuals |
Page 85 highlights
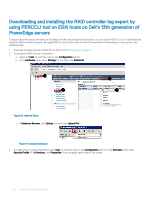
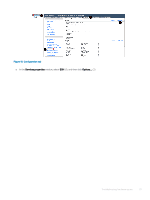
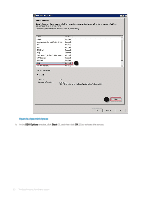
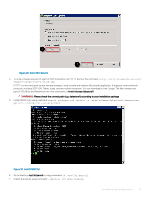
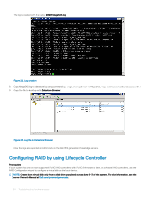
Steps 1 Launch the Lifecycle Controller home page, click Hardware Configuration, and then click Configuration Wizards. The Configuration Wizards window is displayed. 2 In Storage Configuration Wizards, click RAID Configuration. 3 Select the RAID controller to view its current virtual disk configuration and disk attributes. Click Next. 4 Select the RAID level for the virtual disk that you want to create and click Next. 5 On the Select Physical Disks screen, the default values for Protocol, Media Type, and Encryption capability are displayed. 6 Select the required physical disks that you want to include in the virtual disk, and then click Next. 7 On the Virtual Disk Attributes screen, type the virtual disk name. NOTE: The virtual disk name should not contain any space or special characters. 8 Type the size of the physical disk. The values for Stripe Element Size, Read Policy, and Write Policy are displayed by default. 9 If you want to change the values for Stripe Element, Read Policy and Write Policy, select the required values from the respective drop-down lists. The Summary of virtual disk attributes is displayed. 10 Click Finish . 11 On the RAID Configuration Warning window, click Yes if you wish to continue with the creation of virtual disk. The RAID Configuration window is displayed. Note that this operation might take approximately one minute to complete. 12 When the virtual disk is created successfully, the RAID Configuration Success window is displayed. Click OK. You are taken to the Hardware configuration window. Click Back to go to the home page. 13 You can verify, if the RAID operation was successful by checking the events in the Lifecycle Log. a Click View Lifecycle Log History. The View Lifecycle Log window is displayed. Note that this operation might take few minutes. b On the View Log History page, you can verify if the RAID operation is successful. For more information about Dell Lifecycle controller, go toDell.com/ techcenter/LC . For more information about the Dell Lifecycle Controller RAID Configuration video, go to https://www.youtube.com/watch? v=JFPmeHNENV4 Starting and target RAID levels for virtual disk reconfiguration and capacity expansion After you have created a virtual disk, the possibilities for reconfiguring the virtual disk depend on the controller, RAID level, and available physical disks. Table 18. Possible scenarios for reconfiguring a virtual disk Controller Starting RAID Level PERC 6/E, PERC 6/I, PERC H800 Adapter, PERC H700 Adapter, PERC H700 Integrated, and PERC H700 Modular, PERC H310 Adapter, PERC H310 Mini Monolithic, PERC H310 Mini Blades, PERC H710 Adapter, PERC H710 Mini Blades, PERC H710 Mini Monolithic, PERC H710P Adapter, PERC H710P Mini Blades, PERC H710P Mini Monolithic, PERC H810 Adapter, RAID 0 RAID 0 RAID 0 RAID 1 Target RAID Level RAID 1 RAID 0, RAID 5 RAID 6 RAID 0 Comments Add a single disk Add at least one additional disk. RAID 6 requires a minimum of 4 disks. Reconfiguration from RAID 0 to RAID 6 requires at least 2 additional disks even when this exceeds the 4-disk minimum required by RAID 6 With or without adding additional disks Troubleshooting hardware issues 85
-
 1
1 -
2
-
3
-
4
-
5
-
6
-
7
-
8
-
9
-
10
-
11
-
12
-
13
-
14
-
15
-
16
-
17
-
18
-
19
-
20
-
21
-
22
-
23
-
24
-
25
-
26
-
27
-
28
-
29
-
30
-
31
-
32
-
33
-
34
-
35
-
36
-
37
-
38
-
39
-
40
-
41
-
42
-
43
-
44
-
45
-
46
-
47
-
48
-
49
-
50
-
51
-
52
-
53
-
54
-
55
-
56
-
57
-
58
-
59
-
60
-
61
-
62
-
63
-
64
-
65
-
66
-
67
-
68
-
69
-
70
-
71
-
72
-
73
-
74
-
75
-
76
-
77
-
78
-
79
-
 80
80 -
 81
81 -
 82
82 -
 83
83 -
 84
84 -
 85
85 -
 86
86 -
 87
87 -
 88
88 -
 89
89 -
 90
90 -
91
-
92
-
93
-
94
-
95
-
96
-
97
-
98
-
99
-
100
-
101
-
102
-
103
-
104
-
105
-
106
-
107
-
108
-
109
-
110
-
111
-
112
-
113
-
114
-
115
-
116
-
117
-
118
-
119
-
120
-
121
-
122
-
123
-
124
-
125
-
126
-
127
-
128
-
129
-
130
-
131
-
132
 |
 |