Dell PowerEdge T140 EMC PowerEdge Servers Troubleshooting Guide - Page 86
Replacing physical disks in RAID1 configuration
 |
View all Dell PowerEdge T140 manuals
Add to My Manuals
Save this manual to your list of manuals |
Page 86 highlights
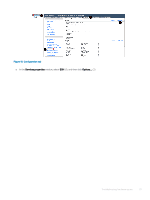
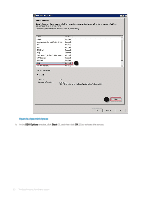
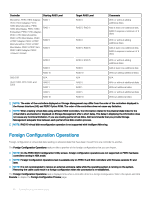
Controller Starting RAID Level PERC H330 Adapter, PERC RAID 1 H330 Mini Monolithic, PERC H330 Mini Blades, PERC H330 Embedded, PERC H730 Adapter, PERC H730 Mini Monolithic, RAID 5 PERC H730 Mini Blades, PERC H730P Adapter, PERC H730P Mini Monolithic, PERC H730P RAID 5 Mini Blades, PERC H730P Slim, PERC H830 Adapter, PERC FD33xD/FD33xS RAID 6 SAS 6/iR PERC S100, S110, S130, and S300 RAID 6 RAID 10 N/A RAID 0 RAID 1 RAID 5 RAID 10 Target RAID Level RAID 5, RAID 6 RAID 0 RAID 5, RAID 6 RAID 0, RAID 5 RAID 6 RAID 10 N/A RAID 0 RAID 1 RAID 5 RAID 10 Comments Add at least one additional disk. RAID 6 requires a minimum of 4 disks. With or without adding additional disks Add at least one additional disk. RAID 6 requires a minimum of 4 disks. With or without adding additional disks Add at least one additional disk Without adding additional disks N/A With or without additional disks Without additional disks With or without additional disks Without additional disks NOTE: The order of the controllers displayed on Storage Management may differ from the order of the controllers displayed in the Human Interface (HII) and PERC Option ROM. The order of the controllers does not cause any limitation. NOTE: When creating virtual disks using software RAID controllers, the information related to the physical disks linked to the virtual disk is enumerated or displayed on Storage Management after a short delay. This delay in displaying the information does not cause any functional limitation. If you are creating partial virtual disks, Dell recommends that you provide Storage Management adequate time between each partial virtual disk creation process. NOTE: RAID 10 virtual disk reconfiguration operation is not supported with Intelligent Mirroring. Replacing physical disks in RAID1 configuration About this task Perform the following steps to replace physical disks in RAID1 configuration: Steps 1 In the Virtual Disk Management window, select Virtual Disk # and press the down-arrow key until Physical Disks are highlighted. 2 Press the right-arrow key to expand the list of physical disks that are members of the virtual disk. 3 Press the down-arrow key and highlight the desired physical disk you want to replace. Press to expand the list of allowed operations on the disk. 4 Select Replace. 5 Select Start. 6 Press the down-arrow to highlight a replacement disk and then press the spacebar to select the disk. 7 Select OK to start the replacement. NOTE: The replacement disk must be a hot spare or an unconfigured disk without a foreign configuration. It must have the same or greater capacity and should be of the same type as the disk it is replacing. 86 Troubleshooting hardware issues
-
 1
1 -
2
-
3
-
4
-
5
-
6
-
7
-
8
-
9
-
10
-
11
-
12
-
13
-
14
-
15
-
16
-
17
-
18
-
19
-
20
-
21
-
22
-
23
-
24
-
25
-
26
-
27
-
28
-
29
-
30
-
31
-
32
-
33
-
34
-
35
-
36
-
37
-
38
-
39
-
40
-
41
-
42
-
43
-
44
-
45
-
46
-
47
-
48
-
49
-
50
-
51
-
52
-
53
-
54
-
55
-
56
-
57
-
58
-
59
-
60
-
61
-
62
-
63
-
64
-
65
-
66
-
67
-
68
-
69
-
70
-
71
-
72
-
73
-
74
-
75
-
76
-
77
-
78
-
79
-
80
-
 81
81 -
 82
82 -
 83
83 -
 84
84 -
 85
85 -
 86
86 -
 87
87 -
 88
88 -
 89
89 -
 90
90 -
 91
91 -
92
-
93
-
94
-
95
-
96
-
97
-
98
-
99
-
100
-
101
-
102
-
103
-
104
-
105
-
106
-
107
-
108
-
109
-
110
-
111
-
112
-
113
-
114
-
115
-
116
-
117
-
118
-
119
-
120
-
121
-
122
-
123
-
124
-
125
-
126
-
127
-
128
-
129
-
130
-
131
-
132
 |
 |
