Dell PowerEdge T140 EMC PowerEdge Servers Troubleshooting Guide - Page 73
Importing a foreign, using PERC, hot spare, configuration
 |
View all Dell PowerEdge T140 manuals
Add to My Manuals
Save this manual to your list of manuals |
Page 73 highlights
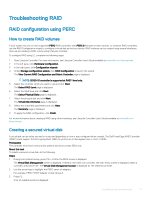
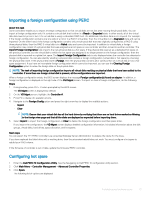
Importing a foreign configuration using PERC About this task Some controllers enable you to import a foreign configuration so that virtual disks are not lost after moving the physical disks. You can import a foreign configuration only if it contains a virtual disk that is either in a Ready or Degraded state. In other words, all of the virtual disk data must be present, but if the virtual disk is using a redundant RAID level, the additional redundant data is not required. For example, if the foreign configuration contains only one side of a mirror in a RAID 1 virtual disk, then the virtual disk is in a Degraded state and can be imported. On the other hand, if the foreign configuration contains only one physical disk that was originally configured as a RAID 5 using three physical disks, then the RAID 5 virtual disk is in a Failed state and cannot be imported. In addition to virtual disks, a foreign configuration may consist of a physical disk that was assigned as a hot spare on one controller and then moved to another controller. The Import Foreign Configuration task imports the new physical disk as a hot spare. If the physical disk was set as a dedicated hot spare on the previous controller, but the virtual disk to which the hot spare was assigned is no longer present in the foreign configuration, then the physical disk is imported as a global hot spare. The Import Foreign Configuration task is only displayed when the controller has detected a foreign configuration. You can also identify whether a physical disk contains a foreign configuration (virtual disk or hot spare) by checking the physical disk state. If the physical disk state is Foreign, then the physical disk contains all or some portion of a virtual disk or has a hot spare assignment. If you have an incomplete foreign configuration which cannot be imported, you can use the Clearing Foreign Configuration option to erase the foreign data on the physical disks. NOTE: The task of importing foreign configuration imports all virtual disks residing on physical disks that have been added to the controller. If more than one foreign virtual disk is present, all the configurations are imported. When a foreign configuration exists, the BIOS screen displays the message Foreign configuration(s) found on adapter. In addition, a foreign configuration is displayed on the right side of the Ctrl Mgmt screen. To import or clear a foreign configuration, do the following: Steps 1 During bootup, press Ctrl + R when prompted by the BIOS screen. The VD Mgmt screen is displayed by default. 2 On the VD Mgmt screen, highlight the Controller #. 3 Press F2 to display the available actions. 4 Navigate to the Foreign Config option and press the right arrow key to display the available actions: • Import • Clear NOTE: Ensure that your virtual disk has all the hard drives by verifying that there are no hard drives marked as Missing in the foreign view page and that all the disks are displayed as expected before importing them. 5 Select Import to import the foreign configuration or Clear to delete the foreign configuration and then press Enter. If you import the configuration, the VD Mgmt screen displays detailed configuration information. It includes information about the disk groups, virtual disks, hard drives, space allocation, and hot spares. Next steps You can export the TTY PERC Controller Log using OpenManage Server Administrator to analyze the cause for the issue. If you have replaced the failed drive with a working drive, then the automated rebuild does not work. You must configure a hot spare to rebuild your RAID volume. If the firmware of controller is out of date, update the firmware/PERC controller. Configuring hot spare 1 Enter the Dell PERC 10 Configuration Utility. See the Navigating to Dell PERC 10 configuration utility section. 2 Click Main Menu > Controller Management > Advanced Controller Properties. 3 Click Spare. The following list of options are displayed: Troubleshooting hardware issues 73
-
 1
1 -
2
-
3
-
4
-
5
-
6
-
7
-
8
-
9
-
10
-
11
-
12
-
13
-
14
-
15
-
16
-
17
-
18
-
19
-
20
-
21
-
22
-
23
-
24
-
25
-
26
-
27
-
28
-
29
-
30
-
31
-
32
-
33
-
34
-
35
-
36
-
37
-
38
-
39
-
40
-
41
-
42
-
43
-
44
-
45
-
46
-
47
-
48
-
49
-
50
-
51
-
52
-
53
-
54
-
55
-
56
-
57
-
58
-
59
-
60
-
61
-
62
-
63
-
64
-
65
-
66
-
67
-
 68
68 -
 69
69 -
 70
70 -
 71
71 -
 72
72 -
 73
73 -
 74
74 -
 75
75 -
 76
76 -
 77
77 -
 78
78 -
79
-
80
-
81
-
82
-
83
-
84
-
85
-
86
-
87
-
88
-
89
-
90
-
91
-
92
-
93
-
94
-
95
-
96
-
97
-
98
-
99
-
100
-
101
-
102
-
103
-
104
-
105
-
106
-
107
-
108
-
109
-
110
-
111
-
112
-
113
-
114
-
115
-
116
-
117
-
118
-
119
-
120
-
121
-
122
-
123
-
124
-
125
-
126
-
127
-
128
-
129
-
130
-
131
-
132
 |
 |
