Dell PowerEdge T140 EMC PowerEdge Servers Troubleshooting Guide - Page 99
How to, a RAID puncture, fix
 |
View all Dell PowerEdge T140 manuals
Add to My Manuals
Save this manual to your list of manuals |
Page 99 highlights
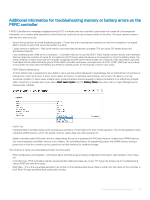
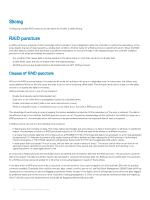
A Check Consistency performed after a RAID puncture is induced will not resolve the issue. This is why it is very important to perform a Check Consistency on a regular basis. It becomes especially important prior to replacing drives, when possible. The array must be in an optimal state to perform the Check Consistency. A RAID array that contains a single data error in conjunction with an additional error event such as a hard drive failure causes a RAID puncture when the failed or replacement drive is rebuilt into the array. As an example, an optimal RAID 5 array includes three members: drive 0, drive 1 and drive 2. If drive 0 fails and is replaced, the data and parity remaining on drives 1 and 2 are used to rebuild the missing information on to the replacement drive 0. However, if a data error exists on drive 1 when the rebuild operation reaches that error, there is insufficient information within the stripe to rebuild the missing data in that stripe. Drive 0 has no data, drive 1 has bad data and drive 2 has good data as it is being rebuilt. There are multiple errors within that stripe. Drive 0 and drive 1 do not contain valid data, so any data in that stripe cannot be recovered and is therefore lost. The result as shown in Figure 3 is that RAID punctures (in stripes 1 and 2) are created during the rebuild. The errors are propagated to drive 0. Figure 24. RAID punctures Puncturing the array restores the redundancy and returns the array to an optimal state. This provides for the array to be protected from additional data loss in the event of additional errors or drive failures. How to fix a RAID puncture Issue: Solution: How to fix RAID arrays that have been subjected to a puncture? Complete the following steps to resolve the issue: WARNING: Following these steps will result in the loss of all data on the array. Ensure that you are prepared to restore from backup or other means prior to following these steps. Use caution so that following these steps does not impact any other arrays. 1 Discard Preserved Cache, if it exists. 2 Clear foreign configurations, if any. 3 Delete the array. 4 Shift the position of the drives by one. Move Disk 0 to slot 1, Disk 1 to slot 2, and Disk 2 to slot 0. 5 Recreate the array as desired. 6 Perform a Full Initialization of the array (not a Fast Initialization). 7 Perform a Check Consistency on the array. If the Check Consistency completes without errors, you can safely assume that the array is now healthy and the puncture is removed. Data can now be restored to the healthy array. Troubleshooting hardware issues 99
-
 1
1 -
2
-
3
-
4
-
5
-
6
-
7
-
8
-
9
-
10
-
11
-
12
-
13
-
14
-
15
-
16
-
17
-
18
-
19
-
20
-
21
-
22
-
23
-
24
-
25
-
26
-
27
-
28
-
29
-
30
-
31
-
32
-
33
-
34
-
35
-
36
-
37
-
38
-
39
-
40
-
41
-
42
-
43
-
44
-
45
-
46
-
47
-
48
-
49
-
50
-
51
-
52
-
53
-
54
-
55
-
56
-
57
-
58
-
59
-
60
-
61
-
62
-
63
-
64
-
65
-
66
-
67
-
68
-
69
-
70
-
71
-
72
-
73
-
74
-
75
-
76
-
77
-
78
-
79
-
80
-
81
-
82
-
83
-
84
-
85
-
86
-
87
-
88
-
89
-
90
-
91
-
92
-
93
-
 94
94 -
 95
95 -
 96
96 -
 97
97 -
 98
98 -
 99
99 -
 100
100 -
 101
101 -
 102
102 -
 103
103 -
 104
104 -
105
-
106
-
107
-
108
-
109
-
110
-
111
-
112
-
113
-
114
-
115
-
116
-
117
-
118
-
119
-
120
-
121
-
122
-
123
-
124
-
125
-
126
-
127
-
128
-
129
-
130
-
131
-
132
 |
 |
