HP 6125G HP 6125G & 6125G/XG Blade Switches High Availability Configur - Page 43
Enabling DLDP, Setting DLDP mode, Setting the interval to send advertisement packets
 |
View all HP 6125G manuals
Add to My Manuals
Save this manual to your list of manuals |
Page 43 highlights
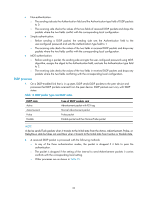
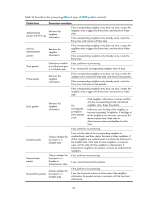
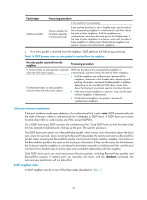
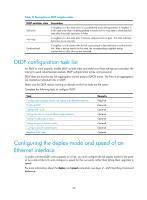
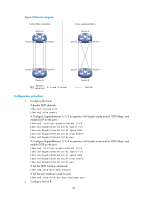
Enabling DLDP To properly configure DLDP on the device, first enable DLDP globally, and then enable it on each port. To enable DLDP: Step 1. Enter system view. 2. Enable DLDP globally. 3. Enter Layer 2 Ethernet interface view. 4. Enable DLDP. Command system-view dldp enable interface interface-type interface-number dldp enable Remarks N/A Globally disabled by default. N/A Disabled on a port by default. NOTE: • DLDP takes effect only on Ethernet interfaces (fiber or copper). • DLDP can detect unidirectional links only after all physical links are connected. Therefore, before enabling DLDP, make sure that optical fibers or copper twisted pairs are connected. Setting DLDP mode DLDP operates in normal or enhanced mode. In normal mode, DLDP does not actively detect neighbors when the corresponding neighbor entries age out. In enhanced mode, DLDP actively detects neighbors when the corresponding neighbor entries age out. To set DLDP mode: Step 1. Enter system view. 2. Set DLDP mode. Command system-view dldp work-mode { enhance | normal } Remarks N/A Optional. Normal by default. Setting the interval to send advertisement packets DLDP detects unidirectional links by sending Advertisement packets. To make sure that DLDP can detect unidirectional links promptly without affecting network performance, set the advertisement interval appropriately depending on your network environment. The interval should be set shorter than one third of the STP convergence time. If the interval is too long, STP loops may occur before unidirectional links are detected and shut down. If the interval is too short, the number of advertisement packets will increase. HP recommends that you use the default interval in most cases. To set the interval to send Advertisement packets: Step 1. Enter system view. Command system-view Remarks N/A 36
-
 1
1 -
2
-
3
-
4
-
5
-
6
-
7
-
8
-
9
-
10
-
11
-
12
-
13
-
14
-
15
-
16
-
17
-
18
-
19
-
20
-
21
-
22
-
23
-
24
-
25
-
26
-
27
-
28
-
29
-
30
-
31
-
32
-
33
-
34
-
35
-
36
-
37
-
 38
38 -
 39
39 -
 40
40 -
 41
41 -
 42
42 -
 43
43 -
 44
44 -
 45
45 -
 46
46 -
 47
47 -
 48
48 -
49
-
50
-
51
-
52
-
53
-
54
-
55
-
56
-
57
-
58
-
59
-
60
-
61
-
62
-
63
-
64
-
65
-
66
-
67
-
68
-
69
-
70
-
71
-
72
-
73
-
74
-
75
-
76
-
77
-
78
-
79
-
80
-
81
-
82
-
83
-
84
-
85
-
86
-
87
-
88
-
89
-
90
-
91
-
92
-
93
-
94
-
95
-
96
-
97
-
98
-
99
-
100
-
101
-
102
-
103
-
104
-
105
-
106
-
107
-
108
-
109
-
110
-
111
-
112
-
113
-
114
-
115
-
116
-
117
-
118
-
119
-
120
-
121
-
122
-
123
-
124
-
125
-
126
-
127
-
128
-
129
-
130
-
131
-
132
-
133
-
134
-
135
-
136
-
137
-
138
-
139
-
140
-
141
-
142
-
143
-
144
-
145
-
146
-
147
-
148
-
149
-
150
-
151
-
152
-
153
-
154
-
155
-
156
-
157
-
158
-
159
-
160
-
161
-
162
-
163
-
164
-
165
-
166
-
167
-
168
-
169
-
170
-
171
-
172
-
173
-
174
-
175
-
176
-
177
-
178
-
179
-
180
-
181
-
182
-
183
-
184
-
185
-
186
-
187
-
188
-
189
-
190
-
191
-
192
-
193
-
194
-
195
-
196
-
197
-
198
-
199
-
200
-
201
-
202
-
203
-
204
-
205
-
206
-
207
-
208
-
209
-
210
-
211
-
212
-
213
-
214
-
215
-
216
-
217
-
218
-
219
-
220
-
221
-
222
 |
 |