Dell Powerconnect W-ClearPass Hardware Appliances W-ClearPass Policy Manager 6 - Page 137
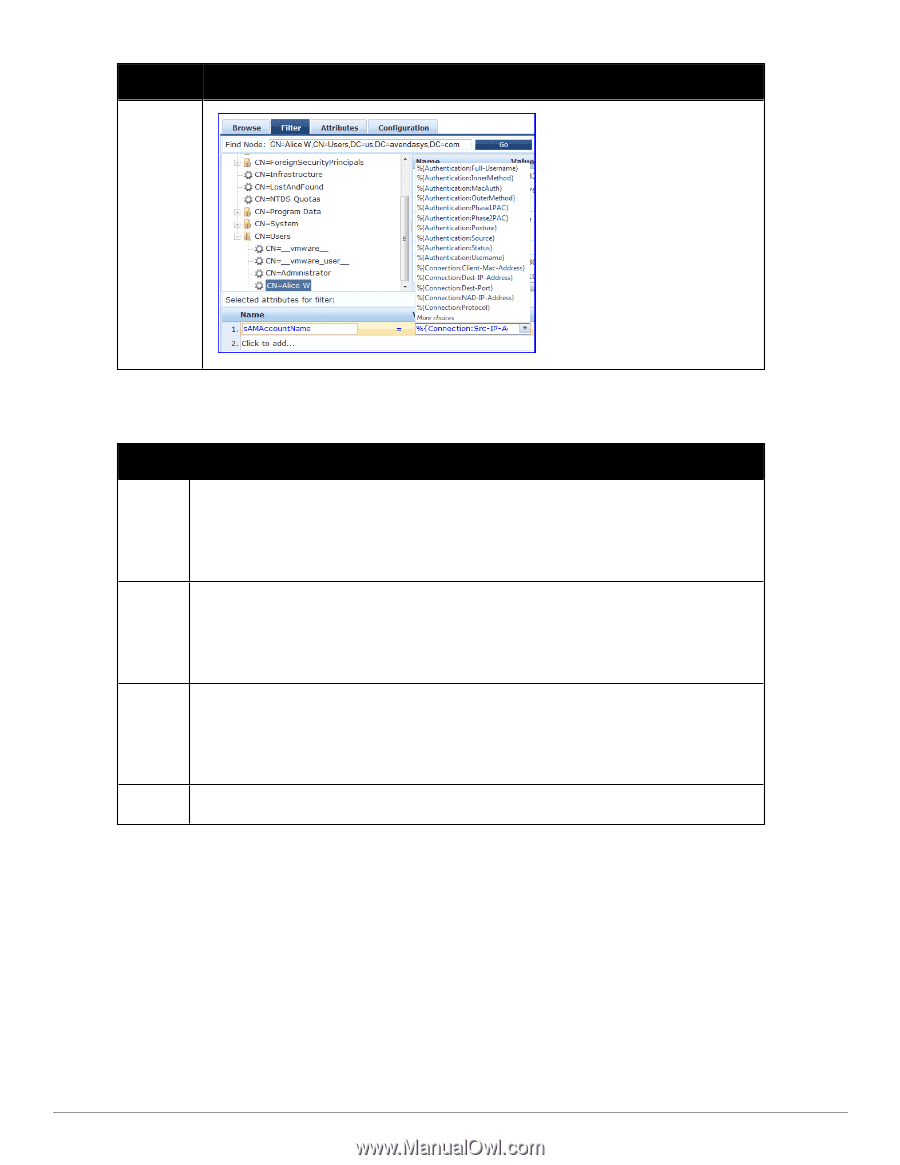
Table 64, Filter Creation Steps
 |
View all Dell Powerconnect W-ClearPass Hardware Appliances manuals
Add to My Manuals
Save this manual to your list of manuals |
Page 137 highlights
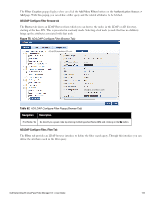
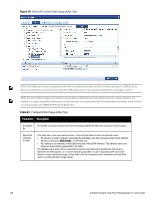
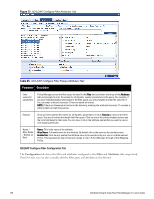
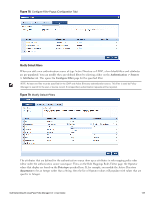
Parameter Description The following tables describes the steps used in creating a filter. Table 64: Filter Creation Steps Step Description Step 1 Select filter node The goal of filter creation is to help Policy Manager understand how to find a user or device connecting to the network in LDAP or Active Directory. From the Filter tab, click on a node that you want to extract user or device information from. For example, browse to the Users container in Active Directory and select the node for a user (Alice, for example). On the right hand side, you see attributes associated with that user. Step 2 Select attribute Click on attributes that will help Policy Manager to uniquely identify the user or device. For example, in Active Directory, an attribute called sAMAccountName stores the user ID. The attributes that you select are automatically populated in the filter table displayed below the browser section (along with their values). In this example, if you select sAMAccountName, the row in the filter table will show this attribute with a value of alice (assuming you picked Alice's record as a sample user node). Step 3 Enter value (optional) After Step 3, you have values for a specific record (Alice's record, in this case). Change the value to a dynamic session attribute that will help Policy Manager to associate a session with a specific record in LDAP/AD. For example, if you selected the sAMAccountName attribute in AD, click on the value field and select %{Authentication:Username}. When Policy Manager processes an authentication request % {Authentication:Username} is populated with the user ID of the user connecting to the network. Step 4 Add more attributes from the node of interest and continue with Step 2. AD/LDAP Configure Filter Attributes Tab The Attributes tab defines the attributes to be fetched from Active Directory or LDAP directory. Each attribute can also be "Enabled as Role," which means the value fetched for this attribute can be used directly in Enforcement Policies (See "Configuring Enforcement Policies " on page 229.) Dell Networking W-ClearPass Policy Manager 6.0 | User Guide 137
-
 1
1 -
2
-
3
-
4
-
5
-
6
-
7
-
8
-
9
-
10
-
11
-
12
-
13
-
14
-
15
-
16
-
17
-
18
-
19
-
20
-
21
-
22
-
23
-
24
-
25
-
26
-
27
-
28
-
29
-
30
-
31
-
32
-
33
-
34
-
35
-
36
-
37
-
38
-
39
-
40
-
41
-
42
-
43
-
44
-
45
-
46
-
47
-
48
-
49
-
50
-
51
-
52
-
53
-
54
-
55
-
56
-
57
-
58
-
59
-
60
-
61
-
62
-
63
-
64
-
65
-
66
-
67
-
68
-
69
-
70
-
71
-
72
-
73
-
74
-
75
-
76
-
77
-
78
-
79
-
80
-
81
-
82
-
83
-
84
-
85
-
86
-
87
-
88
-
89
-
90
-
91
-
92
-
93
-
94
-
95
-
96
-
97
-
98
-
99
-
100
-
101
-
102
-
103
-
104
-
105
-
106
-
107
-
108
-
109
-
110
-
111
-
112
-
113
-
114
-
115
-
116
-
117
-
118
-
119
-
120
-
121
-
122
-
123
-
124
-
125
-
126
-
127
-
128
-
129
-
130
-
131
-
 132
132 -
 133
133 -
 134
134 -
 135
135 -
 136
136 -
 137
137 -
 138
138 -
 139
139 -
 140
140 -
 141
141 -
 142
142 -
143
-
144
-
145
-
146
-
147
-
148
-
149
-
150
-
151
-
152
-
153
-
154
-
155
-
156
-
157
-
158
-
159
-
160
-
161
-
162
-
163
-
164
-
165
-
166
-
167
-
168
-
169
-
170
-
171
-
172
-
173
-
174
-
175
-
176
-
177
-
178
-
179
-
180
-
181
-
182
-
183
-
184
-
185
-
186
-
187
-
188
-
189
-
190
-
191
-
192
-
193
-
194
-
195
-
196
-
197
-
198
-
199
-
200
-
201
-
202
-
203
-
204
-
205
-
206
-
207
-
208
-
209
-
210
-
211
-
212
-
213
-
214
-
215
-
216
-
217
-
218
-
219
-
220
-
221
-
222
-
223
-
224
-
225
-
226
-
227
-
228
-
229
-
230
-
231
-
232
-
233
-
234
-
235
-
236
-
237
-
238
-
239
-
240
-
241
-
242
-
243
-
244
-
245
-
246
-
247
-
248
-
249
-
250
-
251
-
252
-
253
-
254
-
255
-
256
-
257
-
258
-
259
-
260
-
261
-
262
-
263
-
264
-
265
-
266
-
267
-
268
-
269
-
270
-
271
-
272
-
273
-
274
-
275
-
276
-
277
-
278
-
279
-
280
-
281
-
282
-
283
-
284
-
285
-
286
-
287
-
288
-
289
-
290
-
291
-
292
-
293
-
294
-
295
-
296
-
297
-
298
-
299
-
300
-
301
-
302
-
303
-
304
-
305
-
306
-
307
-
308
-
309
-
310
-
311
-
312
-
313
-
314
-
315
-
316
-
317
-
318
-
319
-
320
-
321
-
322
-
323
-
324
-
325
-
326
-
327
-
328
-
329
-
330
-
331
-
332
-
333
-
334
-
335
-
336
-
337
-
338
-
339
-
340
-
341
-
342
-
343
-
344
-
345
-
346
-
347
-
348
-
349
-
350
-
351
-
352
-
353
-
354
-
355
-
356
-
357
-
358
-
359
-
360
-
361
-
362
-
363
-
364
-
365
-
366
-
367
-
368
-
369
-
370
-
371
-
372
 |
 |