Dell Powerconnect W-ClearPass Hardware Appliances W-ClearPass Policy Manager 6 - Page 316
Upgrade the Image on a Single Policy Manager Appliance, Upgrade the Image on All Appliances
 |
View all Dell Powerconnect W-ClearPass Hardware Appliances manuals
Add to My Manuals
Save this manual to your list of manuals |
Page 316 highlights
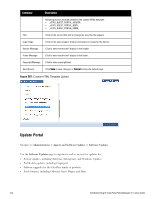
Upgrade the Image on a Single Policy Manager Appliance Perform these steps to upgrade the image on a single Policy Manager appliance: 1. From the ClearPass Policy Manager UI, navigate to Administration > Agents and Software Updates > Software Updates. l If a Subscription ID has been entered, then the server can communicate with the webservice. Available upgrades will be listed in the Firmware & Patches table. Download and install the upgrade, and then reboot the server. l If the Subscription ID has not been entered, or if the appliance cannot communicate with the webservice, click Import Updates to upload the upgrade image that you received from Support (or through other means). The upgrade file is now available and can be specified in the system upgrade CLI command. Alternatively, transfer the image file to a Policy Manager external machine and make it available via http or SSH. 1. Login to the Policy Manager appliance as appadmin user. 2. Use the command system upgrade, which will upgrade your second partition, then reboot. Policy Manager boots into the upgraded image. NOTE: If you access the appliance via serial console, you should also be able to boot into the previous image by choosing that image in the Grub boot screen. 3. Verify that all configuration and session logs are restored and all services are running. Also verify that nodespecific configuration such as the server certificate, log configuration and server parameters are also restored. Upgrade the Image on All Appliances Perform these steps to upgrade the image on all appliances in an Policy Manager cluster. 1. Upgrade publisher Policy Manager first, and reboot into the new image. 2. On the first boot after upgrade, all old configuration data is restored. Verify that all configuration and services are intact. In the cluster servers screen, all subscriber node entries are present but marked as Cluster Sync=false (disabled for replication). Any configuration changes performed in this state do not replicate to subscribers until the subscribers are also upgraded (effectively no configuration changes are possible on subscribers in this state). NOTE: You can add a subscriber to the cluster from the User Interface: Configuration > Administration > Server Configuration (page) > Make Subscriber (link). 3. One node at a time, upgrade the subscriber nodes to the same Policy Manager version as the publisher, using the same steps as for a single Policy Manager server. On the first boot after upgrade, the node is added back to the cluster (the publisher node must be up and available for this to work). 4. Login to the UI and verify that the node is replicating and "Cluster Sync" is set to true. NOTE: If the publisher is not available when the subscriber boots up after the upgrade, adding the node back to the cluster fails. In that case, the subscriber comes up with an empty database. Fix the problem by adding the subscriber back into the cluster from the CLI. All node configuration, including certificates, log configuration and server parameters are restored (as long as the node entry exists in the publisher with Cluster Sync=false). 316 Dell Networking W-ClearPass Policy Manager 6.0 | User Guide
-
 1
1 -
2
-
3
-
4
-
5
-
6
-
7
-
8
-
9
-
10
-
11
-
12
-
13
-
14
-
15
-
16
-
17
-
18
-
19
-
20
-
21
-
22
-
23
-
24
-
25
-
26
-
27
-
28
-
29
-
30
-
31
-
32
-
33
-
34
-
35
-
36
-
37
-
38
-
39
-
40
-
41
-
42
-
43
-
44
-
45
-
46
-
47
-
48
-
49
-
50
-
51
-
52
-
53
-
54
-
55
-
56
-
57
-
58
-
59
-
60
-
61
-
62
-
63
-
64
-
65
-
66
-
67
-
68
-
69
-
70
-
71
-
72
-
73
-
74
-
75
-
76
-
77
-
78
-
79
-
80
-
81
-
82
-
83
-
84
-
85
-
86
-
87
-
88
-
89
-
90
-
91
-
92
-
93
-
94
-
95
-
96
-
97
-
98
-
99
-
100
-
101
-
102
-
103
-
104
-
105
-
106
-
107
-
108
-
109
-
110
-
111
-
112
-
113
-
114
-
115
-
116
-
117
-
118
-
119
-
120
-
121
-
122
-
123
-
124
-
125
-
126
-
127
-
128
-
129
-
130
-
131
-
132
-
133
-
134
-
135
-
136
-
137
-
138
-
139
-
140
-
141
-
142
-
143
-
144
-
145
-
146
-
147
-
148
-
149
-
150
-
151
-
152
-
153
-
154
-
155
-
156
-
157
-
158
-
159
-
160
-
161
-
162
-
163
-
164
-
165
-
166
-
167
-
168
-
169
-
170
-
171
-
172
-
173
-
174
-
175
-
176
-
177
-
178
-
179
-
180
-
181
-
182
-
183
-
184
-
185
-
186
-
187
-
188
-
189
-
190
-
191
-
192
-
193
-
194
-
195
-
196
-
197
-
198
-
199
-
200
-
201
-
202
-
203
-
204
-
205
-
206
-
207
-
208
-
209
-
210
-
211
-
212
-
213
-
214
-
215
-
216
-
217
-
218
-
219
-
220
-
221
-
222
-
223
-
224
-
225
-
226
-
227
-
228
-
229
-
230
-
231
-
232
-
233
-
234
-
235
-
236
-
237
-
238
-
239
-
240
-
241
-
242
-
243
-
244
-
245
-
246
-
247
-
248
-
249
-
250
-
251
-
252
-
253
-
254
-
255
-
256
-
257
-
258
-
259
-
260
-
261
-
262
-
263
-
264
-
265
-
266
-
267
-
268
-
269
-
270
-
271
-
272
-
273
-
274
-
275
-
276
-
277
-
278
-
279
-
280
-
281
-
282
-
283
-
284
-
285
-
286
-
287
-
288
-
289
-
290
-
291
-
292
-
293
-
294
-
295
-
296
-
297
-
298
-
299
-
300
-
301
-
302
-
303
-
304
-
305
-
306
-
307
-
308
-
309
-
310
-
 311
311 -
 312
312 -
 313
313 -
 314
314 -
 315
315 -
 316
316 -
 317
317 -
 318
318 -
 319
319 -
 320
320 -
 321
321 -
322
-
323
-
324
-
325
-
326
-
327
-
328
-
329
-
330
-
331
-
332
-
333
-
334
-
335
-
336
-
337
-
338
-
339
-
340
-
341
-
342
-
343
-
344
-
345
-
346
-
347
-
348
-
349
-
350
-
351
-
352
-
353
-
354
-
355
-
356
-
357
-
358
-
359
-
360
-
361
-
362
-
363
-
364
-
365
-
366
-
367
-
368
-
369
-
370
-
371
-
372
 |
 |
