HP Z620 HP Remote Graphics Software 5.4.7 - Page 66
Automatic installation of the RGS Receiver on Windows,
 |
View all HP Z620 manuals
Add to My Manuals
Save this manual to your list of manuals |
Page 66 highlights
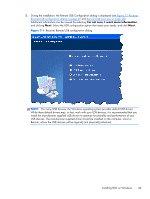
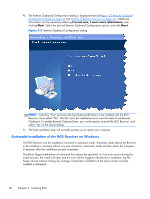
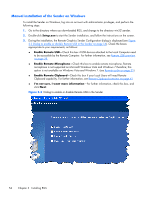
4. The Remote Clipboard Configuration dialog is displayed next (seeFigure 3-2 Remote Clipboard Configuration dialog on page 50 and Remote Clipboard overview on page 41). Additional information can be viewed by selecting I'm not sure, I want more information, and clicking Next. Select the desired Remote Clipboard Configuration option, and click Next. Figure 3-2 Remote Clipboard Configuration dialog NOTE: Selecting "Yes" will cause the hprclipboard.dll library to be installed with the RGS Receiver. If you select "No", this DLL won't be installed and you won't be able to use Remote Clipboard. To enable Remote Clipboard later, you would need to reinstall the RGS Receiver, and select "Yes" in the above dialog. 5. The final installation step will normally prompt you to restart your computer. Automatic installation of the RGS Receiver on Windows The RGS Receiver can be installed or removed in automatic mode. Automatic mode allows the Receiver to be installed or removed without any user interaction. Automatic mode will also restart the computer, if required, after the installation process completes. Should an illegal combination of command line options be specified, or if an error occurs during the install process, the install will abort and the error will be logged to the Receiver installation log file. Setup will exit without making any changes if automatic installation of the same version currently installed is attempted. 50 Chapter 3 Installing RGS
-
 1
1 -
2
-
3
-
4
-
5
-
6
-
7
-
8
-
9
-
10
-
11
-
12
-
13
-
14
-
15
-
16
-
17
-
18
-
19
-
20
-
21
-
22
-
23
-
24
-
25
-
26
-
27
-
28
-
29
-
30
-
31
-
32
-
33
-
34
-
35
-
36
-
37
-
38
-
39
-
40
-
41
-
42
-
43
-
44
-
45
-
46
-
47
-
48
-
49
-
50
-
51
-
52
-
53
-
54
-
55
-
56
-
57
-
58
-
59
-
60
-
 61
61 -
 62
62 -
 63
63 -
 64
64 -
 65
65 -
 66
66 -
 67
67 -
 68
68 -
 69
69 -
 70
70 -
 71
71 -
72
-
73
-
74
-
75
-
76
-
77
-
78
-
79
-
80
-
81
-
82
-
83
-
84
-
85
-
86
-
87
-
88
-
89
-
90
-
91
-
92
-
93
-
94
-
95
-
96
-
97
-
98
-
99
-
100
-
101
-
102
-
103
-
104
-
105
-
106
-
107
-
108
-
109
-
110
-
111
-
112
-
113
-
114
-
115
-
116
-
117
-
118
-
119
-
120
-
121
-
122
-
123
-
124
-
125
-
126
-
127
-
128
-
129
-
130
-
131
-
132
-
133
-
134
-
135
-
136
-
137
-
138
-
139
-
140
-
141
-
142
-
143
-
144
-
145
-
146
-
147
-
148
-
149
-
150
-
151
-
152
-
153
-
154
-
155
-
156
-
157
-
158
-
159
-
160
-
161
-
162
-
163
-
164
-
165
-
166
-
167
-
168
-
169
-
170
-
171
-
172
-
173
-
174
-
175
-
176
-
177
-
178
-
179
-
180
-
181
-
182
-
183
-
184
-
185
-
186
-
187
-
188
-
189
-
190
-
191
-
192
-
193
-
194
-
195
-
196
-
197
-
198
-
199
-
200
-
201
-
202
-
203
-
204
-
205
-
206
-
207
-
208
-
209
-
210
-
211
-
212
-
213
-
214
-
215
-
216
-
217
-
218
-
219
-
220
-
221
-
222
-
223
-
224
-
225
-
226
-
227
-
228
-
229
-
230
-
231
-
232
-
233
-
234
-
235
-
236
-
237
-
238
-
239
-
240
-
241
-
242
-
243
-
244
-
245
-
246
-
247
 |
 |
