HP Z620 HP Remote Graphics Software 5.4.7 - Page 76
Setting the Sender process priority using HP PA, Installing and enabling Single Sign-on
 |
View all HP Z620 manuals
Add to My Manuals
Save this manual to your list of manuals |
Page 76 highlights
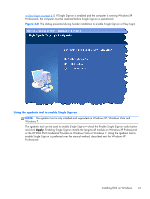
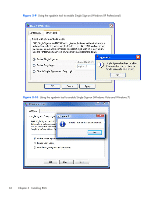
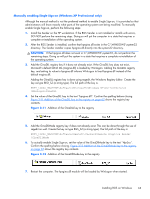
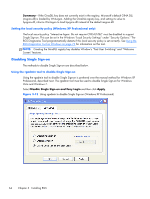
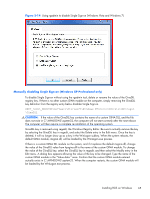
CAUTION: Adjusting the process priority of the Sender to a level higher than -normal can cause other normally privileged processes to receive fewer CPU cycles than normal. Therefore, caution should be observed in adjusting the priority of the Sender. Setting the Sender process priority using HP PA The HP Performance Advisor (HP PA) can be used adjust the priority of the Sender without having to use regedit. HP PA is available for HP Workstations only from this location: http://www.hp.com/go/ performanceadvisor See the HP PA help and documentation for further information. Installing and enabling Single Sign-on CAUTION: Installing RGS Single Sign-on is for experienced users and IT administrators only. Please read all directions completely before proceeding, and exercise caution when installing. Windows XP Professional - The RGS shared library, hprgina.dll, enables Single Sign-on. The file hprgina.dll is a GINA (Graphical Identification and Authentication) module that is loaded by the Windows XP Professional WinLogon.exe process. There are three ways to install hprgina.dll, and therefore enable RGS Single Sign-on for Windows XP Professional. Windows Vista and Windows 7 - Single Sign-on for Windows Vista and Windows 7 uses the HP RGS SSO Credential Provider. The Credential Provider can only be installed during RGS installation or by running the rgadmin tool. Enabling Single Sign-on during installation Single Sign-on can be enabled during Figure 3-8 The dialog presented during Sender installation to enable Single Sign-on or Easy Login on page 61 installation-enabling Single Sign-on installs the hprgina.dll module on Windows XP Professional or the HP RGS SSO Credential Provider on Windows Vista or Windows 7. This is the preferred method to enable Single Sign-on. The default during installation is to not enable Single Sign-on. The administrator must answer two questions to enable Single Sign-on (see Figure 3-8 The dialog presented during Sender installation to enable Single Sign-on 60 Chapter 3 Installing RGS
-
 1
1 -
2
-
3
-
4
-
5
-
6
-
7
-
8
-
9
-
10
-
11
-
12
-
13
-
14
-
15
-
16
-
17
-
18
-
19
-
20
-
21
-
22
-
23
-
24
-
25
-
26
-
27
-
28
-
29
-
30
-
31
-
32
-
33
-
34
-
35
-
36
-
37
-
38
-
39
-
40
-
41
-
42
-
43
-
44
-
45
-
46
-
47
-
48
-
49
-
50
-
51
-
52
-
53
-
54
-
55
-
56
-
57
-
58
-
59
-
60
-
61
-
62
-
63
-
64
-
65
-
66
-
67
-
68
-
69
-
70
-
 71
71 -
 72
72 -
 73
73 -
 74
74 -
 75
75 -
 76
76 -
 77
77 -
 78
78 -
 79
79 -
 80
80 -
 81
81 -
82
-
83
-
84
-
85
-
86
-
87
-
88
-
89
-
90
-
91
-
92
-
93
-
94
-
95
-
96
-
97
-
98
-
99
-
100
-
101
-
102
-
103
-
104
-
105
-
106
-
107
-
108
-
109
-
110
-
111
-
112
-
113
-
114
-
115
-
116
-
117
-
118
-
119
-
120
-
121
-
122
-
123
-
124
-
125
-
126
-
127
-
128
-
129
-
130
-
131
-
132
-
133
-
134
-
135
-
136
-
137
-
138
-
139
-
140
-
141
-
142
-
143
-
144
-
145
-
146
-
147
-
148
-
149
-
150
-
151
-
152
-
153
-
154
-
155
-
156
-
157
-
158
-
159
-
160
-
161
-
162
-
163
-
164
-
165
-
166
-
167
-
168
-
169
-
170
-
171
-
172
-
173
-
174
-
175
-
176
-
177
-
178
-
179
-
180
-
181
-
182
-
183
-
184
-
185
-
186
-
187
-
188
-
189
-
190
-
191
-
192
-
193
-
194
-
195
-
196
-
197
-
198
-
199
-
200
-
201
-
202
-
203
-
204
-
205
-
206
-
207
-
208
-
209
-
210
-
211
-
212
-
213
-
214
-
215
-
216
-
217
-
218
-
219
-
220
-
221
-
222
-
223
-
224
-
225
-
226
-
227
-
228
-
229
-
230
-
231
-
232
-
233
-
234
-
235
-
236
-
237
-
238
-
239
-
240
-
241
-
242
-
243
-
244
-
245
-
246
-
247
 |
 |
