HP Z620 HP Remote Graphics Software 5.4.7 - Page 72
Starting and stopping the Sender on Windows, Control Panel, Administrative Toolsl
 |
View all HP Z620 manuals
Add to My Manuals
Save this manual to your list of manuals |
Page 72 highlights
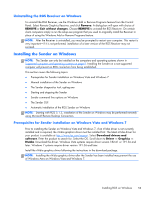
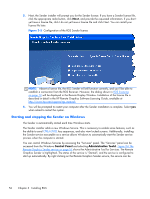
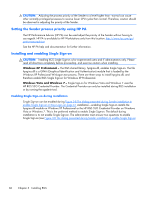
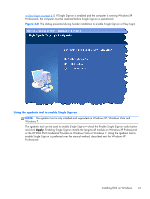
5. Next, the Sender installer will prompt you for the Sender license. If you have a Sender license file, click the appropriate radio button, click Next, and provide the requested information. If you don't yet have a license file, click I do not yet have a license file and click Next. You can install your license file later. Figure 3-5 Configuration of the RGS Sender license NOTE: Absent a license file, the RGS Sender will still function correctly, and you'll be able to establish a connection from the RGS Receiver. However, the dialog shown in RGS licensing on page 12 will be displayed in the Remote Display Window. Installation of the license file is described in detail in the HP Remote Graphics Software Licensing Guide, available at http://www.hp.com/support/rgs_manuals 6. You will be prompted to restart your computer after the Sender installation is complete. Select yes when asked to restart the system. Starting and stopping the Sender on Windows The Sender is automatically started each time Windows starts. The Sender installer adds a new Windows Service. This is necessary to enable some features, such as the ability to send CTRL-ALT-DEL key sequences, and also view locked screens. Additionally, installing the Sender service executable as a service allows Windows to automatically start the Sender service process when the computer is started. You can control Windows Services by accessing the "Services" panel. The "Services" panel can be accessed from the Windows Control Panel and selecting Administrative Toolsl. Figure 3-6 The Remote Graphics Sender service on page 57 shows the Administrative Tool for Services. The Remote Graphics Sender is highlighted. The status of the service is "Started", and the service is configured to start up automatically. By right clicking on the Remote Graphics Sender service, the service can be 56 Chapter 3 Installing RGS
-
 1
1 -
2
-
3
-
4
-
5
-
6
-
7
-
8
-
9
-
10
-
11
-
12
-
13
-
14
-
15
-
16
-
17
-
18
-
19
-
20
-
21
-
22
-
23
-
24
-
25
-
26
-
27
-
28
-
29
-
30
-
31
-
32
-
33
-
34
-
35
-
36
-
37
-
38
-
39
-
40
-
41
-
42
-
43
-
44
-
45
-
46
-
47
-
48
-
49
-
50
-
51
-
52
-
53
-
54
-
55
-
56
-
57
-
58
-
59
-
60
-
61
-
62
-
63
-
64
-
65
-
66
-
 67
67 -
 68
68 -
 69
69 -
 70
70 -
 71
71 -
 72
72 -
 73
73 -
 74
74 -
 75
75 -
 76
76 -
 77
77 -
78
-
79
-
80
-
81
-
82
-
83
-
84
-
85
-
86
-
87
-
88
-
89
-
90
-
91
-
92
-
93
-
94
-
95
-
96
-
97
-
98
-
99
-
100
-
101
-
102
-
103
-
104
-
105
-
106
-
107
-
108
-
109
-
110
-
111
-
112
-
113
-
114
-
115
-
116
-
117
-
118
-
119
-
120
-
121
-
122
-
123
-
124
-
125
-
126
-
127
-
128
-
129
-
130
-
131
-
132
-
133
-
134
-
135
-
136
-
137
-
138
-
139
-
140
-
141
-
142
-
143
-
144
-
145
-
146
-
147
-
148
-
149
-
150
-
151
-
152
-
153
-
154
-
155
-
156
-
157
-
158
-
159
-
160
-
161
-
162
-
163
-
164
-
165
-
166
-
167
-
168
-
169
-
170
-
171
-
172
-
173
-
174
-
175
-
176
-
177
-
178
-
179
-
180
-
181
-
182
-
183
-
184
-
185
-
186
-
187
-
188
-
189
-
190
-
191
-
192
-
193
-
194
-
195
-
196
-
197
-
198
-
199
-
200
-
201
-
202
-
203
-
204
-
205
-
206
-
207
-
208
-
209
-
210
-
211
-
212
-
213
-
214
-
215
-
216
-
217
-
218
-
219
-
220
-
221
-
222
-
223
-
224
-
225
-
226
-
227
-
228
-
229
-
230
-
231
-
232
-
233
-
234
-
235
-
236
-
237
-
238
-
239
-
240
-
241
-
242
-
243
-
244
-
245
-
246
-
247
 |
 |
