IBM 6000R Hardware Maintenance Manual - Page 141
Supported and certified databases, Reference by operating system and database client, version.
 |
UPC - 087944534341
View all IBM 6000R manuals
Add to My Manuals
Save this manual to your list of manuals |
Page 141 highlights
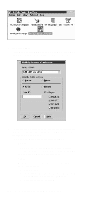
All privileges (Insert, Delete, Select, and Update) are selected by default. A user ID must have all of these privileges to export data to the database. d. Click OK to open the Database Server window. • Revoke Disables access to a database for a specified user ID. To revoke access: a. Click Revoke. b. In the User ID field type the user ID that will have access to the database revoked. c. Deselect privileges to be revoked for this ID. All privileges (Insert, Delete, Select, and Update) are selected by default. A user ID must have all of these privileges to export data to the database. Some or all of these privileges can be revoked. d. Click OK to open the Database Server window. 4. Select the database within which the table groups will be created. 5. Click OK. The Netfinity Manager Database Access window opens. 6. Type in the User ID field netfin netfin is the qualifier name of the Netfinity Manager database. 7. In the Password field type the password that enables access to the Netfinity Manager database. 8. Click OK. As the information is processed, a Creating tables status message should be displayed. When the operation completes, a Requested Action Completed message should be displayed. Supported and certified databases The following tables show databases and operating systems that are certified for use with this release of Netfinity Manager. Table 22. Supported Netfinity Databases for Windows. Reference by operating system and database client version. Product IBM DB2 Version 2.1.2 Windows 95 Yes Windows NT 3.51 Yes Windows NT 4.0 Yes Netfinity Manager 129
-
 1
1 -
2
-
3
-
4
-
5
-
6
-
7
-
8
-
9
-
10
-
11
-
12
-
13
-
14
-
15
-
16
-
17
-
18
-
19
-
20
-
21
-
22
-
23
-
24
-
25
-
26
-
27
-
28
-
29
-
30
-
31
-
32
-
33
-
34
-
35
-
36
-
37
-
38
-
39
-
40
-
41
-
42
-
43
-
44
-
45
-
46
-
47
-
48
-
49
-
50
-
51
-
52
-
53
-
54
-
55
-
56
-
57
-
58
-
59
-
60
-
61
-
62
-
63
-
64
-
65
-
66
-
67
-
68
-
69
-
70
-
71
-
72
-
73
-
74
-
75
-
76
-
77
-
78
-
79
-
80
-
81
-
82
-
83
-
84
-
85
-
86
-
87
-
88
-
89
-
90
-
91
-
92
-
93
-
94
-
95
-
96
-
97
-
98
-
99
-
100
-
101
-
102
-
103
-
104
-
105
-
106
-
107
-
108
-
109
-
110
-
111
-
112
-
113
-
114
-
115
-
116
-
117
-
118
-
119
-
120
-
121
-
122
-
123
-
124
-
125
-
126
-
127
-
128
-
129
-
130
-
131
-
132
-
133
-
134
-
135
-
 136
136 -
 137
137 -
 138
138 -
 139
139 -
 140
140 -
 141
141 -
 142
142 -
 143
143 -
 144
144 -
 145
145 -
 146
146 -
147
-
148
-
149
-
150
-
151
-
152
-
153
-
154
-
155
-
156
-
157
-
158
-
159
-
160
-
161
-
162
-
163
-
164
-
165
-
166
-
167
-
168
-
169
-
170
-
171
-
172
-
173
-
174
-
175
-
176
-
177
-
178
-
179
-
180
-
181
-
182
-
183
-
184
-
185
-
186
-
187
-
188
-
189
-
190
-
191
-
192
-
193
-
194
-
195
-
196
-
197
-
198
-
199
-
200
-
201
-
202
-
203
-
204
-
205
-
206
-
207
-
208
-
209
-
210
-
211
-
212
-
213
-
214
-
215
-
216
-
217
-
218
-
219
-
220
-
221
-
222
-
223
-
224
-
225
-
226
-
227
-
228
-
229
-
230
-
231
-
232
-
233
-
234
-
235
-
236
-
237
-
238
-
239
-
240
-
241
-
242
-
243
-
244
-
245
-
246
-
247
-
248
-
249
-
250
-
251
-
252
 |
 |