IBM 6000R Hardware Maintenance Manual - Page 89
Using IBM ServeRAID, Manual pertaining to the specific RAID adapter
 |
UPC - 087944534341
View all IBM 6000R manuals
Add to My Manuals
Save this manual to your list of manuals |
Page 89 highlights
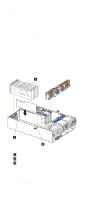
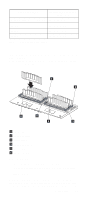
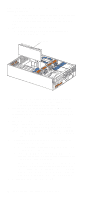
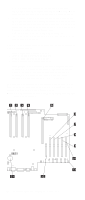
1 Filler panel 2 Drive tray assembly 3 Drive tray handle (open position) To install a drive in a hot-swap bay: 1. Review "Before you begin" on page 63. 2. Unlock and open the server front door. Attention: To maintain proper system cooling, do not operate the server for more than 10 minutes without either a drive or a filler panel installed for each bay. 3. Remove the filler panel from one of the empty hot-swap bays by inserting your finger into the depression at the left side of the filler panel and pulling it away from the server. 4. Install the hard disk drive in the hot-swap bay: a. Ensure that the tray handle is open (that is, perpendicular to the drive). b. Align the drive assembly so that it engages the guide rails in the bay. c. Gently push the drive assembly into the bay until the drive stops. d. Push the tray handle to the closed (locked) position. e. Check the hard disk drive status indicator to verify that the hard disk drive is operating properly. If the amber hard-disk status light for a drive is lit continuously, that individual drive is faulty and needs to be replaced. If the green hard-disk activity light is flashing, the drive is being accessed. Note: If the server has a ServeRAID controller or adapter installed, you might need to reconfigure the disk arrays after installing hard disk drives. Refer to Using IBM ServeRAID on the Documentation CD or the Hardware Maintenance Manual pertaining to the specific RAID adapter for information. Installing options 77
-
 1
1 -
2
-
3
-
4
-
5
-
6
-
7
-
8
-
9
-
10
-
11
-
12
-
13
-
14
-
15
-
16
-
17
-
18
-
19
-
20
-
21
-
22
-
23
-
24
-
25
-
26
-
27
-
28
-
29
-
30
-
31
-
32
-
33
-
34
-
35
-
36
-
37
-
38
-
39
-
40
-
41
-
42
-
43
-
44
-
45
-
46
-
47
-
48
-
49
-
50
-
51
-
52
-
53
-
54
-
55
-
56
-
57
-
58
-
59
-
60
-
61
-
62
-
63
-
64
-
65
-
66
-
67
-
68
-
69
-
70
-
71
-
72
-
73
-
74
-
75
-
76
-
77
-
78
-
79
-
80
-
81
-
82
-
83
-
 84
84 -
 85
85 -
 86
86 -
 87
87 -
 88
88 -
 89
89 -
 90
90 -
 91
91 -
 92
92 -
 93
93 -
 94
94 -
95
-
96
-
97
-
98
-
99
-
100
-
101
-
102
-
103
-
104
-
105
-
106
-
107
-
108
-
109
-
110
-
111
-
112
-
113
-
114
-
115
-
116
-
117
-
118
-
119
-
120
-
121
-
122
-
123
-
124
-
125
-
126
-
127
-
128
-
129
-
130
-
131
-
132
-
133
-
134
-
135
-
136
-
137
-
138
-
139
-
140
-
141
-
142
-
143
-
144
-
145
-
146
-
147
-
148
-
149
-
150
-
151
-
152
-
153
-
154
-
155
-
156
-
157
-
158
-
159
-
160
-
161
-
162
-
163
-
164
-
165
-
166
-
167
-
168
-
169
-
170
-
171
-
172
-
173
-
174
-
175
-
176
-
177
-
178
-
179
-
180
-
181
-
182
-
183
-
184
-
185
-
186
-
187
-
188
-
189
-
190
-
191
-
192
-
193
-
194
-
195
-
196
-
197
-
198
-
199
-
200
-
201
-
202
-
203
-
204
-
205
-
206
-
207
-
208
-
209
-
210
-
211
-
212
-
213
-
214
-
215
-
216
-
217
-
218
-
219
-
220
-
221
-
222
-
223
-
224
-
225
-
226
-
227
-
228
-
229
-
230
-
231
-
232
-
233
-
234
-
235
-
236
-
237
-
238
-
239
-
240
-
241
-
242
-
243
-
244
-
245
-
246
-
247
-
248
-
249
-
250
-
251
-
252
 |
 |
