IBM 6000R Hardware Maintenance Manual - Page 171
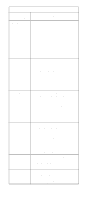
Check the DC Good LED on, Check System Error Log
 |
UPC - 087944534341
View all IBM 6000R manuals
Add to My Manuals
Save this manual to your list of manuals |
Page 171 highlights
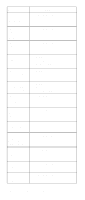
Note: The System Error LED will also be on. Diagnostic Panel LED FRU/Action NMI LED on Note: NMI LED can only be turned off by removing ac power from system, then restoring ac power. 1. Reboot the system. 2. Check the System Error Log. PCI A LED on 1. Check System Error Log for additional information. 2. PCI card in slot 1. See "System board component locations" on page 54. 3. Remove all PCI adapters from slots 1-6. 4. Replace failing PCI adapter. 5. System Board. PCI B LED on 1. Check System Error Log for additional information. 2. PCI card in slots 2-4. See "System board component locations" on page 54. 3. Remove all PCI adapters from slots 1-6. 4. Replace failing PCI adapter. 5. System Board. PCI C LED on 1. Check System Error Log for additional information. 2. PCI card in slots 5-6. See "System board component locations" on page 54. 3. Remove all PCI adapters from slots 1-6. 4. Replace failing PCI adapter. 5. System Board. PS1 LED on 1. Check the DC Good LED on power supply 1. If off, replace power supply 1. 2. Power Backplane. PS2 LED on 1. Check the DC Good LED on power supply 2. If off, replace power supply 2. 2. Power Backplane. Symptom-to-FRU index 159
-
 1
1 -
2
-
3
-
4
-
5
-
6
-
7
-
8
-
9
-
10
-
11
-
12
-
13
-
14
-
15
-
16
-
17
-
18
-
19
-
20
-
21
-
22
-
23
-
24
-
25
-
26
-
27
-
28
-
29
-
30
-
31
-
32
-
33
-
34
-
35
-
36
-
37
-
38
-
39
-
40
-
41
-
42
-
43
-
44
-
45
-
46
-
47
-
48
-
49
-
50
-
51
-
52
-
53
-
54
-
55
-
56
-
57
-
58
-
59
-
60
-
61
-
62
-
63
-
64
-
65
-
66
-
67
-
68
-
69
-
70
-
71
-
72
-
73
-
74
-
75
-
76
-
77
-
78
-
79
-
80
-
81
-
82
-
83
-
84
-
85
-
86
-
87
-
88
-
89
-
90
-
91
-
92
-
93
-
94
-
95
-
96
-
97
-
98
-
99
-
100
-
101
-
102
-
103
-
104
-
105
-
106
-
107
-
108
-
109
-
110
-
111
-
112
-
113
-
114
-
115
-
116
-
117
-
118
-
119
-
120
-
121
-
122
-
123
-
124
-
125
-
126
-
127
-
128
-
129
-
130
-
131
-
132
-
133
-
134
-
135
-
136
-
137
-
138
-
139
-
140
-
141
-
142
-
143
-
144
-
145
-
146
-
147
-
148
-
149
-
150
-
151
-
152
-
153
-
154
-
155
-
156
-
157
-
158
-
159
-
160
-
161
-
162
-
163
-
164
-
165
-
 166
166 -
 167
167 -
 168
168 -
 169
169 -
 170
170 -
 171
171 -
 172
172 -
 173
173 -
 174
174 -
 175
175 -
 176
176 -
177
-
178
-
179
-
180
-
181
-
182
-
183
-
184
-
185
-
186
-
187
-
188
-
189
-
190
-
191
-
192
-
193
-
194
-
195
-
196
-
197
-
198
-
199
-
200
-
201
-
202
-
203
-
204
-
205
-
206
-
207
-
208
-
209
-
210
-
211
-
212
-
213
-
214
-
215
-
216
-
217
-
218
-
219
-
220
-
221
-
222
-
223
-
224
-
225
-
226
-
227
-
228
-
229
-
230
-
231
-
232
-
233
-
234
-
235
-
236
-
237
-
238
-
239
-
240
-
241
-
242
-
243
-
244
-
245
-
246
-
247
-
248
-
249
-
250
-
251
-
252
 |
 |
