IBM 6000R Hardware Maintenance Manual - Page 90
Installing memory-module kits, Install only 3.3 V, 168-pin, 8-byte, 100 MHz, PCI
 |
UPC - 087944534341
View all IBM 6000R manuals
Add to My Manuals
Save this manual to your list of manuals |
Page 90 highlights
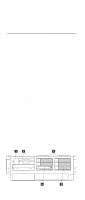
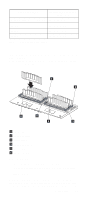
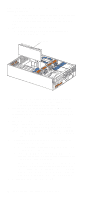
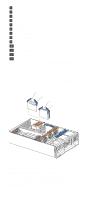
Installing memory-module kits The illustrations in this document might differ slightly from your hardware. Adding memory to the server is an easy way to make programs run faster. You can increase the amount of memory in the server by installing memory-module options. You must install a bank of four matched dual-inline memory modules (DIMMs). Notes: 1. The DIMM options available for the server are 128 MB, 256 MB, 512MB, and 1 GB. The server supports a minimum of 512 MB (4 x 128MB) and a maximum of 16 GB (16 x 1GB) of system memory. 2. When 4 GB of memory is installed in the server, the amount of usable memory will be reduced depending on the system configuration. A certain amount of memory must be reserved below 4 GB for system resources. A second reduction in the usable memory is made when 16 GB of memory is installed. 3. The server comes with a minimum of 512 MB (4x128) memory installed in bank 1. When you install additional DIMMs, be sure to follow the DIMM population sequence in Table 11 on page 79. 4. All the DIMMs installed in a bank must be the same size, speed, type, and technology. You can mix compatible DIMMs from various manufacturers. 5. All the banks do not have to contain DIMMs of the same size, speed, type, and technology. You can mix compatible DIMMs from various manufacturers. 6. The memory board contains 16 DIMM connectors and utilizes 4-way memory interleaving. See Table 11 on page 79. The 4-way memory interleave technology in the server requires that you install DIMMs in all four connectors in each populated bank. 7. Install only 3.3 V, 168-pin, 8-byte, 100 MHz, PCI, PC100-322-622R, registered synchronous dynamic random-access memory (SDRAM) with error correcting code (ECC), DIMMs. Only 100MHz, 72-bit, registered, synchronous, x4 SDRAM configuration DIMM memory is supported for the 128MB, 256 MB, 512 MB, and 1GB DIMMs. 8. Installing or removing DIMMs changes the configuration information in the server. Therefore, after installing or removing a bank of DIMMs, you must save the new configuration information using the Configuration/Setup Utility program. When you restart the server, the system displays a message indicating that the memory configuration has changed. Start the Configuration/Setup Utility program and select Save Settings. See "Configuring the server" on page 43 for more information. Install the DIMMs in the order provided in Table 11 on page 79. 78 Netfinity 6000R Type 8682 Models 1RY, 2RY
-
 1
1 -
2
-
3
-
4
-
5
-
6
-
7
-
8
-
9
-
10
-
11
-
12
-
13
-
14
-
15
-
16
-
17
-
18
-
19
-
20
-
21
-
22
-
23
-
24
-
25
-
26
-
27
-
28
-
29
-
30
-
31
-
32
-
33
-
34
-
35
-
36
-
37
-
38
-
39
-
40
-
41
-
42
-
43
-
44
-
45
-
46
-
47
-
48
-
49
-
50
-
51
-
52
-
53
-
54
-
55
-
56
-
57
-
58
-
59
-
60
-
61
-
62
-
63
-
64
-
65
-
66
-
67
-
68
-
69
-
70
-
71
-
72
-
73
-
74
-
75
-
76
-
77
-
78
-
79
-
80
-
81
-
82
-
83
-
84
-
 85
85 -
 86
86 -
 87
87 -
 88
88 -
 89
89 -
 90
90 -
 91
91 -
 92
92 -
 93
93 -
 94
94 -
 95
95 -
96
-
97
-
98
-
99
-
100
-
101
-
102
-
103
-
104
-
105
-
106
-
107
-
108
-
109
-
110
-
111
-
112
-
113
-
114
-
115
-
116
-
117
-
118
-
119
-
120
-
121
-
122
-
123
-
124
-
125
-
126
-
127
-
128
-
129
-
130
-
131
-
132
-
133
-
134
-
135
-
136
-
137
-
138
-
139
-
140
-
141
-
142
-
143
-
144
-
145
-
146
-
147
-
148
-
149
-
150
-
151
-
152
-
153
-
154
-
155
-
156
-
157
-
158
-
159
-
160
-
161
-
162
-
163
-
164
-
165
-
166
-
167
-
168
-
169
-
170
-
171
-
172
-
173
-
174
-
175
-
176
-
177
-
178
-
179
-
180
-
181
-
182
-
183
-
184
-
185
-
186
-
187
-
188
-
189
-
190
-
191
-
192
-
193
-
194
-
195
-
196
-
197
-
198
-
199
-
200
-
201
-
202
-
203
-
204
-
205
-
206
-
207
-
208
-
209
-
210
-
211
-
212
-
213
-
214
-
215
-
216
-
217
-
218
-
219
-
220
-
221
-
222
-
223
-
224
-
225
-
226
-
227
-
228
-
229
-
230
-
231
-
232
-
233
-
234
-
235
-
236
-
237
-
238
-
239
-
240
-
241
-
242
-
243
-
244
-
245
-
246
-
247
-
248
-
249
-
250
-
251
-
252
 |
 |
