IBM 6000R Hardware Maintenance Manual - Page 36
Recovering BIOS, Turn off the server and peripheral devices
 |
UPC - 087944534341
View all IBM 6000R manuals
Add to My Manuals
Save this manual to your list of manuals |
Page 36 highlights
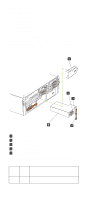
power on (see "Minimum operating requirements" on page 187). 4. Reconnect the AC cord and power on the system. If the system powers up successfully, replace adapters and devices one at a time until the problem is isolated. If system does not power up from minimal configuration, replace FRUs of minimal configuration one at a time until the problem is isolated. To use this method it is important to know the minimum configuration required for a system to power up (see page 187). For specific problems, see "Power error messages" on page 183. Recovering BIOS If the BIOS code in the server has become corrupted, such as from a power failure during a flash update, you can recover the BIOS using the recovery boot block and a BIOS flash diskette. Note: You can obtain a BIOS flash diskette from one of the following sources: • Use the ServerGuide program to make a BIOS flash diskette. • Download a BIOS flash diskette from the World Wide Web. Go to http://www.pc.ibm.com/support/, select IBM Server Support, and make the selections for the server. The flash memory of the server consists of a primary page and a backup page. The J14 jumper controls which page is used to start the server. If the BIOS in the primary page is corrupted, you can use the backup page to start the server; then boot the BIOS Flash Diskette to restore the BIOS to the primary page. To recover the BIOS: 1. Turn off the server and peripheral devices and disconnect all external cables and power cords; then, remove the cover. 2. Locate jumper J14 on the processor board (see "System board jumpers" on page 56). 3. Move J14 to pins 1 and 2 to enable secondary boot block page. 4. Insert the BIOS flash diskette into the diskette drive. 5. Restart the server. 6. The system begins the power-on self-test (POST). Select 1 - Update POST/BIOS from the menu that contains various flash (update) options. 7. When you are asked if you would like to move the current POST/BIOS image to the backup ROM location, type N. Attention: Typing Y will copy the corrupted BIOS into the secondary page. 24 Netfinity 6000R Type 8682 Models 1RY, 2RY
-
 1
1 -
2
-
3
-
4
-
5
-
6
-
7
-
8
-
9
-
10
-
11
-
12
-
13
-
14
-
15
-
16
-
17
-
18
-
19
-
20
-
21
-
22
-
23
-
24
-
25
-
26
-
27
-
28
-
29
-
30
-
 31
31 -
 32
32 -
 33
33 -
 34
34 -
 35
35 -
 36
36 -
 37
37 -
 38
38 -
 39
39 -
 40
40 -
 41
41 -
42
-
43
-
44
-
45
-
46
-
47
-
48
-
49
-
50
-
51
-
52
-
53
-
54
-
55
-
56
-
57
-
58
-
59
-
60
-
61
-
62
-
63
-
64
-
65
-
66
-
67
-
68
-
69
-
70
-
71
-
72
-
73
-
74
-
75
-
76
-
77
-
78
-
79
-
80
-
81
-
82
-
83
-
84
-
85
-
86
-
87
-
88
-
89
-
90
-
91
-
92
-
93
-
94
-
95
-
96
-
97
-
98
-
99
-
100
-
101
-
102
-
103
-
104
-
105
-
106
-
107
-
108
-
109
-
110
-
111
-
112
-
113
-
114
-
115
-
116
-
117
-
118
-
119
-
120
-
121
-
122
-
123
-
124
-
125
-
126
-
127
-
128
-
129
-
130
-
131
-
132
-
133
-
134
-
135
-
136
-
137
-
138
-
139
-
140
-
141
-
142
-
143
-
144
-
145
-
146
-
147
-
148
-
149
-
150
-
151
-
152
-
153
-
154
-
155
-
156
-
157
-
158
-
159
-
160
-
161
-
162
-
163
-
164
-
165
-
166
-
167
-
168
-
169
-
170
-
171
-
172
-
173
-
174
-
175
-
176
-
177
-
178
-
179
-
180
-
181
-
182
-
183
-
184
-
185
-
186
-
187
-
188
-
189
-
190
-
191
-
192
-
193
-
194
-
195
-
196
-
197
-
198
-
199
-
200
-
201
-
202
-
203
-
204
-
205
-
206
-
207
-
208
-
209
-
210
-
211
-
212
-
213
-
214
-
215
-
216
-
217
-
218
-
219
-
220
-
221
-
222
-
223
-
224
-
225
-
226
-
227
-
228
-
229
-
230
-
231
-
232
-
233
-
234
-
235
-
236
-
237
-
238
-
239
-
240
-
241
-
242
-
243
-
244
-
245
-
246
-
247
-
248
-
249
-
250
-
251
-
252
 |
 |