Samsung SGH-T959 This Document Is For The T-mobile Sgh-t959 (vibrant) Only. ( - Page 174
Privacy Settings, Advanced Settings - backup
 |
UPC - 610214622631
View all Samsung SGH-T959 manuals
Add to My Manuals
Save this manual to your list of manuals |
Page 174 highlights
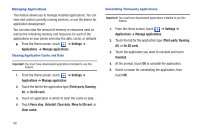
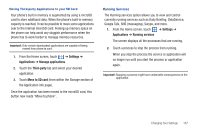
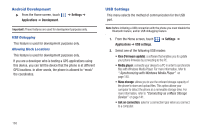
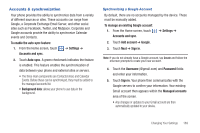
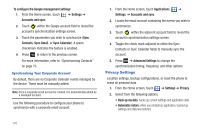
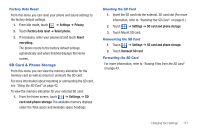
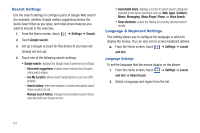
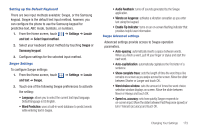
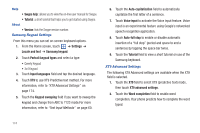
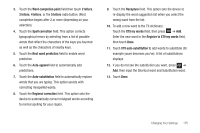
To configure the Google management settings: 1. From the Home screen, touch ➔ Settings ➔ Accounts and sync. 2. Touch within the Google account field to reveal the account's synchronization settings screen. 3. Touch the parameters you wish to synchronize (Sync Contacts, Sync Gmail, or Sync Calendar). A green checkmark indicates the feature is enabled. 4. Press to return to the previous screen. For more information, refer to "Synchronizing Contacts" on page 75. Synchronizing Your Corporate Account By default, there are no Corporate Calendar events managed by the device. These must be manually added. Note: Once a corporate email account is created, it is automatically added as a managed account. Use the following procedure to configure your phone to synchronize with a corporate email account. 1. From the Home screen, touch Applications ➔ Settings ➔ Accounts and sync. 2. Locate the email account containing the events you wish to synchronize. 3. Touch within the adjacent account field to reveal the account's synchronization settings screen. 4. Toggle the check mark adjacent to either the Sync Contacts or Sync Calendar fields to manually sync the account. 5. Press ➔ Advanced Settings to change the synchronization timing, frequency, and other options. Privacy Settings Location settings, backup configurations, or reset the phone to erase all personal data. 1. From the Home screen, touch ➔ Settings ➔ Privacy. 2. Select from the following options: • Back up my data: backs up current settings and application data. • Automatic restore: when you reinstall an application, backed up settings and data are restored. 170
-
 1
1 -
2
-
3
-
4
-
5
-
6
-
7
-
8
-
9
-
10
-
11
-
12
-
13
-
14
-
15
-
16
-
17
-
18
-
19
-
20
-
21
-
22
-
23
-
24
-
25
-
26
-
27
-
28
-
29
-
30
-
31
-
32
-
33
-
34
-
35
-
36
-
37
-
38
-
39
-
40
-
41
-
42
-
43
-
44
-
45
-
46
-
47
-
48
-
49
-
50
-
51
-
52
-
53
-
54
-
55
-
56
-
57
-
58
-
59
-
60
-
61
-
62
-
63
-
64
-
65
-
66
-
67
-
68
-
69
-
70
-
71
-
72
-
73
-
74
-
75
-
76
-
77
-
78
-
79
-
80
-
81
-
82
-
83
-
84
-
85
-
86
-
87
-
88
-
89
-
90
-
91
-
92
-
93
-
94
-
95
-
96
-
97
-
98
-
99
-
100
-
101
-
102
-
103
-
104
-
105
-
106
-
107
-
108
-
109
-
110
-
111
-
112
-
113
-
114
-
115
-
116
-
117
-
118
-
119
-
120
-
121
-
122
-
123
-
124
-
125
-
126
-
127
-
128
-
129
-
130
-
131
-
132
-
133
-
134
-
135
-
136
-
137
-
138
-
139
-
140
-
141
-
142
-
143
-
144
-
145
-
146
-
147
-
148
-
149
-
150
-
151
-
152
-
153
-
154
-
155
-
156
-
157
-
158
-
159
-
160
-
161
-
162
-
163
-
164
-
165
-
166
-
167
-
168
-
 169
169 -
 170
170 -
 171
171 -
 172
172 -
 173
173 -
 174
174 -
 175
175 -
 176
176 -
 177
177 -
 178
178 -
 179
179 -
180
-
181
-
182
-
183
-
184
-
185
-
186
-
187
-
188
-
189
-
190
-
191
-
192
-
193
-
194
-
195
-
196
-
197
-
198
-
199
-
200
-
201
-
202
-
203
-
204
-
205
-
206
-
207
-
208
-
209
-
210
-
211
-
212
-
213
-
214
-
215
-
216
-
217
-
218
 |
 |