Samsung SM-G900R4 User Manual Us Cellular Sm-g900r4 Galaxy S 5 Kit Kat English - Page 171
Using the Camera, Change Camera Mode
 |
View all Samsung SM-G900R4 manuals
Add to My Manuals
Save this manual to your list of manuals |
Page 171 highlights
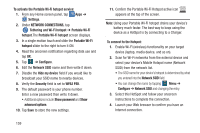
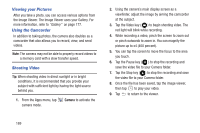
Using the Camera Taking pictures with your device's built-in camera is as simple as choosing a subject, pointing the camera, then pressing the camera key. Ⅲ From the Apps menu, tap camera mode. Camera to activate the 1 2 3 4 5 6 7 8 9 1. Front Facing Camera 2. Camera Mode 3. Record Video 4. Settings Shortcuts 5. Camera button 6. Change Camera Mode 7. Settings 8. Viewfinder 9. Image Viewer Note: When taking a photo in direct sunlight or in bright conditions, shadows may appear on the photo. To use the camera: 1. Using the phone's main display screen as a viewfinder, adjust the image by aiming the camera at the subject. 2. Before you take a picture, pinch the screen to zoom out or pinch outwards to zoom in. You can magnify the picture up to x4 (400 percent). 3. If desired, before taking the photo, you can tap on-screen icons to access various camera options and settings. 4. You can also tap the screen to move the focus to the area you touch. 5. Press the Camera button until the shutter sounds. (The picture is automatically stored within your designated storage location. If no microSD is installed, all pictures are stored on the Phone.) Applications 164
-
 1
1 -
2
-
3
-
4
-
5
-
6
-
7
-
8
-
9
-
10
-
11
-
12
-
13
-
14
-
15
-
16
-
17
-
18
-
19
-
20
-
21
-
22
-
23
-
24
-
25
-
26
-
27
-
28
-
29
-
30
-
31
-
32
-
33
-
34
-
35
-
36
-
37
-
38
-
39
-
40
-
41
-
42
-
43
-
44
-
45
-
46
-
47
-
48
-
49
-
50
-
51
-
52
-
53
-
54
-
55
-
56
-
57
-
58
-
59
-
60
-
61
-
62
-
63
-
64
-
65
-
66
-
67
-
68
-
69
-
70
-
71
-
72
-
73
-
74
-
75
-
76
-
77
-
78
-
79
-
80
-
81
-
82
-
83
-
84
-
85
-
86
-
87
-
88
-
89
-
90
-
91
-
92
-
93
-
94
-
95
-
96
-
97
-
98
-
99
-
100
-
101
-
102
-
103
-
104
-
105
-
106
-
107
-
108
-
109
-
110
-
111
-
112
-
113
-
114
-
115
-
116
-
117
-
118
-
119
-
120
-
121
-
122
-
123
-
124
-
125
-
126
-
127
-
128
-
129
-
130
-
131
-
132
-
133
-
134
-
135
-
136
-
137
-
138
-
139
-
140
-
141
-
142
-
143
-
144
-
145
-
146
-
147
-
148
-
149
-
150
-
151
-
152
-
153
-
154
-
155
-
156
-
157
-
158
-
159
-
160
-
161
-
162
-
163
-
164
-
165
-
 166
166 -
 167
167 -
 168
168 -
 169
169 -
 170
170 -
 171
171 -
 172
172 -
 173
173 -
 174
174 -
 175
175 -
 176
176 -
177
-
178
-
179
-
180
-
181
-
182
-
183
-
184
-
185
-
186
-
187
-
188
-
189
-
190
-
191
-
192
-
193
-
194
-
195
-
196
-
197
-
198
-
199
-
200
-
201
-
202
-
203
-
204
-
205
-
206
-
207
-
208
-
209
-
210
-
211
-
212
-
213
-
214
-
215
-
216
-
217
-
218
-
219
-
220
-
221
-
222
 |
 |