Yamaha QY700 Owner's Manual - Page 102
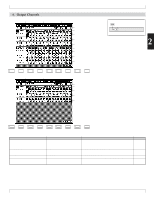
Track numbers, track name, and key, board track, Track status data, SOLO, MUTE
 |
View all Yamaha QY700 manuals
Add to My Manuals
Save this manual to your list of manuals |
Page 102 highlights
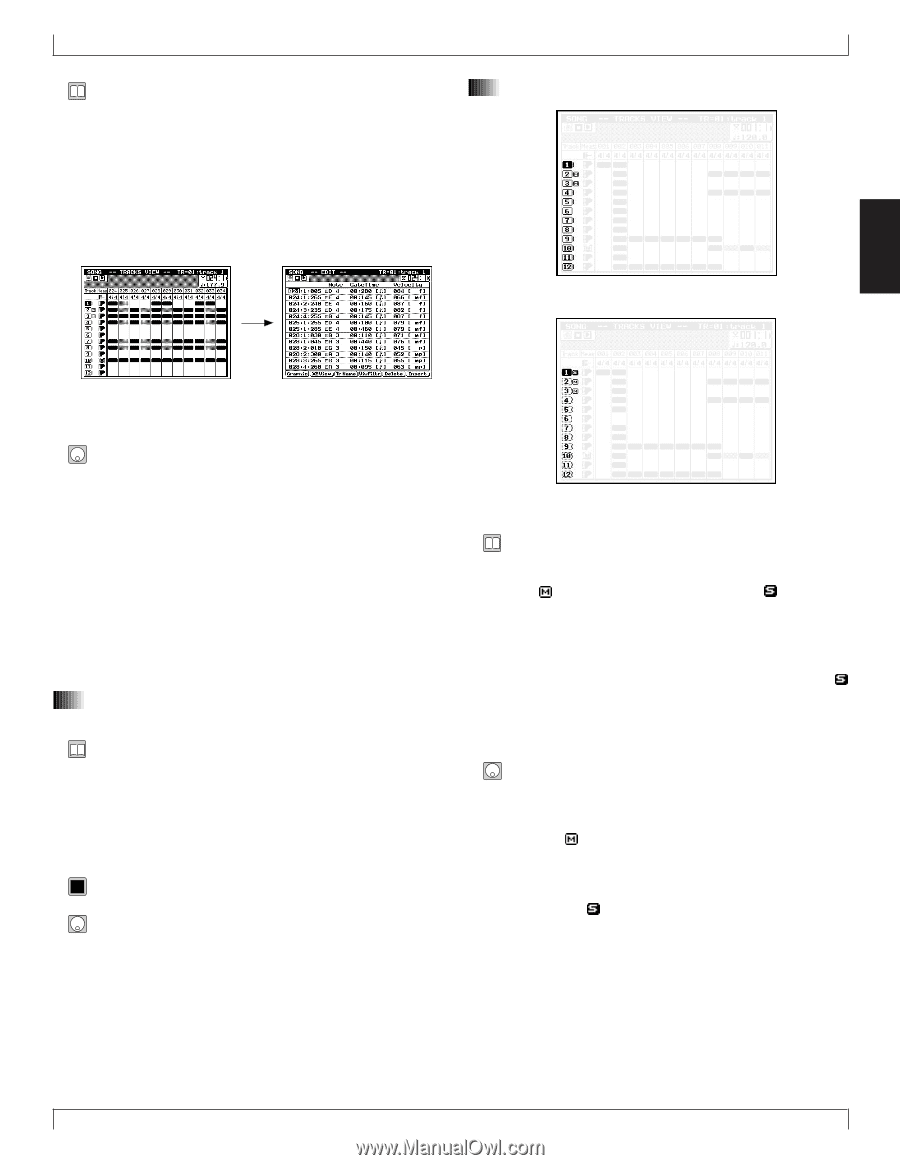
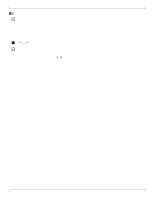
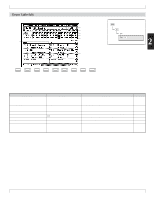
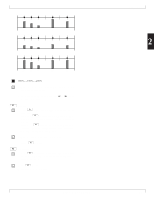
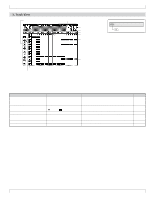
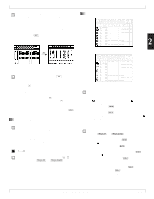
• The Track View feature lets you see which measures of which tracks contain recorded data. This makes it easy to check the general sound structure of each track, or of the entire song. • A gray rectangle indicates that the measure contains between 1 and 4 recorded events. A black rectangle means that the measure contains more than 4 events. • If you press e, the QY700 will display a list of the events in the currently selected track and measure. e 3. Track View 2. Track status (data, SOLO, MUTE) 2 1. At the SONG PLAY screen, press 2 (TrView). w The QY700 displays the Track view screen. 2. Press p to begin song playback. w The PLAY indicator begins flashing, and the QY700 starts playback. 3. If you like, you can press s to stop playback and freeze the screen. You can then press p to resume playback. 4. When you are finished viewing the tracks, press e to return to the SONG PLAY screen. 1. Track numbers, track name, and keyboard track • The numbers running down the left of the screen identify the different sequence tracks (tracks 1 to 32). Each track is identified by its track number. (You can scroll the display using the up/down cursor keys.) • The highlighted track number identifies the keyboard track. • The keyboard track is internally connected to the QY700 controller section. 0101 1101 1,...,32 • You can set the keyboard track using the u/d cursor key, or the u or d key. • The keyboard track is indicated by highlight. • The space to the immediate right of the track number shows you the track's status. If there is no entry, then the track is empty. A [| ] mark indicates that the track contains data. An means that the track is muted, while an means that it is set to SOLO. • You can use the m key to mute one or more tracks. (See the procedure below.) • You can use the s key to select a track for solo play, so that playback from all other tracks is switched off. An symbol appears to indicate that the track is selected for solo play, and all [| ] markers change appearance to indicate that these other tracks are temporarily switched off. 1. First select a track using the up or down cursor key or the u or d key. 2. To mute the track: Press the m key once, so that the appears. To release a mute: Press m once again. 3. To select the track for SOLO play : Press s, so that the appears. To deselect SOLO play, press s once again. • You can easily use this feature to listen to your tracks one by one. Begin by playing one of the tracks solo, then move the cursor to another track and press s again. Note that each time you press s, any previous SOLO selection is automatically canceled. Chapter 2. SONG MODE 101
-
 1
1 -
2
-
3
-
4
-
5
-
6
-
7
-
8
-
9
-
10
-
11
-
12
-
13
-
14
-
15
-
16
-
17
-
18
-
19
-
20
-
21
-
22
-
23
-
24
-
25
-
26
-
27
-
28
-
29
-
30
-
31
-
32
-
33
-
34
-
35
-
36
-
37
-
38
-
39
-
40
-
41
-
42
-
43
-
44
-
45
-
46
-
47
-
48
-
49
-
50
-
51
-
52
-
53
-
54
-
55
-
56
-
57
-
58
-
59
-
60
-
61
-
62
-
63
-
64
-
65
-
66
-
67
-
68
-
69
-
70
-
71
-
72
-
73
-
74
-
75
-
76
-
77
-
78
-
79
-
80
-
81
-
82
-
83
-
84
-
85
-
86
-
87
-
88
-
89
-
90
-
91
-
92
-
93
-
94
-
95
-
96
-
 97
97 -
 98
98 -
 99
99 -
 100
100 -
 101
101 -
 102
102 -
 103
103 -
 104
104 -
 105
105 -
 106
106 -
 107
107 -
108
-
109
-
110
-
111
-
112
-
113
-
114
-
115
-
116
-
117
-
118
-
119
-
120
-
121
-
122
-
123
-
124
-
125
-
126
-
127
-
128
-
129
-
130
-
131
-
132
-
133
-
134
-
135
-
136
-
137
-
138
-
139
-
140
-
141
-
142
-
143
-
144
-
145
-
146
-
147
-
148
-
149
-
150
-
151
-
152
-
153
-
154
-
155
-
156
-
157
-
158
-
159
-
160
-
161
-
162
-
163
-
164
-
165
-
166
-
167
-
168
-
169
-
170
-
171
-
172
-
173
-
174
-
175
-
176
-
177
-
178
-
179
-
180
-
181
-
182
-
183
-
184
-
185
-
186
-
187
-
188
-
189
-
190
-
191
-
192
-
193
-
194
-
195
-
196
-
197
-
198
-
199
-
200
-
201
-
202
-
203
-
204
-
205
-
206
-
207
-
208
-
209
-
210
-
211
-
212
-
213
-
214
-
215
-
216
-
217
-
218
-
219
-
220
-
221
-
222
-
223
-
224
-
225
-
226
-
227
-
228
-
229
-
230
-
231
-
232
-
233
-
234
-
235
-
236
-
237
-
238
-
239
-
240
-
241
-
242
-
243
-
244
-
245
-
246
-
247
-
248
-
249
-
250
-
251
-
252
-
253
-
254
-
255
-
256
-
257
-
258
-
259
-
260
-
261
-
262
-
263
-
264
-
265
-
266
-
267
-
268
-
269
-
270
-
271
-
272
-
273
-
274
-
275
-
276
-
277
-
278
-
279
-
280
-
281
-
282
-
283
-
284
-
285
-
286
-
287
-
288
-
289
-
290
-
291
-
292
-
293
-
294
-
295
-
296
-
297
-
298
-
299
-
300
-
301
-
302
-
303
-
304
-
305
-
306
-
307
-
308
-
309
-
310
-
311
-
312
-
313
-
314
-
315
-
316
-
317
-
318
-
319
-
320
-
321
-
322
-
323
-
324
-
325
-
326
-
327
-
328
-
329
-
330
-
331
-
332
-
333
-
334
 |
 |