Yamaha QY700 Owner's Manual - Page 309
D5] Song SMF
 |
View all Yamaha QY700 manuals
Add to My Manuals
Save this manual to your list of manuals |
Page 309 highlights
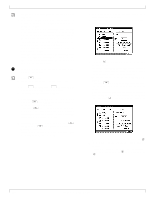
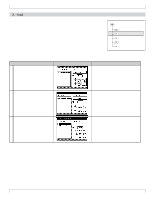
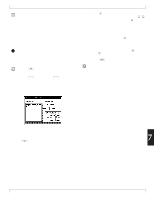
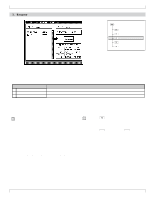
1. Save • The Save operation saves data from internal memory to floppy disk. • Select one of five types of data to be saved. For details on the different file types, refer to "Types of file used by the QY700." (→ p.304) • The "DISK INFORMATION" area located in the lower right of the screen shows the total number of files on the floppy disk, the total size of all files, and the free area on the disk. The area below this shows the number of files of the selected type that are on the floppy disk, and the total size. Refer to this information when saving your data. • Before a floppy disk can be used to save data, it must first be formatted. (→ p.316) • If the size of the data to be saved is greater than the free area of the floppy disk, a message of "Disk Full" will appear. If this occurs, delete unwanted files from the disk, and try the Save operation once again. • Be careful that you do not accidentally delete important data from the disk. 1. Press 1 (Save). w The top line of the display will indicate "DISK -- SAVE --". 2. Press d [D1] (All Data) - d [D5] (Song SMF) to select the type of data that will be saved. w The corresponding Save page will appear. 3. If Song ESEQ or Song SMF was selected as the data type, use 4 (XG HEADR) to specify whether or not an XG header will be added. If you press 4 (XG HEADR) to highlight the display, 1 - 2 measures of setup data will be added to the beginning of the playback data when it is saved. For details on the XG header, refer to "XG header" (→ p.306). 4. If Song SMF was selected as the data type, use 1 (FORMAT0) or 2 (FORMAT1) to select the format of the Standard MIDI File. For details on Standard MIDI File formats, refer to "Types of file used by the QY700". (→ p.304) 5. In the left side of the display, select the style or song number that you wish to save. • If you are saving All Data, there will not be a number selection at this point. 6. Press the r key to move the cursor to the right, and specify a filename. • The filename is what distinguishes between files on the same floppy disk. It is not possible to specify the same filename for two or more different files on the same disk. • For character input, refer to "Chapter 1. BASIC CONCEPTS". (→ p.53) • If you press 6 (DeflName), the name previously specified for the selected of song or style will be copied to the filename. • When you access the Save page, the filename display will show the name of the file that was saved last. This means that if you press e without modifying the filename, the previous file will be overwritten. 7. Make sure that the settings are correct, and press e. w The display will indicate "Executing...", and the data will be saved. • If the data will be overwritten, a confirmation message will appear. To execute saving, press y. To cancel saving, press n . 308 Chapter 7. DISK MODE
-
 1
1 -
2
-
3
-
4
-
5
-
6
-
7
-
8
-
9
-
10
-
11
-
12
-
13
-
14
-
15
-
16
-
17
-
18
-
19
-
20
-
21
-
22
-
23
-
24
-
25
-
26
-
27
-
28
-
29
-
30
-
31
-
32
-
33
-
34
-
35
-
36
-
37
-
38
-
39
-
40
-
41
-
42
-
43
-
44
-
45
-
46
-
47
-
48
-
49
-
50
-
51
-
52
-
53
-
54
-
55
-
56
-
57
-
58
-
59
-
60
-
61
-
62
-
63
-
64
-
65
-
66
-
67
-
68
-
69
-
70
-
71
-
72
-
73
-
74
-
75
-
76
-
77
-
78
-
79
-
80
-
81
-
82
-
83
-
84
-
85
-
86
-
87
-
88
-
89
-
90
-
91
-
92
-
93
-
94
-
95
-
96
-
97
-
98
-
99
-
100
-
101
-
102
-
103
-
104
-
105
-
106
-
107
-
108
-
109
-
110
-
111
-
112
-
113
-
114
-
115
-
116
-
117
-
118
-
119
-
120
-
121
-
122
-
123
-
124
-
125
-
126
-
127
-
128
-
129
-
130
-
131
-
132
-
133
-
134
-
135
-
136
-
137
-
138
-
139
-
140
-
141
-
142
-
143
-
144
-
145
-
146
-
147
-
148
-
149
-
150
-
151
-
152
-
153
-
154
-
155
-
156
-
157
-
158
-
159
-
160
-
161
-
162
-
163
-
164
-
165
-
166
-
167
-
168
-
169
-
170
-
171
-
172
-
173
-
174
-
175
-
176
-
177
-
178
-
179
-
180
-
181
-
182
-
183
-
184
-
185
-
186
-
187
-
188
-
189
-
190
-
191
-
192
-
193
-
194
-
195
-
196
-
197
-
198
-
199
-
200
-
201
-
202
-
203
-
204
-
205
-
206
-
207
-
208
-
209
-
210
-
211
-
212
-
213
-
214
-
215
-
216
-
217
-
218
-
219
-
220
-
221
-
222
-
223
-
224
-
225
-
226
-
227
-
228
-
229
-
230
-
231
-
232
-
233
-
234
-
235
-
236
-
237
-
238
-
239
-
240
-
241
-
242
-
243
-
244
-
245
-
246
-
247
-
248
-
249
-
250
-
251
-
252
-
253
-
254
-
255
-
256
-
257
-
258
-
259
-
260
-
261
-
262
-
263
-
264
-
265
-
266
-
267
-
268
-
269
-
270
-
271
-
272
-
273
-
274
-
275
-
276
-
277
-
278
-
279
-
280
-
281
-
282
-
283
-
284
-
285
-
286
-
287
-
288
-
289
-
290
-
291
-
292
-
293
-
294
-
295
-
296
-
297
-
298
-
299
-
300
-
301
-
302
-
303
-
 304
304 -
 305
305 -
 306
306 -
 307
307 -
 308
308 -
 309
309 -
 310
310 -
 311
311 -
 312
312 -
 313
313 -
 314
314 -
315
-
316
-
317
-
318
-
319
-
320
-
321
-
322
-
323
-
324
-
325
-
326
-
327
-
328
-
329
-
330
-
331
-
332
-
333
-
334
 |
 |
