HP Xw460c HP Integrated Lights-Out 2 User Guide for Firmware 1.75 and 1.77 - Page 123
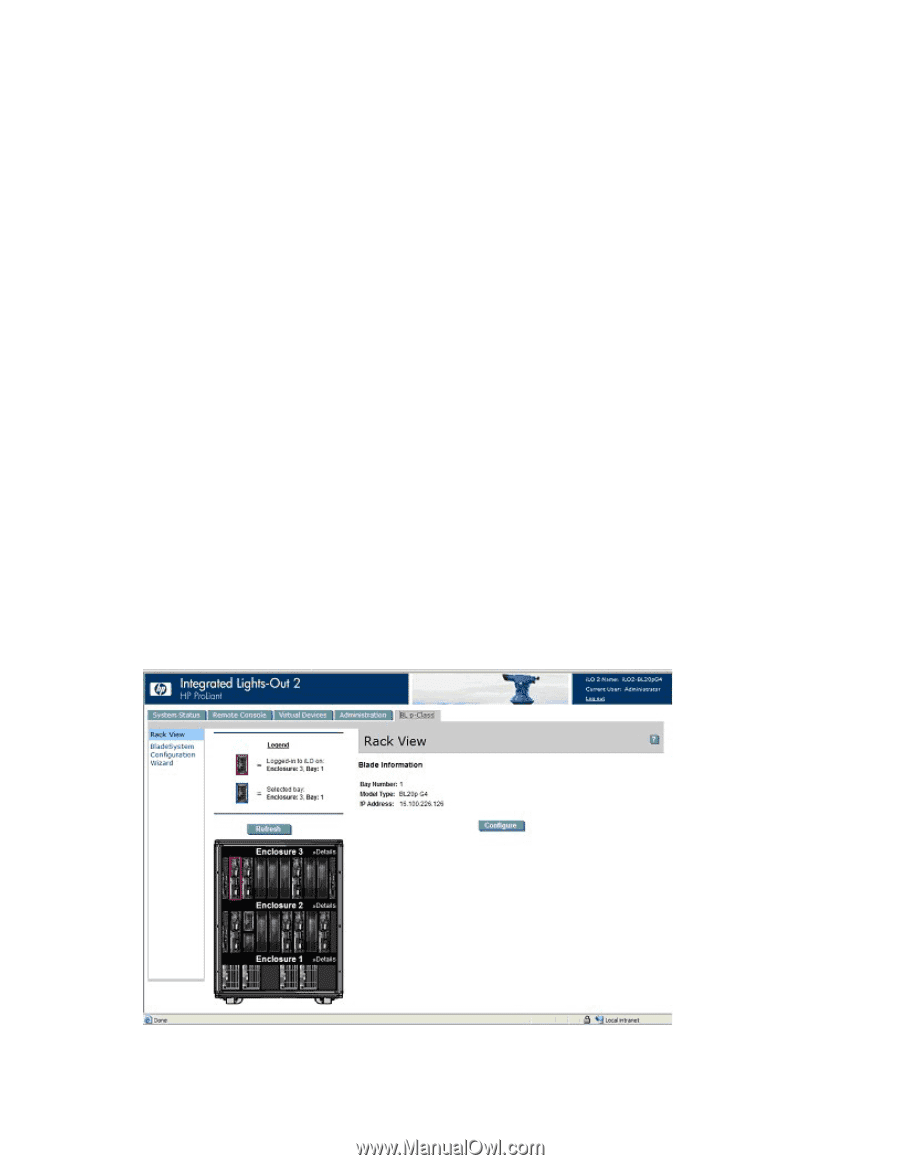
Rack View, iLO 2 also provides Web-based status for the ProLiant BL p-Class server rack.
 |
View all HP Xw460c manuals
Add to My Manuals
Save this manual to your list of manuals |
Page 123 highlights
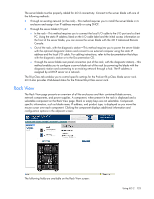
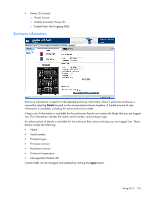
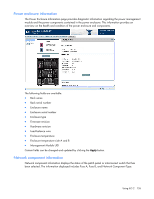
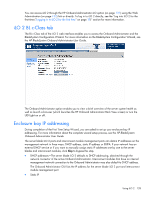
The server blade must be properly cabled for iLO 2 connectivity. Connect to the server blade with one of the following methods: • Through an existing network (in the rack)-This method requires you to install the server blade in its enclosure and assign it an IP address manually or using DHCP. • Through the server blade I/O port o In the rack-This method requires you to connect the local I/O cable to the I/O port and a client PC. Using the static IP address listed on the I/O cable label and the initial access information on the front of the server blade, you can access the server blade with the iLO 2 Advanced Remote Console. o Out of the rack, with the diagnostic station-This method requires you to power the server blade with the optional diagnostic station and connect to an external computer using the static IP address and the local I/O cable. For cabling instructions, refer to the documentation that ships with the diagnostic station or to the Documentation CD. o Through the server blade rear panel connectors (out of the rack, with the diagnostic station)-This method enables you to configure a server blade out of the rack by powering the blade with the diagnostic station and connecting to an existing network through a hub. The IP address is assigned by a DHCP server on a network. The BL p-Class tab enables you to control specific settings for the ProLiant BL p-Class blade server rack. iLO 2 also provides Web-based status for the ProLiant BL p-Class server rack. Rack View The Rack View page presents an overview of all the enclosures and their contained blade servers, network components, and power supplies. A component, when present in the rack is displayed and a selectable component on the Rack View page. Blank or empty bays are not selectable. Componentspecific information, such as blade name, IP address, and product type, is displayed as you move the mouse cursor over each component. Clicking the component displays additional information and configuration options in the adjacent screen. The following fields are available on the Rack View screen: Using iLO 2 123
-
 1
1 -
2
-
3
-
4
-
5
-
6
-
7
-
8
-
9
-
10
-
11
-
12
-
13
-
14
-
15
-
16
-
17
-
18
-
19
-
20
-
21
-
22
-
23
-
24
-
25
-
26
-
27
-
28
-
29
-
30
-
31
-
32
-
33
-
34
-
35
-
36
-
37
-
38
-
39
-
40
-
41
-
42
-
43
-
44
-
45
-
46
-
47
-
48
-
49
-
50
-
51
-
52
-
53
-
54
-
55
-
56
-
57
-
58
-
59
-
60
-
61
-
62
-
63
-
64
-
65
-
66
-
67
-
68
-
69
-
70
-
71
-
72
-
73
-
74
-
75
-
76
-
77
-
78
-
79
-
80
-
81
-
82
-
83
-
84
-
85
-
86
-
87
-
88
-
89
-
90
-
91
-
92
-
93
-
94
-
95
-
96
-
97
-
98
-
99
-
100
-
101
-
102
-
103
-
104
-
105
-
106
-
107
-
108
-
109
-
110
-
111
-
112
-
113
-
114
-
115
-
116
-
117
-
 118
118 -
 119
119 -
 120
120 -
 121
121 -
 122
122 -
 123
123 -
 124
124 -
 125
125 -
 126
126 -
 127
127 -
 128
128 -
129
-
130
-
131
-
132
-
133
-
134
-
135
-
136
-
137
-
138
-
139
-
140
-
141
-
142
-
143
-
144
-
145
-
146
-
147
-
148
-
149
-
150
-
151
-
152
-
153
-
154
-
155
-
156
-
157
-
158
-
159
-
160
-
161
-
162
-
163
-
164
-
165
-
166
-
167
-
168
-
169
-
170
-
171
-
172
-
173
-
174
-
175
-
176
-
177
-
178
-
179
-
180
-
181
-
182
-
183
-
184
-
185
-
186
-
187
-
188
-
189
-
190
-
191
-
192
-
193
-
194
-
195
-
196
-
197
-
198
-
199
-
200
-
201
-
202
-
203
-
204
-
205
-
206
-
207
-
208
-
209
-
210
-
211
-
212
-
213
-
214
-
215
-
216
-
217
-
218
-
219
-
220
-
221
-
222
-
223
-
224
-
225
-
226
-
227
-
228
-
229
-
230
-
231
-
232
-
233
-
234
-
235
 |
 |