HP Xw460c HP Integrated Lights-Out 2 User Guide for Firmware 1.75 and 1.77 - Page 148
Installing Active Directory on Windows Server 2008
 |
View all HP Xw460c manuals
Add to My Manuals
Save this manual to your list of manuals |
Page 148 highlights
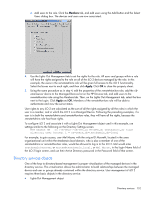
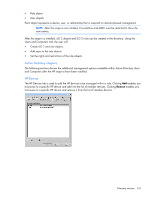
iLO 2 requires a secure connection to communicate with the directory service. This requires the installation of the Microsoft® CA. Refer to the Microsoft® technical reference Knowledge Base Article 321051: How to Enable LDAP over SSL with a Third-Party Certification Authority. Installing Active Directory on Windows Server 2008 For the Default Schema: 1. Disable IPV6, and install Active Directory, DNS, and root CA to Windows Server® 2008. 2. Log in to iLO, and access the Directory Settings page. Click Administration>Security>Directory. 3. In Directory Settings, enter the settings for your directory. 4. In Directory User Context, enter the settings for you directory. 5. Create the Administer Groups for your iLO users. 6. Click Administration>Network>DHCP/DNS and in Domain Name, and Primary DNS server, modify the settings for your environment. For the Extended Schema: 1. Disable IPV6, and install Active Directory, DNS, and root CA to Windows Server® 2008. 2. The iLO LDAP Component requires .Net Framework 1.1_4322. Install .Net Framework. 3. Install the latest iLO LDAP Component (sp31581 or later.) 4. Extend the schema using the HP Management Devices Schema Extender. 5. Install the HP the LDAP component snap-in. 6. Create the HP Device, and HP Role. 7. Log in to iLO, and access the Directory Settings page. Click Administration>Security>Directory. 8. Enter the Directory Settings for your directory. 9. Enter the Directory User Context. 10. Click Administration>Network>DHCP/DNS and in Domain Name, and Primary DNS server modify, the settings for your environment. The LDAP component does not work with a Windows Server® 2008 core installation. Directory services preparation for Active Directory To set up directory services for use with iLO 2 management processors: 1. Install Active Directory. For more information, refer to Installing Active Directory in the Microsoft® Windows® 2000 Server Resource Kit. 2. Install the Microsoft® Admin Pack (the ADMINPAK.MSI file, which is located in the i386 subdirectory of the Windows® 2000 Server or Advance Server CD). For more information, refer to the Microsoft® Knowledge Base Article 216999. 3. In Windows® 2000, the safety interlock that prevents accidental writes to the schema must be temporarily disabled. The schema extender utility can do this if the remote registry service is running and the user has sufficient rights. This can also be done by setting HKEY_LOCAL_MACHINE\SYSTEM\CurrentControlSet\ServicesParameters\Schema Update Allowed in the registry to a non-zero value (refer to the "Order of Processing When Extending the Schema" section of Installation of Schema Extensions in the Windows® 2000 Server Resource Kit) or by the following steps. This step is not necessary if you are using Windows® Server 2003. Directory services 148
-
 1
1 -
2
-
3
-
4
-
5
-
6
-
7
-
8
-
9
-
10
-
11
-
12
-
13
-
14
-
15
-
16
-
17
-
18
-
19
-
20
-
21
-
22
-
23
-
24
-
25
-
26
-
27
-
28
-
29
-
30
-
31
-
32
-
33
-
34
-
35
-
36
-
37
-
38
-
39
-
40
-
41
-
42
-
43
-
44
-
45
-
46
-
47
-
48
-
49
-
50
-
51
-
52
-
53
-
54
-
55
-
56
-
57
-
58
-
59
-
60
-
61
-
62
-
63
-
64
-
65
-
66
-
67
-
68
-
69
-
70
-
71
-
72
-
73
-
74
-
75
-
76
-
77
-
78
-
79
-
80
-
81
-
82
-
83
-
84
-
85
-
86
-
87
-
88
-
89
-
90
-
91
-
92
-
93
-
94
-
95
-
96
-
97
-
98
-
99
-
100
-
101
-
102
-
103
-
104
-
105
-
106
-
107
-
108
-
109
-
110
-
111
-
112
-
113
-
114
-
115
-
116
-
117
-
118
-
119
-
120
-
121
-
122
-
123
-
124
-
125
-
126
-
127
-
128
-
129
-
130
-
131
-
132
-
133
-
134
-
135
-
136
-
137
-
138
-
139
-
140
-
141
-
142
-
 143
143 -
 144
144 -
 145
145 -
 146
146 -
 147
147 -
 148
148 -
 149
149 -
 150
150 -
 151
151 -
 152
152 -
 153
153 -
154
-
155
-
156
-
157
-
158
-
159
-
160
-
161
-
162
-
163
-
164
-
165
-
166
-
167
-
168
-
169
-
170
-
171
-
172
-
173
-
174
-
175
-
176
-
177
-
178
-
179
-
180
-
181
-
182
-
183
-
184
-
185
-
186
-
187
-
188
-
189
-
190
-
191
-
192
-
193
-
194
-
195
-
196
-
197
-
198
-
199
-
200
-
201
-
202
-
203
-
204
-
205
-
206
-
207
-
208
-
209
-
210
-
211
-
212
-
213
-
214
-
215
-
216
-
217
-
218
-
219
-
220
-
221
-
222
-
223
-
224
-
225
-
226
-
227
-
228
-
229
-
230
-
231
-
232
-
233
-
234
-
235
 |
 |