HP Xw460c HP Integrated Lights-Out 2 User Guide for Firmware 1.75 and 1.77 - Page 32
Group administration, Delete User., Administration>User Administration>Group Accounts.
 |
View all HP Xw460c manuals
Add to My Manuals
Save this manual to your list of manuals |
Page 32 highlights
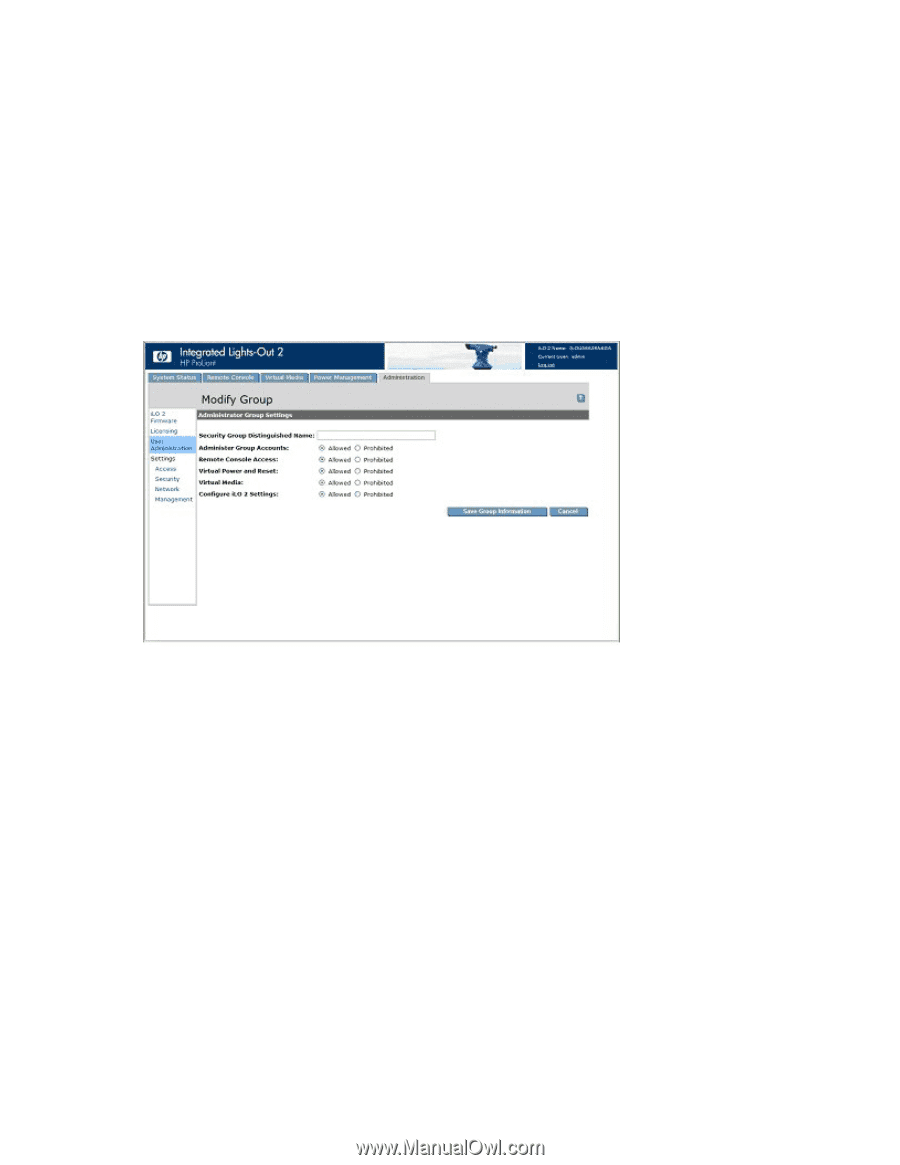
2. Click User Administration and select from the list the name of the user whose information you want to change. 3. Click Delete User. A pop-up window is displayed asking, Are you sure you want to delete the selected user? Click OK. Group administration iLO 2 enables you to view iLO 2 groups and modify settings for those groups. You must have the Administer Directory Groups privilege. To view or modify a group: 1. Click Administration>User Administration>Group Accounts. 2. Select the group, and click View/Modify Group. The Modify Group page appears. Click Cancel to return to the Group Administration page. The following settings are available: • Security Group Distinguished Name is the distinguished name of a group within the directory. All members of this group are granted the privileges set for the group. The group specified in the Security Group Distinguished Name must exist within the directory, and users who need access to iLO 2 should be members of this group. Complete this field with a Distinguished Name from the directory (for example, CN=Group1,OU=Managed Groups, DC=domain, DC=extension). • Administer Group Accounts allows users who belong to this group to alter privileges for any group. • Remote Console Access allows you to remotely access the host system Remote Console, including the Remote Serial Console. You must have access to the remote system to use this capability. • Virtual Power and Reset allows you to power cycle or reset the host platform. These activities interrupt the availability of the system. If selected, this option also allows you to diagnose the system using the virtual NMI button. • Virtual Media allows you to use virtual media on the host platform. • Configure iLO 2 Settings allows you to configure most iLO 2 settings, including security settings. If selected, you can remotely update iLO 2 firmware. This setting does not include group account administration. These settings rarely change. Configuring iLO 2 32
-
 1
1 -
2
-
3
-
4
-
5
-
6
-
7
-
8
-
9
-
10
-
11
-
12
-
13
-
14
-
15
-
16
-
17
-
18
-
19
-
20
-
21
-
22
-
23
-
24
-
25
-
26
-
 27
27 -
 28
28 -
 29
29 -
 30
30 -
 31
31 -
 32
32 -
 33
33 -
 34
34 -
 35
35 -
 36
36 -
 37
37 -
38
-
39
-
40
-
41
-
42
-
43
-
44
-
45
-
46
-
47
-
48
-
49
-
50
-
51
-
52
-
53
-
54
-
55
-
56
-
57
-
58
-
59
-
60
-
61
-
62
-
63
-
64
-
65
-
66
-
67
-
68
-
69
-
70
-
71
-
72
-
73
-
74
-
75
-
76
-
77
-
78
-
79
-
80
-
81
-
82
-
83
-
84
-
85
-
86
-
87
-
88
-
89
-
90
-
91
-
92
-
93
-
94
-
95
-
96
-
97
-
98
-
99
-
100
-
101
-
102
-
103
-
104
-
105
-
106
-
107
-
108
-
109
-
110
-
111
-
112
-
113
-
114
-
115
-
116
-
117
-
118
-
119
-
120
-
121
-
122
-
123
-
124
-
125
-
126
-
127
-
128
-
129
-
130
-
131
-
132
-
133
-
134
-
135
-
136
-
137
-
138
-
139
-
140
-
141
-
142
-
143
-
144
-
145
-
146
-
147
-
148
-
149
-
150
-
151
-
152
-
153
-
154
-
155
-
156
-
157
-
158
-
159
-
160
-
161
-
162
-
163
-
164
-
165
-
166
-
167
-
168
-
169
-
170
-
171
-
172
-
173
-
174
-
175
-
176
-
177
-
178
-
179
-
180
-
181
-
182
-
183
-
184
-
185
-
186
-
187
-
188
-
189
-
190
-
191
-
192
-
193
-
194
-
195
-
196
-
197
-
198
-
199
-
200
-
201
-
202
-
203
-
204
-
205
-
206
-
207
-
208
-
209
-
210
-
211
-
212
-
213
-
214
-
215
-
216
-
217
-
218
-
219
-
220
-
221
-
222
-
223
-
224
-
225
-
226
-
227
-
228
-
229
-
230
-
231
-
232
-
233
-
234
-
235
 |
 |