HP Xw460c HP Integrated Lights-Out 2 User Guide for Firmware 1.75 and 1.77 - Page 192
Hardware and software link-related issues
 |
View all HP Xw460c manuals
Add to My Manuals
Save this manual to your list of manuals |
Page 192 highlights
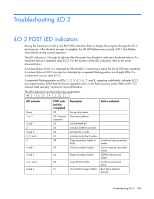
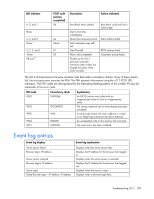
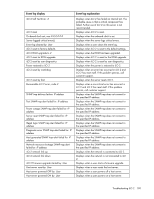
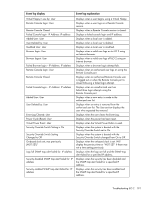
Event log display Virtual Floppy connected by User Virtual Floppy disconnected by User License added by: User License removed by: User License activation error by: User iLO 2 RBSU user login: User Power on request received by: Type Virtual NMI selected by: User Virtual Serial Port session started by: User Virtual Serial Port session stopped by: User Virtual Serial Port session login failure from: User Event log explanation Displays when an authorized user connects the Virtual Floppy. Displays when an authorized user disconnects the Virtual Floppy. Displays when an authorized user adds a license. Displays when an authorized user removes a license. Displays when there is an error activating the license. Displays when an authorized user logs in to iLO 2 RBSU. A power request was received as one of the following types: Power Button Wake On LAN Automatic Power On Displays when an authorized user selects the Virtual NMI button. Displays when a Virtual Serial Port session is started. Displays when a Virtual Serial Port session is ended. Displays when there is a login failure for a Virtual Serial Port session. Hardware and software link-related issues iLO 2 uses standard Ethernet cabling, which includes CAT5 UTP with RJ-45 connectors. Straight-through cabling is necessary for a hardware link to a standard Ethernet hub. Use a crossover cable for a direct PC connection. The iLO 2 Management Port must be connected to a network that is connected to a DHCP server, and iLO 2 must be on the network before power is applied. DHCP sends a request soon after power is applied. If the DHCP request is not answered when iLO 2 first boots, then it will reissue the request at 90-second intervals. The DHCP server must be configured to supply DNS and WINS name resolution. iLO 2 can be configured to work with a static IP address either in the F8 option ROM setup or from the Network Settings Web page. The default DNS name appears on the network settings tag and can be used to locate iLO 2 without knowing the assigned IP address. If a direct connection to a PC is used, then a static IP address must be used because there is no DHCP server on the link. Within the iLO 2 RBSU, you may press the F1 key inside the DNS/DHCP page for advanced options to view the status of iLO 2 DHCP requests. Troubleshooting iLO 2 192
-
 1
1 -
2
-
3
-
4
-
5
-
6
-
7
-
8
-
9
-
10
-
11
-
12
-
13
-
14
-
15
-
16
-
17
-
18
-
19
-
20
-
21
-
22
-
23
-
24
-
25
-
26
-
27
-
28
-
29
-
30
-
31
-
32
-
33
-
34
-
35
-
36
-
37
-
38
-
39
-
40
-
41
-
42
-
43
-
44
-
45
-
46
-
47
-
48
-
49
-
50
-
51
-
52
-
53
-
54
-
55
-
56
-
57
-
58
-
59
-
60
-
61
-
62
-
63
-
64
-
65
-
66
-
67
-
68
-
69
-
70
-
71
-
72
-
73
-
74
-
75
-
76
-
77
-
78
-
79
-
80
-
81
-
82
-
83
-
84
-
85
-
86
-
87
-
88
-
89
-
90
-
91
-
92
-
93
-
94
-
95
-
96
-
97
-
98
-
99
-
100
-
101
-
102
-
103
-
104
-
105
-
106
-
107
-
108
-
109
-
110
-
111
-
112
-
113
-
114
-
115
-
116
-
117
-
118
-
119
-
120
-
121
-
122
-
123
-
124
-
125
-
126
-
127
-
128
-
129
-
130
-
131
-
132
-
133
-
134
-
135
-
136
-
137
-
138
-
139
-
140
-
141
-
142
-
143
-
144
-
145
-
146
-
147
-
148
-
149
-
150
-
151
-
152
-
153
-
154
-
155
-
156
-
157
-
158
-
159
-
160
-
161
-
162
-
163
-
164
-
165
-
166
-
167
-
168
-
169
-
170
-
171
-
172
-
173
-
174
-
175
-
176
-
177
-
178
-
179
-
180
-
181
-
182
-
183
-
184
-
185
-
186
-
 187
187 -
 188
188 -
 189
189 -
 190
190 -
 191
191 -
 192
192 -
 193
193 -
 194
194 -
 195
195 -
 196
196 -
 197
197 -
198
-
199
-
200
-
201
-
202
-
203
-
204
-
205
-
206
-
207
-
208
-
209
-
210
-
211
-
212
-
213
-
214
-
215
-
216
-
217
-
218
-
219
-
220
-
221
-
222
-
223
-
224
-
225
-
226
-
227
-
228
-
229
-
230
-
231
-
232
-
233
-
234
-
235
 |
 |