HP Xw460c HP Integrated Lights-Out 2 User Guide for Firmware 1.75 and 1.77 - Page 45
SSH key administration, SSL certificate administration, Administration>Security>SSH Key., Browse
 |
View all HP Xw460c manuals
Add to My Manuals
Save this manual to your list of manuals |
Page 45 highlights
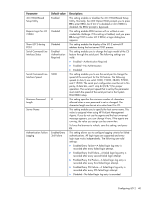
iLO 2 saves a detailed log entry for failed login attempts, which imposes a delay of 60 seconds. SSH key administration iLO 2 enables you to authorize up to four SSH keys at one time on the SSH Key tab. The SSH Key tab also displays the owner (if any keys are authorized) of each authorized SSH key. Multiple keys can belong to a single user. To add an authorized key to iLO 2, the public key path must be submitted to iLO 2. The key file must contain the user name after the end of the key. iLO 2 associates each key with a local user account. If the local account does not exist or if it is deleted, the key is invalid (the key is not listed if the local account does not exist). Alternatively, you can authorize SSH keys for an HP SIM server by running the mxagentconfig tool from the HP SIM server and specifying the address and user credentials for iLO 2. See your HP SIM documentation for more details. To authorize a new key: 1. In the iLO 2 interface, click Administration>Security>SSH Key. 2. Click Browse, and locate the key file. 3. Click Authorize Key. You can view or delete any previously authorized key by selecting the key, and clicking View Selected Key or Delete Selected Key. The View Selected Key and Delete Selected Key buttons only appear when SSH keys are installed. SSL certificate administration iLO 2 enables you to create a certificate request, import a certificate, and view certificate administration information associated with a stored certificate. Certificate information is encoded in the certificate by the CA and is extracted by iLO 2. By default, iLO 2 creates a self-signed certificate for use in SSL connections. This certificate enables iLO 2 to work without any additional configuration steps. The security features of the iLO 2 can be enhanced by importing a trusted certificate. For more information on certificates and certificate services, see the sections, "Introduction to certificate services (on page 138)" and "Installing certificate services (on page 138)." To access certificate information, click Administration>Security>SSL Certificate. The SSL Certificate tab displays the following information: • The Issued To field lists the entity to which the certificate was issued. • The Issued By field lists the CA that issued the certificate. • The Valid From field lists the first date that the certificate is valid. • The Valid Until field lists the date that the certificate will expire. • The Serial Number field lists the serial number assigned to the certificate by the CA. The following options are available on the SSL Certificate tab: • Create Certificate Request-Use this button to create a certificate request. When you click this button, a CR is created (in PKCS #10 format) that can be sent to a CA. This certificate request is Configuring iLO 2 45
-
 1
1 -
2
-
3
-
4
-
5
-
6
-
7
-
8
-
9
-
10
-
11
-
12
-
13
-
14
-
15
-
16
-
17
-
18
-
19
-
20
-
21
-
22
-
23
-
24
-
25
-
26
-
27
-
28
-
29
-
30
-
31
-
32
-
33
-
34
-
35
-
36
-
37
-
38
-
39
-
 40
40 -
 41
41 -
 42
42 -
 43
43 -
 44
44 -
 45
45 -
 46
46 -
 47
47 -
 48
48 -
 49
49 -
 50
50 -
51
-
52
-
53
-
54
-
55
-
56
-
57
-
58
-
59
-
60
-
61
-
62
-
63
-
64
-
65
-
66
-
67
-
68
-
69
-
70
-
71
-
72
-
73
-
74
-
75
-
76
-
77
-
78
-
79
-
80
-
81
-
82
-
83
-
84
-
85
-
86
-
87
-
88
-
89
-
90
-
91
-
92
-
93
-
94
-
95
-
96
-
97
-
98
-
99
-
100
-
101
-
102
-
103
-
104
-
105
-
106
-
107
-
108
-
109
-
110
-
111
-
112
-
113
-
114
-
115
-
116
-
117
-
118
-
119
-
120
-
121
-
122
-
123
-
124
-
125
-
126
-
127
-
128
-
129
-
130
-
131
-
132
-
133
-
134
-
135
-
136
-
137
-
138
-
139
-
140
-
141
-
142
-
143
-
144
-
145
-
146
-
147
-
148
-
149
-
150
-
151
-
152
-
153
-
154
-
155
-
156
-
157
-
158
-
159
-
160
-
161
-
162
-
163
-
164
-
165
-
166
-
167
-
168
-
169
-
170
-
171
-
172
-
173
-
174
-
175
-
176
-
177
-
178
-
179
-
180
-
181
-
182
-
183
-
184
-
185
-
186
-
187
-
188
-
189
-
190
-
191
-
192
-
193
-
194
-
195
-
196
-
197
-
198
-
199
-
200
-
201
-
202
-
203
-
204
-
205
-
206
-
207
-
208
-
209
-
210
-
211
-
212
-
213
-
214
-
215
-
216
-
217
-
218
-
219
-
220
-
221
-
222
-
223
-
224
-
225
-
226
-
227
-
228
-
229
-
230
-
231
-
232
-
233
-
234
-
235
 |
 |