HP Xw460c HP Integrated Lights-Out 2 User Guide for Firmware 1.75 and 1.77 - Page 70
Configuring a ProLiant BL p Class blade enclosure, Configuring static IP bay settings - g1
 |
View all HP Xw460c manuals
Add to My Manuals
Save this manual to your list of manuals |
Page 70 highlights
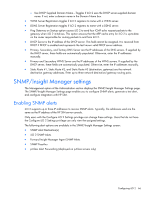
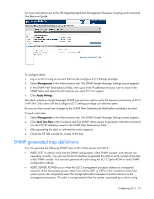
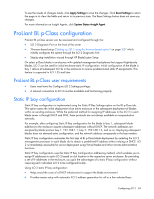
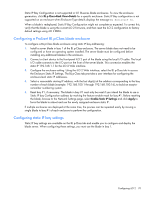
Static IP Bay Configuration is not supported in G1 BL-series blade enclosures. To view the enclosure generation, click BL p-Class>Rack View>Details for a specific enclosure. Static IP Bay configuration is not supported on an enclosure when Enclosure Type details displays the message BL Enclosure G1. When a blade is redeployed, Static IP Bay Configuration might not complete as expected. To correct this, verify that the blade is using the current iLO 2 firmware, and then reset the iLO 2 configuration to factory default settings using iLO 2 RBSU. Configuring a ProLiant BL p-Class blade enclosure To configure a BL p-Class blade enclosure using static IP bay addressing: 1. Install a server blade in bay 1 of the BL p-Class enclosure. The server blade does not need to be configured or have an operating system installed. The server blade must be configured before installing any additional blades in the enclosure. 2. Connect a client device to the front-panel iLO 2 port of the blade using the local I/O cable. The local I/O cable connects to the I/O port on the front of the server blade. This connection enables the static IP 192.168.1.1 for the iLO 2 Web interface. 3. Configure the enclosure setting. Using the iLO 2 Web interface, select the BL p-Class tab to access the Enclosure Static IP Settings. The BL p-Class tab provides a user interface for configuring the enclosure-level static IP addresses. 4. Select a reasonable starting IP address, with the last digit(s) of the address corresponding to the bay number of each blade (example: 192.168.100.1 through 192.168.100.16), to build an easy-toremember numbering system. 5. Reset bay #1, if necessary. The blade in bay #1 must only be reset if you intend the blade to use a Static IP bay Configuration address by marking the feature enable mask for bay #1. Before resetting the blade, browse to the Network Settings page, select Enable Static IP Settings and click Apply to force the blade to reboot and use the newly assigned enclosure static IP. If multiple enclosures are deployed at the same time, the process can be repeated easily by moving a single blade to bay #1 of each enclosure to perform the configuration. Configuring static IP bay settings Static IP bay settings are available on the BL p-Class tab and enable you to configure and deploy the blade server. When configuring these settings, you must use the blade in bay 1. Configuring iLO 2 70
-
 1
1 -
2
-
3
-
4
-
5
-
6
-
7
-
8
-
9
-
10
-
11
-
12
-
13
-
14
-
15
-
16
-
17
-
18
-
19
-
20
-
21
-
22
-
23
-
24
-
25
-
26
-
27
-
28
-
29
-
30
-
31
-
32
-
33
-
34
-
35
-
36
-
37
-
38
-
39
-
40
-
41
-
42
-
43
-
44
-
45
-
46
-
47
-
48
-
49
-
50
-
51
-
52
-
53
-
54
-
55
-
56
-
57
-
58
-
59
-
60
-
61
-
62
-
63
-
64
-
 65
65 -
 66
66 -
 67
67 -
 68
68 -
 69
69 -
 70
70 -
 71
71 -
 72
72 -
 73
73 -
 74
74 -
 75
75 -
76
-
77
-
78
-
79
-
80
-
81
-
82
-
83
-
84
-
85
-
86
-
87
-
88
-
89
-
90
-
91
-
92
-
93
-
94
-
95
-
96
-
97
-
98
-
99
-
100
-
101
-
102
-
103
-
104
-
105
-
106
-
107
-
108
-
109
-
110
-
111
-
112
-
113
-
114
-
115
-
116
-
117
-
118
-
119
-
120
-
121
-
122
-
123
-
124
-
125
-
126
-
127
-
128
-
129
-
130
-
131
-
132
-
133
-
134
-
135
-
136
-
137
-
138
-
139
-
140
-
141
-
142
-
143
-
144
-
145
-
146
-
147
-
148
-
149
-
150
-
151
-
152
-
153
-
154
-
155
-
156
-
157
-
158
-
159
-
160
-
161
-
162
-
163
-
164
-
165
-
166
-
167
-
168
-
169
-
170
-
171
-
172
-
173
-
174
-
175
-
176
-
177
-
178
-
179
-
180
-
181
-
182
-
183
-
184
-
185
-
186
-
187
-
188
-
189
-
190
-
191
-
192
-
193
-
194
-
195
-
196
-
197
-
198
-
199
-
200
-
201
-
202
-
203
-
204
-
205
-
206
-
207
-
208
-
209
-
210
-
211
-
212
-
213
-
214
-
215
-
216
-
217
-
218
-
219
-
220
-
221
-
222
-
223
-
224
-
225
-
226
-
227
-
228
-
229
-
230
-
231
-
232
-
233
-
234
-
235
 |
 |