HP Xw460c HP Integrated Lights-Out 2 User Guide for Firmware 1.75 and 1.77 - Page 180
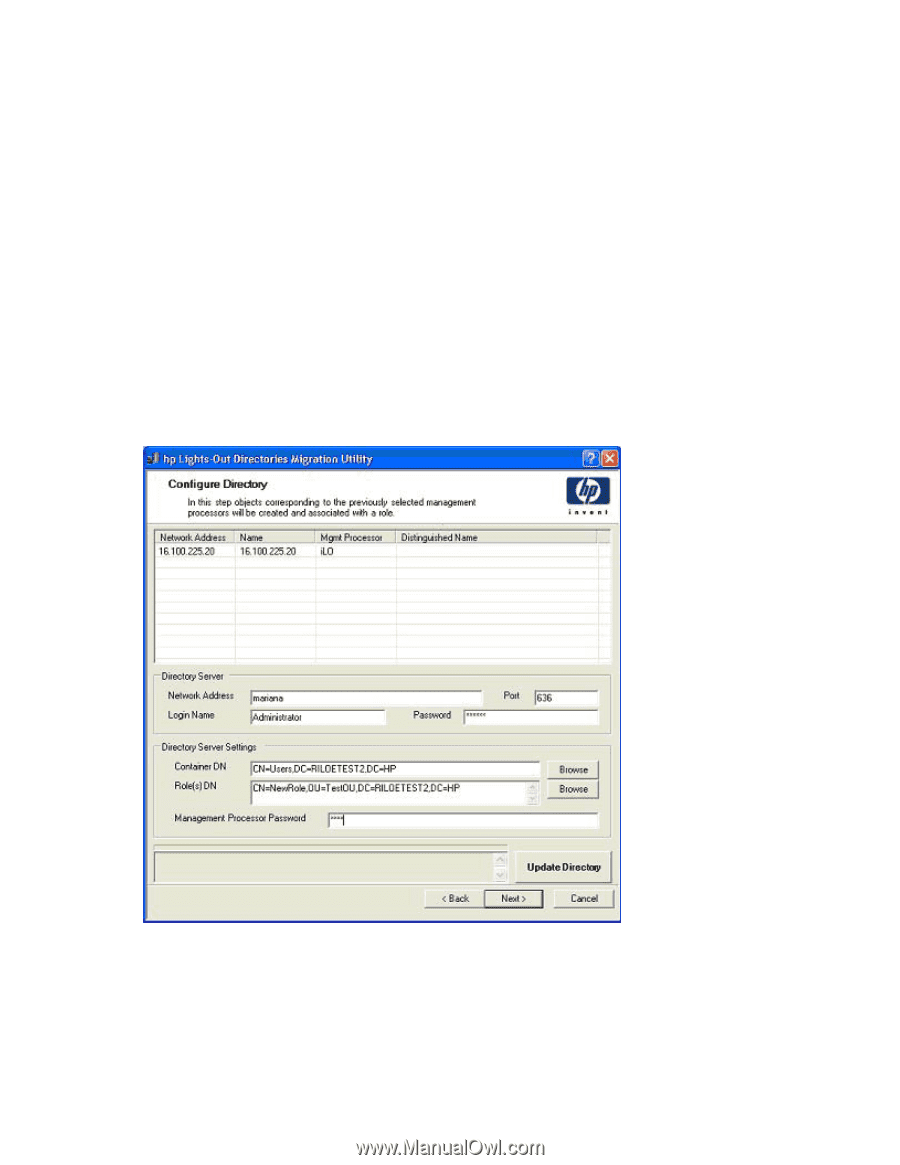
Configuring directories when schema-free integration is selected, Login Name, Password, Container DN
 |
View all HP Xw460c manuals
Add to My Manuals
Save this manual to your list of manuals |
Page 180 highlights
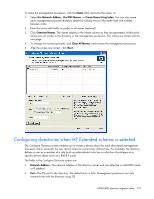
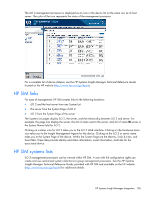
• Login Name and Password-These fields are used to log in with an account that has domain administrator access to the directory. • Container DN-After you have the network address, port, and login information, you can click Browse to navigate for the container and role distinguished name. The container Distinguished Name is where the migration utility will create all of the management processor objects in the directory. • Role DN-The role distinguished name is where the role to be associated with the device objects resides and must be created before to running this utility. To configure the device objects to be associated with a role: 1. Enter the network address, login name, and password for the designated directory server. 2. Enter the container distinguished name in the Container DN field, or click Browse. 3. Associate device objects with a member of a role by entering the role distinguished name in the Role DN field, or click Browse. 4. Click Update Directory. The tool will connect to the directory, creates the management processor objects, and adds them to the selected roles. 5. After the device objects have been associated with a role, click Next. Configuring directories when schema-free integration is selected The fields in the Configure Management Processors screen are: • Network Address-The network address of the directory server, which can be a valid DNS name or IP address. HPQLOMIG directory migration utility 180
-
 1
1 -
2
-
3
-
4
-
5
-
6
-
7
-
8
-
9
-
10
-
11
-
12
-
13
-
14
-
15
-
16
-
17
-
18
-
19
-
20
-
21
-
22
-
23
-
24
-
25
-
26
-
27
-
28
-
29
-
30
-
31
-
32
-
33
-
34
-
35
-
36
-
37
-
38
-
39
-
40
-
41
-
42
-
43
-
44
-
45
-
46
-
47
-
48
-
49
-
50
-
51
-
52
-
53
-
54
-
55
-
56
-
57
-
58
-
59
-
60
-
61
-
62
-
63
-
64
-
65
-
66
-
67
-
68
-
69
-
70
-
71
-
72
-
73
-
74
-
75
-
76
-
77
-
78
-
79
-
80
-
81
-
82
-
83
-
84
-
85
-
86
-
87
-
88
-
89
-
90
-
91
-
92
-
93
-
94
-
95
-
96
-
97
-
98
-
99
-
100
-
101
-
102
-
103
-
104
-
105
-
106
-
107
-
108
-
109
-
110
-
111
-
112
-
113
-
114
-
115
-
116
-
117
-
118
-
119
-
120
-
121
-
122
-
123
-
124
-
125
-
126
-
127
-
128
-
129
-
130
-
131
-
132
-
133
-
134
-
135
-
136
-
137
-
138
-
139
-
140
-
141
-
142
-
143
-
144
-
145
-
146
-
147
-
148
-
149
-
150
-
151
-
152
-
153
-
154
-
155
-
156
-
157
-
158
-
159
-
160
-
161
-
162
-
163
-
164
-
165
-
166
-
167
-
168
-
169
-
170
-
171
-
172
-
173
-
174
-
 175
175 -
 176
176 -
 177
177 -
 178
178 -
 179
179 -
 180
180 -
 181
181 -
 182
182 -
 183
183 -
 184
184 -
 185
185 -
186
-
187
-
188
-
189
-
190
-
191
-
192
-
193
-
194
-
195
-
196
-
197
-
198
-
199
-
200
-
201
-
202
-
203
-
204
-
205
-
206
-
207
-
208
-
209
-
210
-
211
-
212
-
213
-
214
-
215
-
216
-
217
-
218
-
219
-
220
-
221
-
222
-
223
-
224
-
225
-
226
-
227
-
228
-
229
-
230
-
231
-
232
-
233
-
234
-
235
 |
 |