HP Xw460c HP Integrated Lights-Out 2 User Guide for Firmware 1.75 and 1.77 - Page 73
iLO 2 configuration screen, Verify Server RAID Configuration screen
 |
View all HP Xw460c manuals
Add to My Manuals
Save this manual to your list of manuals |
Page 73 highlights
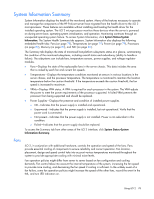
1. iLO 2 configuration 2. Server RAID verification 3. Virtual media connection 4. Software installation iLO 2 configuration screen This screen enables you to change the following settings: • Administrator password. HP recommends changing the default password. • Network configuration settings. The following are the default settings: o Enable DHCP-Yes o Enable Static IP Bay Configuration-No • If connected to the blade in enclosure slot 1, you can enable Static IP Bay configuration to preconfigure the static address for other iLO 2 processors in the enclosure. In the default configuration, the iLO 2 being updated gets its IP address through DHCP. Other iLO 2 processors in the enclosure must be configured separately. If these settings are not changed, clicking Next displays the next page in the setup wizard. If either of these settings are changed, iLO 2 reboots to invoke the updated settings. The following configuration combinations are also available (the default setting is in parentheses): • Enable DHCP (Yes) and Enable Static IP Bay Configuration (Yes) This configuration causes the iLO 2 being configured to get its IP address through DHCP. Clicking Next displays the Static IP Bay Configuration page, enabling you to specify the IP addresses for other iLO 2s in the enclosure. After you click Next, you are prompted to verify that you want to use DHCP for this iLO 2 IP address. • Enable DHCP (No) and Enable Static IP Bay Configuration (Yes) This configuration causes the iLO 2 being configured to set its IP address according to the settings specified through the Static IP Bay Configuration. Clicking Next displays the Static IP Bay Configuration page. • Enable DHCP (No) and Enable Static IP Bay Configuration (No) This configuration causes the iLO 2 being configured to set its IP address according to the settings specified through the Network Settings page. Clicking Next displays the Network Settings page. To save any network changes, you must have the Configure iLO 2 privilege. Click Next to save changes and continue. Verify Server RAID Configuration screen This step of the installation wizard enables you to verify and accept server RAID configuration settings. Verify the detected RAID level for the hard drives on the blade server displayed on the web page and do one of the following: • Click Next to keep current RAID settings. • Click Default Settings to automatically configure the RAID level based on the number of installed drives. You are prompted to verify that you want to reset the RAID level because this could result in loss of data. Resetting the RAID level requires a server power-on or reboot. iLO 2 displays a page Configuring iLO 2 73
-
 1
1 -
2
-
3
-
4
-
5
-
6
-
7
-
8
-
9
-
10
-
11
-
12
-
13
-
14
-
15
-
16
-
17
-
18
-
19
-
20
-
21
-
22
-
23
-
24
-
25
-
26
-
27
-
28
-
29
-
30
-
31
-
32
-
33
-
34
-
35
-
36
-
37
-
38
-
39
-
40
-
41
-
42
-
43
-
44
-
45
-
46
-
47
-
48
-
49
-
50
-
51
-
52
-
53
-
54
-
55
-
56
-
57
-
58
-
59
-
60
-
61
-
62
-
63
-
64
-
65
-
66
-
67
-
 68
68 -
 69
69 -
 70
70 -
 71
71 -
 72
72 -
 73
73 -
 74
74 -
 75
75 -
 76
76 -
 77
77 -
 78
78 -
79
-
80
-
81
-
82
-
83
-
84
-
85
-
86
-
87
-
88
-
89
-
90
-
91
-
92
-
93
-
94
-
95
-
96
-
97
-
98
-
99
-
100
-
101
-
102
-
103
-
104
-
105
-
106
-
107
-
108
-
109
-
110
-
111
-
112
-
113
-
114
-
115
-
116
-
117
-
118
-
119
-
120
-
121
-
122
-
123
-
124
-
125
-
126
-
127
-
128
-
129
-
130
-
131
-
132
-
133
-
134
-
135
-
136
-
137
-
138
-
139
-
140
-
141
-
142
-
143
-
144
-
145
-
146
-
147
-
148
-
149
-
150
-
151
-
152
-
153
-
154
-
155
-
156
-
157
-
158
-
159
-
160
-
161
-
162
-
163
-
164
-
165
-
166
-
167
-
168
-
169
-
170
-
171
-
172
-
173
-
174
-
175
-
176
-
177
-
178
-
179
-
180
-
181
-
182
-
183
-
184
-
185
-
186
-
187
-
188
-
189
-
190
-
191
-
192
-
193
-
194
-
195
-
196
-
197
-
198
-
199
-
200
-
201
-
202
-
203
-
204
-
205
-
206
-
207
-
208
-
209
-
210
-
211
-
212
-
213
-
214
-
215
-
216
-
217
-
218
-
219
-
220
-
221
-
222
-
223
-
224
-
225
-
226
-
227
-
228
-
229
-
230
-
231
-
232
-
233
-
234
-
235
 |
 |