Netgear GS716Tv2 GS716Tv2/GS724Tv3 Software Admin Manual - Page 28
Configuration and Monitoring Options, Table, Common Command Buttons - reset
 |
View all Netgear GS716Tv2 manuals
Add to My Manuals
Save this manual to your list of manuals |
Page 28 highlights
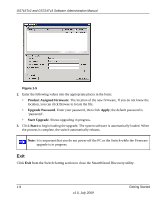
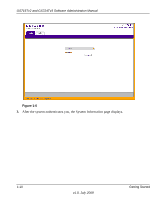
GS716Tv2 and GS724Tv3 Software Administration Manual subfolder, and HTML page in the navigation menu. When you click a folder or subfolder, it becomes preceded by a down arrow symbol and, if there is a subfolder, the folder expands to display the contents. If you click an HTML page, a new page displays in the main frame. Folder HTML Page Figure 1-8 Configuration and Monitoring Options The panel directly under the tabs and to the right of the navigation menu displays the configuration information or status for the page you select. On pages that contain configuration options, you can input information into fields or select options from drop down menus. Each page contains access to the HTML-based help that explains the fields and configuration options for the page. Many pages also contain command buttons. Table 1-2 shows the following command buttons are used throughout the pages in the Web interface: Table 1-2. Common Command Buttons Button Add Function Click Add to update the switch with the values on a screen. Apply Cancel Delete Refresh Logout Clicking the Apply button sends the updated configuration to the switch. Configuration changes take effect immediately. Click Cancel to cancel the configuration on the screen and reset the data on the screen to the latest value of the switch. To remove a configured item, select it and click Delete. Clicking the Refresh button refreshes the page with the latest information from the device. Clicking the Logout button ends the session. 1-12 v1.0, July 2009 Getting Started
-
 1
1 -
2
-
3
-
4
-
5
-
6
-
7
-
8
-
9
-
10
-
11
-
12
-
13
-
14
-
15
-
16
-
17
-
18
-
19
-
20
-
21
-
22
-
 23
23 -
 24
24 -
 25
25 -
 26
26 -
 27
27 -
 28
28 -
 29
29 -
 30
30 -
 31
31 -
 32
32 -
 33
33 -
34
-
35
-
36
-
37
-
38
-
39
-
40
-
41
-
42
-
43
-
44
-
45
-
46
-
47
-
48
-
49
-
50
-
51
-
52
-
53
-
54
-
55
-
56
-
57
-
58
-
59
-
60
-
61
-
62
-
63
-
64
-
65
-
66
-
67
-
68
-
69
-
70
-
71
-
72
-
73
-
74
-
75
-
76
-
77
-
78
-
79
-
80
-
81
-
82
-
83
-
84
-
85
-
86
-
87
-
88
-
89
-
90
-
91
-
92
-
93
-
94
-
95
-
96
-
97
-
98
-
99
-
100
-
101
-
102
-
103
-
104
-
105
-
106
-
107
-
108
-
109
-
110
-
111
-
112
-
113
-
114
-
115
-
116
-
117
-
118
-
119
-
120
-
121
-
122
-
123
-
124
-
125
-
126
-
127
-
128
-
129
-
130
-
131
-
132
-
133
-
134
-
135
-
136
-
137
-
138
-
139
-
140
-
141
-
142
-
143
-
144
-
145
-
146
-
147
-
148
-
149
-
150
-
151
-
152
-
153
-
154
-
155
-
156
-
157
-
158
-
159
-
160
-
161
-
162
-
163
-
164
-
165
-
166
-
167
-
168
-
169
-
170
-
171
-
172
-
173
-
174
-
175
-
176
-
177
-
178
-
179
-
180
-
181
-
182
-
183
-
184
-
185
-
186
-
187
-
188
-
189
-
190
-
191
-
192
-
193
-
194
-
195
-
196
-
197
-
198
-
199
-
200
-
201
-
202
-
203
-
204
-
205
-
206
-
207
-
208
-
209
-
210
-
211
-
212
-
213
-
214
-
215
-
216
-
217
-
218
-
219
-
220
-
221
-
222
-
223
-
224
-
225
-
226
-
227
-
228
-
229
-
230
-
231
-
232
-
233
-
234
-
235
-
236
-
237
-
238
-
239
-
240
-
241
-
242
-
243
-
244
-
245
-
246
 |
 |
