Netgear GS716Tv2 GS716Tv2/GS724Tv3 Software Admin Manual - Page 43
SNTP Server Status, Apply, Server, Delete, Cancel - factory reset
 |
View all Netgear GS716Tv2 manuals
Add to My Manuals
Save this manual to your list of manuals |
Page 43 highlights
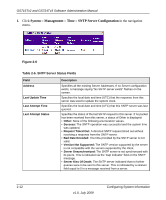
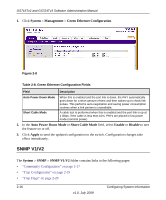
GS716Tv2 and GS724Tv3 Software Administration Manual Table 2-5. SNTP Server Configuration Fields Field Server Type Description Specifies the address type of the configured SNTP server to view or modify information about, or select Add to configure a new SNTP server. You can define up to three SNTP servers. Address Port Priority Version Shows the format of the TFTP Server Address field The factory default is IPv4. Enter the IP address of the SNTP server. Enter a port number from 1-65535. The default is 123. Specifies the priority of this server entry in determining the sequence of servers to which SNTP requests are sent. Enter a priority from 1-3, with 1 being the default and the highest priority. Servers with lowest numbers have priority. Enter the protocol version number. The range is 1-4. 2. To add an SNTP server, select Add, complete the remaining fields as desired, and click Apply. The SNTP server is added, and is now reflected in the Server list. 3. To removing an SNTP server, select the IP address of the server to remove from the Server list, and then click Delete. The entry is removed, and the device is updated. 4. Click Cancel to cancel the configuration on the screen and reset the data on the screen to the latest value of the switch. 5. If you change any of the settings on the page, click Apply to send the updated configuration to the switch. Configuration changes take effect immediately. SNTP Server Status The SNTP Server Status page displays status information about the SNTP servers configured on your switch. To access the SNTP Server Status page: Configuring System Information v1.0, July 2009 2-11
-
 1
1 -
2
-
3
-
4
-
5
-
6
-
7
-
8
-
9
-
10
-
11
-
12
-
13
-
14
-
15
-
16
-
17
-
18
-
19
-
20
-
21
-
22
-
23
-
24
-
25
-
26
-
27
-
28
-
29
-
30
-
31
-
32
-
33
-
34
-
35
-
36
-
37
-
 38
38 -
 39
39 -
 40
40 -
 41
41 -
 42
42 -
 43
43 -
 44
44 -
 45
45 -
 46
46 -
 47
47 -
 48
48 -
49
-
50
-
51
-
52
-
53
-
54
-
55
-
56
-
57
-
58
-
59
-
60
-
61
-
62
-
63
-
64
-
65
-
66
-
67
-
68
-
69
-
70
-
71
-
72
-
73
-
74
-
75
-
76
-
77
-
78
-
79
-
80
-
81
-
82
-
83
-
84
-
85
-
86
-
87
-
88
-
89
-
90
-
91
-
92
-
93
-
94
-
95
-
96
-
97
-
98
-
99
-
100
-
101
-
102
-
103
-
104
-
105
-
106
-
107
-
108
-
109
-
110
-
111
-
112
-
113
-
114
-
115
-
116
-
117
-
118
-
119
-
120
-
121
-
122
-
123
-
124
-
125
-
126
-
127
-
128
-
129
-
130
-
131
-
132
-
133
-
134
-
135
-
136
-
137
-
138
-
139
-
140
-
141
-
142
-
143
-
144
-
145
-
146
-
147
-
148
-
149
-
150
-
151
-
152
-
153
-
154
-
155
-
156
-
157
-
158
-
159
-
160
-
161
-
162
-
163
-
164
-
165
-
166
-
167
-
168
-
169
-
170
-
171
-
172
-
173
-
174
-
175
-
176
-
177
-
178
-
179
-
180
-
181
-
182
-
183
-
184
-
185
-
186
-
187
-
188
-
189
-
190
-
191
-
192
-
193
-
194
-
195
-
196
-
197
-
198
-
199
-
200
-
201
-
202
-
203
-
204
-
205
-
206
-
207
-
208
-
209
-
210
-
211
-
212
-
213
-
214
-
215
-
216
-
217
-
218
-
219
-
220
-
221
-
222
-
223
-
224
-
225
-
226
-
227
-
228
-
229
-
230
-
231
-
232
-
233
-
234
-
235
-
236
-
237
-
238
-
239
-
240
-
241
-
242
-
243
-
244
-
245
-
246
 |
 |
