HP rp3440 User Service Guide, Sixth Edition - HP 9000 rp3410/rp3440 - Page 143
Removing the Disk Drive Slot Filler, Installing the Hard Disk Drive
 |
View all HP rp3440 manuals
Add to My Manuals
Save this manual to your list of manuals |
Page 143 highlights
Figure 6-25 Removing the Disk Drive Slot Filler 4. Insert the hard disk drive into the drive bay from which you removed the drive and push inward on the release lever until the drive no longer slides forward. You must leave the release lever in the open position, as shown, when you push the drive into the server. 5. Push in on the release lever to secure the drive is in the bay and to ensure that the drive connector is seated properly. Figure 6-26 Installing the Hard Disk Drive 6. To lock the hard drives in place, press down on the lock lever. Replace the server cover if it was removed to unlock drives. Removing and Replacing an Internal Hard Disk Drive 143
-
 1
1 -
2
-
3
-
4
-
5
-
6
-
7
-
8
-
9
-
10
-
11
-
12
-
13
-
14
-
15
-
16
-
17
-
18
-
19
-
20
-
21
-
22
-
23
-
24
-
25
-
26
-
27
-
28
-
29
-
30
-
31
-
32
-
33
-
34
-
35
-
36
-
37
-
38
-
39
-
40
-
41
-
42
-
43
-
44
-
45
-
46
-
47
-
48
-
49
-
50
-
51
-
52
-
53
-
54
-
55
-
56
-
57
-
58
-
59
-
60
-
61
-
62
-
63
-
64
-
65
-
66
-
67
-
68
-
69
-
70
-
71
-
72
-
73
-
74
-
75
-
76
-
77
-
78
-
79
-
80
-
81
-
82
-
83
-
84
-
85
-
86
-
87
-
88
-
89
-
90
-
91
-
92
-
93
-
94
-
95
-
96
-
97
-
98
-
99
-
100
-
101
-
102
-
103
-
104
-
105
-
106
-
107
-
108
-
109
-
110
-
111
-
112
-
113
-
114
-
115
-
116
-
117
-
118
-
119
-
120
-
121
-
122
-
123
-
124
-
125
-
126
-
127
-
128
-
129
-
130
-
131
-
132
-
133
-
134
-
135
-
136
-
137
-
 138
138 -
 139
139 -
 140
140 -
 141
141 -
 142
142 -
 143
143 -
 144
144 -
 145
145 -
 146
146 -
 147
147 -
 148
148 -
149
-
150
-
151
-
152
-
153
-
154
-
155
-
156
-
157
-
158
-
159
-
160
-
161
-
162
-
163
-
164
-
165
-
166
-
167
-
168
-
169
-
170
-
171
-
172
-
173
-
174
-
175
-
176
-
177
-
178
-
179
-
180
-
181
-
182
-
183
-
184
-
185
-
186
-
187
-
188
-
189
-
190
-
191
-
192
-
193
-
194
-
195
-
196
-
197
-
198
-
199
-
200
-
201
-
202
-
203
-
204
-
205
-
206
-
207
-
208
-
209
-
210
 |
 |
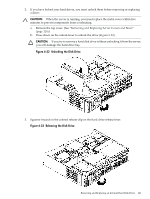
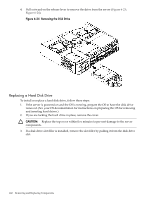
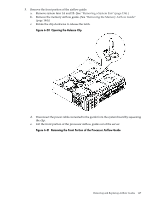
Figure 6-25 Removing the Disk Drive Slot Filler
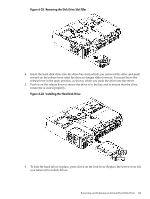
4.
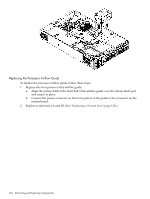
Insert the hard disk drive into the drive bay from which you removed the drive and push
inward on the release lever until the drive no longer slides forward. You must leave the
release lever in the open position, as shown, when you push the drive into the server.
5.
Push in on the release lever to secure the drive is in the bay and to ensure that the drive
connector is seated properly.
Figure 6-26 Installing the Hard Disk Drive
6.
To lock the hard drives in place, press down on the lock lever. Replace the server cover if it
was removed to unlock drives.
Removing and Replacing an Internal Hard Disk Drive
143