HP rp3440 User Service Guide, Sixth Edition - HP 9000 rp3410/rp3440 - Page 53
Extend the Server From the Rack, Removing and Replacing the Top Cover on a Rack-Mounted Server
 |
View all HP rp3440 manuals
Add to My Manuals
Save this manual to your list of manuals |
Page 53 highlights
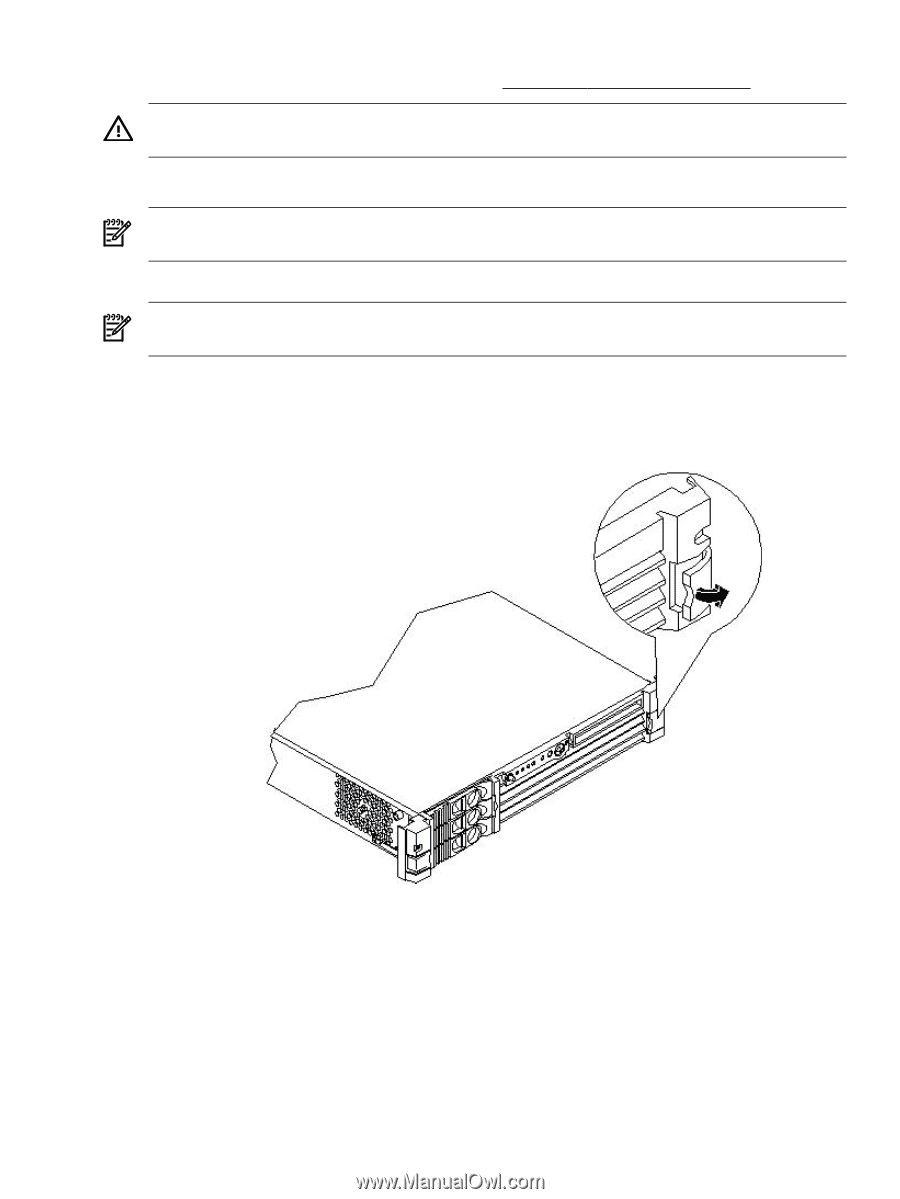
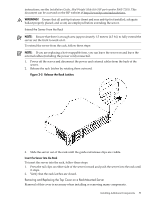
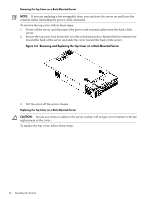
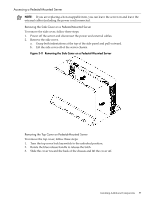
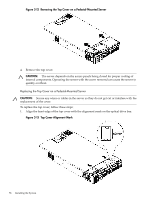
instructions, see the Installation Guide, Mid-Weight Slide Kit (HP part number 5065-7291). This document can be accessed on the HP website at http://www.hp.com/racksolutions. WARNING! Ensure that all anti-tip features (front and rear anti-tip feet installed; adequate ballast properly placed; and so on) are employed before extending the server. Extend the Server From the Rack NOTE: Ensure that there is enough area (approximately 1.5 meters {4.5 ft.}) to fully extend the server out the front to work on it. To extend the server from the rack, follow these steps: NOTE: If you are replacing a hot-swappable item, you can leave the server on and leave the external cables (including the power cord) connected. 1. Power off the server and disconnect the power and external cables from the back of the server. 2. Release the rack latches by rotating them outward. Figure 3-5 Release the Rack Latches 3. Slide the server out of the rack until the guide-rail release clips are visible. Insert the Server Into the Rack To insert the server into the rack, follow these steps: 1. Press the rail clips on either side of the server inward and push the server into the rack until it stops. 2. Verify that the rack latches are closed. Removing and Replacing the Top Cover on a Rack-Mounted Server Removal of this cover is necessary when installing or removing many components. Installing Additional Components 53
-
 1
1 -
2
-
3
-
4
-
5
-
6
-
7
-
8
-
9
-
10
-
11
-
12
-
13
-
14
-
15
-
16
-
17
-
18
-
19
-
20
-
21
-
22
-
23
-
24
-
25
-
26
-
27
-
28
-
29
-
30
-
31
-
32
-
33
-
34
-
35
-
36
-
37
-
38
-
39
-
40
-
41
-
42
-
43
-
44
-
45
-
46
-
47
-
 48
48 -
 49
49 -
 50
50 -
 51
51 -
 52
52 -
 53
53 -
 54
54 -
 55
55 -
 56
56 -
 57
57 -
 58
58 -
59
-
60
-
61
-
62
-
63
-
64
-
65
-
66
-
67
-
68
-
69
-
70
-
71
-
72
-
73
-
74
-
75
-
76
-
77
-
78
-
79
-
80
-
81
-
82
-
83
-
84
-
85
-
86
-
87
-
88
-
89
-
90
-
91
-
92
-
93
-
94
-
95
-
96
-
97
-
98
-
99
-
100
-
101
-
102
-
103
-
104
-
105
-
106
-
107
-
108
-
109
-
110
-
111
-
112
-
113
-
114
-
115
-
116
-
117
-
118
-
119
-
120
-
121
-
122
-
123
-
124
-
125
-
126
-
127
-
128
-
129
-
130
-
131
-
132
-
133
-
134
-
135
-
136
-
137
-
138
-
139
-
140
-
141
-
142
-
143
-
144
-
145
-
146
-
147
-
148
-
149
-
150
-
151
-
152
-
153
-
154
-
155
-
156
-
157
-
158
-
159
-
160
-
161
-
162
-
163
-
164
-
165
-
166
-
167
-
168
-
169
-
170
-
171
-
172
-
173
-
174
-
175
-
176
-
177
-
178
-
179
-
180
-
181
-
182
-
183
-
184
-
185
-
186
-
187
-
188
-
189
-
190
-
191
-
192
-
193
-
194
-
195
-
196
-
197
-
198
-
199
-
200
-
201
-
202
-
203
-
204
-
205
-
206
-
207
-
208
-
209
-
210
 |
 |