HP rp3440 User Service Guide, Sixth Edition - HP 9000 rp3410/rp3440 - Page 185
Replacing a System Board, System Product Number, System Serial Number, Key Certificate
 |
View all HP rp3440 manuals
Add to My Manuals
Save this manual to your list of manuals |
Page 185 highlights
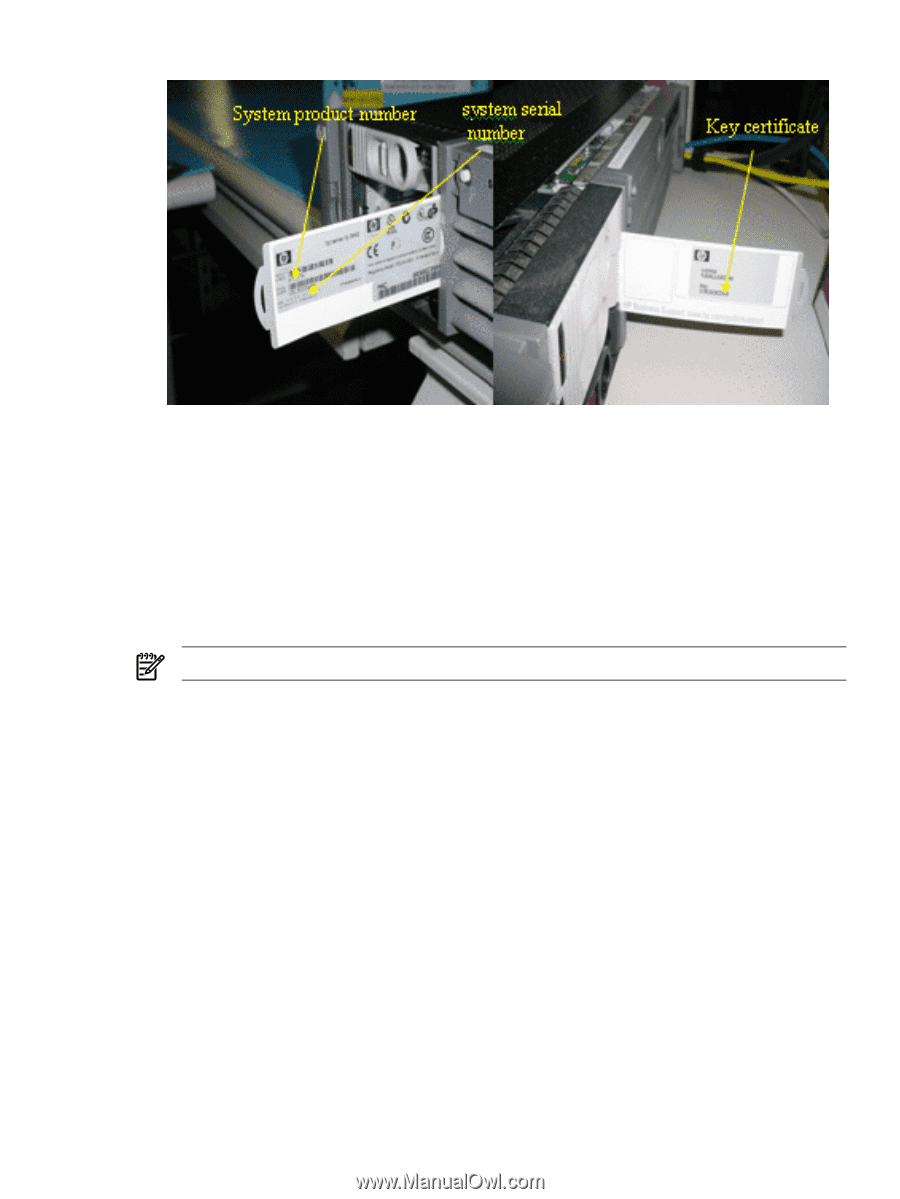
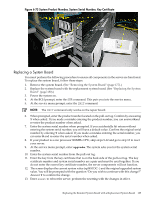
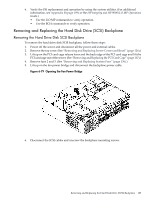
Figure 6-73 System Product Number, System Serial Number, Key Certificate Replacing a System Board You must perform the following procedure to ensure all components in the server are functional. To replace the system board, follow these steps: 1. Remove the system board. (See "Removing the System Board" (page 177).) 2. Replace the system board with the replacement system board. (See "Replacing the System Board" (page 180).) 3. Power the system on. 4. At the BCH prompt, enter the SER command. This puts you into the service menu. 5. At the service menu prompt, enter the INIT command. NOTE: The INIT command only works on the repair board. 6. When prompted, enter the product number located on the pull-out tag. Confirm by answering Y when asked. If you made a mistake entering the product number, you can answer Nand re-enter the product number when asked. 7. Enter the system serial number when prompted. If you accidentally hit return without entering the system serial number, you will have a default value. Confirm the original serial number by entering Y when asked. If you made a mistake entering the serial number, you can enter N and re-enter the serial number when asked. 8. If your product is a one processor 800MHz CPU, skip steps 9-12 and go to step 13 to reset your server. 9. At the service menu prompt, enter upgrade. The system asks you for the system serial number. 10. Enter the system serial number from the pull-out tag. 11. Enter the key from the key certificate that is on the back side of the pull-out tag. The key certificate number and system serial number are a pair and must be used together. If you do not enter the correct key certificate number, the server components will not function. 12. The screen displays the current system value (rp3410 DC--) and the original upgraded system value. You will be prompted with the question "Do you wish to continue with this change?" Answer Y to confirm the change. 13. Enter reset to reboot the server. perform the resetting with the changes in effect. Replacing the Resident System Board with a Replacement System Board 185
-
 1
1 -
2
-
3
-
4
-
5
-
6
-
7
-
8
-
9
-
10
-
11
-
12
-
13
-
14
-
15
-
16
-
17
-
18
-
19
-
20
-
21
-
22
-
23
-
24
-
25
-
26
-
27
-
28
-
29
-
30
-
31
-
32
-
33
-
34
-
35
-
36
-
37
-
38
-
39
-
40
-
41
-
42
-
43
-
44
-
45
-
46
-
47
-
48
-
49
-
50
-
51
-
52
-
53
-
54
-
55
-
56
-
57
-
58
-
59
-
60
-
61
-
62
-
63
-
64
-
65
-
66
-
67
-
68
-
69
-
70
-
71
-
72
-
73
-
74
-
75
-
76
-
77
-
78
-
79
-
80
-
81
-
82
-
83
-
84
-
85
-
86
-
87
-
88
-
89
-
90
-
91
-
92
-
93
-
94
-
95
-
96
-
97
-
98
-
99
-
100
-
101
-
102
-
103
-
104
-
105
-
106
-
107
-
108
-
109
-
110
-
111
-
112
-
113
-
114
-
115
-
116
-
117
-
118
-
119
-
120
-
121
-
122
-
123
-
124
-
125
-
126
-
127
-
128
-
129
-
130
-
131
-
132
-
133
-
134
-
135
-
136
-
137
-
138
-
139
-
140
-
141
-
142
-
143
-
144
-
145
-
146
-
147
-
148
-
149
-
150
-
151
-
152
-
153
-
154
-
155
-
156
-
157
-
158
-
159
-
160
-
161
-
162
-
163
-
164
-
165
-
166
-
167
-
168
-
169
-
170
-
171
-
172
-
173
-
174
-
175
-
176
-
177
-
178
-
179
-
 180
180 -
 181
181 -
 182
182 -
 183
183 -
 184
184 -
 185
185 -
 186
186 -
 187
187 -
 188
188 -
 189
189 -
 190
190 -
191
-
192
-
193
-
194
-
195
-
196
-
197
-
198
-
199
-
200
-
201
-
202
-
203
-
204
-
205
-
206
-
207
-
208
-
209
-
210
 |
 |