HP rp3440 User Service Guide, Sixth Edition - HP 9000 rp3410/rp3440 - Page 90
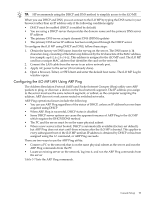
Setup Flowchart, Table 3-4 Setup Checklist
 |
View all HP rp3440 manuals
Add to My Manuals
Save this manual to your list of manuals |
Page 90 highlights
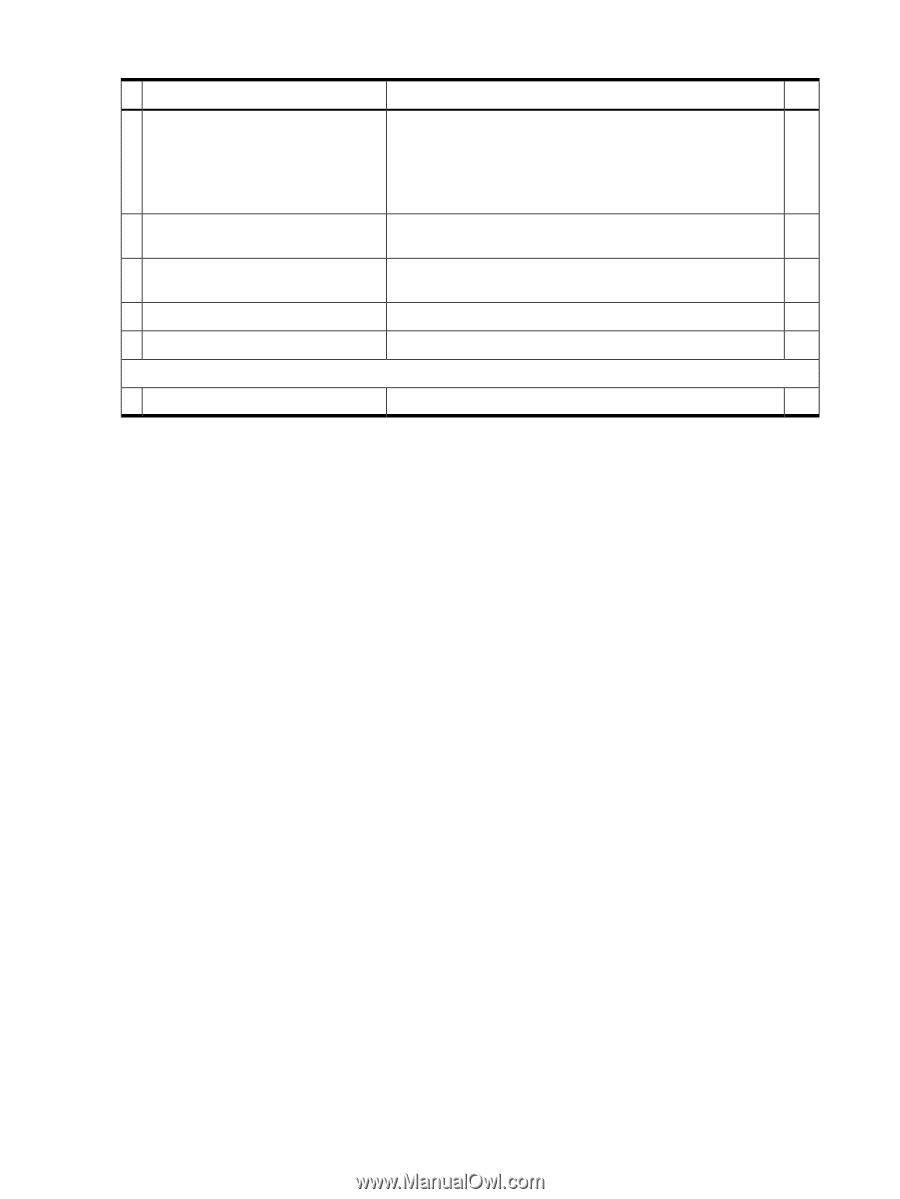
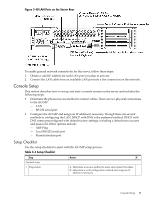
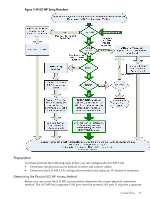
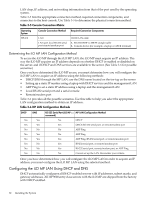
Table 3-4 Setup Checklist (continued) Step 2 Configure the iLO MP LAN Action X Choose one of the three methods to configure the LAN for iLO MP access: • DHCP with DNS • ARP Ping • RS-232 serial port 3 Log on to the iLO MP 4 Change default user name and password 5 Set up user accounts 6 Set up security access Advanced Setup 1 Activate Advanced Pack Features Log in to the iLO MP from a supported web browser or command line using the default user name and password. Change the default user name and password on the administrator account to your predefined selections. Set up the user accounts if you are using the local accounts feature. Set up the security access settings. Activate advanced features by entering a license key. Setup Flowchart Use this flowchart as a guide to assist in the iLO MP setup process. 90 Installing the System
-
 1
1 -
2
-
3
-
4
-
5
-
6
-
7
-
8
-
9
-
10
-
11
-
12
-
13
-
14
-
15
-
16
-
17
-
18
-
19
-
20
-
21
-
22
-
23
-
24
-
25
-
26
-
27
-
28
-
29
-
30
-
31
-
32
-
33
-
34
-
35
-
36
-
37
-
38
-
39
-
40
-
41
-
42
-
43
-
44
-
45
-
46
-
47
-
48
-
49
-
50
-
51
-
52
-
53
-
54
-
55
-
56
-
57
-
58
-
59
-
60
-
61
-
62
-
63
-
64
-
65
-
66
-
67
-
68
-
69
-
70
-
71
-
72
-
73
-
74
-
75
-
76
-
77
-
78
-
79
-
80
-
81
-
82
-
83
-
84
-
 85
85 -
 86
86 -
 87
87 -
 88
88 -
 89
89 -
 90
90 -
 91
91 -
 92
92 -
 93
93 -
 94
94 -
 95
95 -
96
-
97
-
98
-
99
-
100
-
101
-
102
-
103
-
104
-
105
-
106
-
107
-
108
-
109
-
110
-
111
-
112
-
113
-
114
-
115
-
116
-
117
-
118
-
119
-
120
-
121
-
122
-
123
-
124
-
125
-
126
-
127
-
128
-
129
-
130
-
131
-
132
-
133
-
134
-
135
-
136
-
137
-
138
-
139
-
140
-
141
-
142
-
143
-
144
-
145
-
146
-
147
-
148
-
149
-
150
-
151
-
152
-
153
-
154
-
155
-
156
-
157
-
158
-
159
-
160
-
161
-
162
-
163
-
164
-
165
-
166
-
167
-
168
-
169
-
170
-
171
-
172
-
173
-
174
-
175
-
176
-
177
-
178
-
179
-
180
-
181
-
182
-
183
-
184
-
185
-
186
-
187
-
188
-
189
-
190
-
191
-
192
-
193
-
194
-
195
-
196
-
197
-
198
-
199
-
200
-
201
-
202
-
203
-
204
-
205
-
206
-
207
-
208
-
209
-
210
 |
 |