HP rp3440 User Service Guide, Sixth Edition - HP 9000 rp3410/rp3440 - Page 176
Replacing the iLO MP Card Battery, Removing and Replacing the LED Status Panel
 |
View all HP rp3440 manuals
Add to My Manuals
Save this manual to your list of manuals |
Page 176 highlights
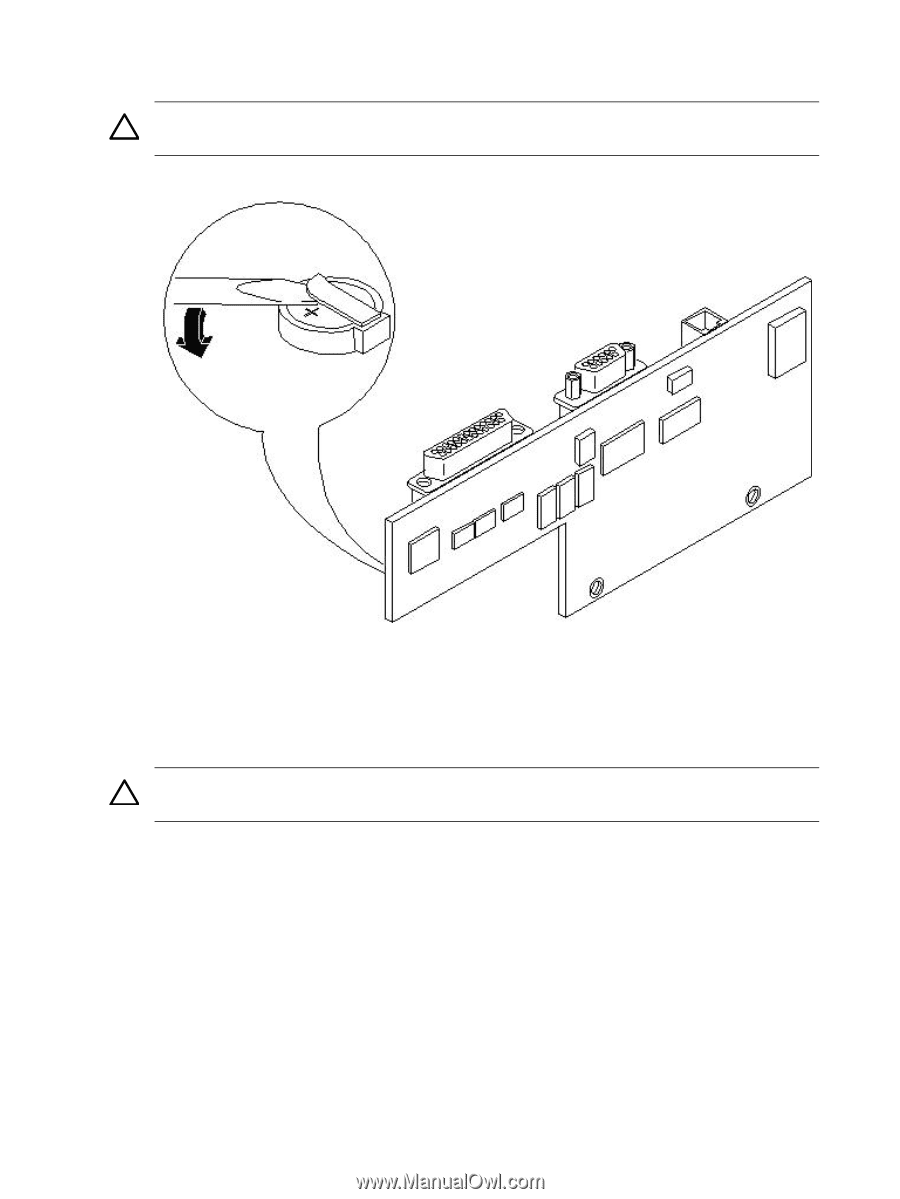
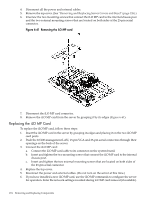
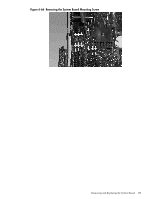
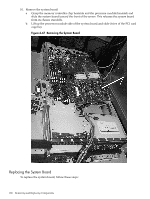
3. Lift up on the battery retaining clip with a flat-head screwdriver and slide the battery out of its socket. CAUTION: Only lift the battery high enough to clear the holder. Excessive stress on the battery holder retaining clip can damage the clip. Figure 6-62 Removing the iLO MP Card Battery Replacing the iLO MP Card Battery To replace the iLO MP card battery, follow these steps: 1. Lift up on the battery holder retaining clip with a flat-head screwdriver and slide the battery into the holder. The positive (+) terminal of the battery faces up. CAUTION: Only lift the battery high enough to clear the holder. Excessive stress on the battery holder retaining clip can damage the clip. 2. Replace the iLO MP card. (See "Replacing the iLO MP Card" (page 174).) 3. Verify the battery replacement and operation by using the system utilities. (For additional information, see Appendix B (page 199) or the HP Integrity and HP 9000 iLO MP Operations Guide.) • Use the iLO MP commands to verify operation. • Use the BCH commands to verify operation. Removing and Replacing the LED Status Panel The LED status panel card contains the server and diagnostic LEDs. Removing the LED Status Panel To remove the LED status panel, follow these steps: 1. Power off the server and disconnect all the power and external cables. 176 Removing and Replacing Components
-
 1
1 -
2
-
3
-
4
-
5
-
6
-
7
-
8
-
9
-
10
-
11
-
12
-
13
-
14
-
15
-
16
-
17
-
18
-
19
-
20
-
21
-
22
-
23
-
24
-
25
-
26
-
27
-
28
-
29
-
30
-
31
-
32
-
33
-
34
-
35
-
36
-
37
-
38
-
39
-
40
-
41
-
42
-
43
-
44
-
45
-
46
-
47
-
48
-
49
-
50
-
51
-
52
-
53
-
54
-
55
-
56
-
57
-
58
-
59
-
60
-
61
-
62
-
63
-
64
-
65
-
66
-
67
-
68
-
69
-
70
-
71
-
72
-
73
-
74
-
75
-
76
-
77
-
78
-
79
-
80
-
81
-
82
-
83
-
84
-
85
-
86
-
87
-
88
-
89
-
90
-
91
-
92
-
93
-
94
-
95
-
96
-
97
-
98
-
99
-
100
-
101
-
102
-
103
-
104
-
105
-
106
-
107
-
108
-
109
-
110
-
111
-
112
-
113
-
114
-
115
-
116
-
117
-
118
-
119
-
120
-
121
-
122
-
123
-
124
-
125
-
126
-
127
-
128
-
129
-
130
-
131
-
132
-
133
-
134
-
135
-
136
-
137
-
138
-
139
-
140
-
141
-
142
-
143
-
144
-
145
-
146
-
147
-
148
-
149
-
150
-
151
-
152
-
153
-
154
-
155
-
156
-
157
-
158
-
159
-
160
-
161
-
162
-
163
-
164
-
165
-
166
-
167
-
168
-
169
-
170
-
 171
171 -
 172
172 -
 173
173 -
 174
174 -
 175
175 -
 176
176 -
 177
177 -
 178
178 -
 179
179 -
 180
180 -
 181
181 -
182
-
183
-
184
-
185
-
186
-
187
-
188
-
189
-
190
-
191
-
192
-
193
-
194
-
195
-
196
-
197
-
198
-
199
-
200
-
201
-
202
-
203
-
204
-
205
-
206
-
207
-
208
-
209
-
210
 |
 |