HP rp3440 User Service Guide, Sixth Edition - HP 9000 rp3410/rp3440 - Page 86
Installing the Server Into a Rack, Non-HP Rack, or Pedestal, CAUTION
 |
View all HP rp3440 manuals
Add to My Manuals
Save this manual to your list of manuals |
Page 86 highlights
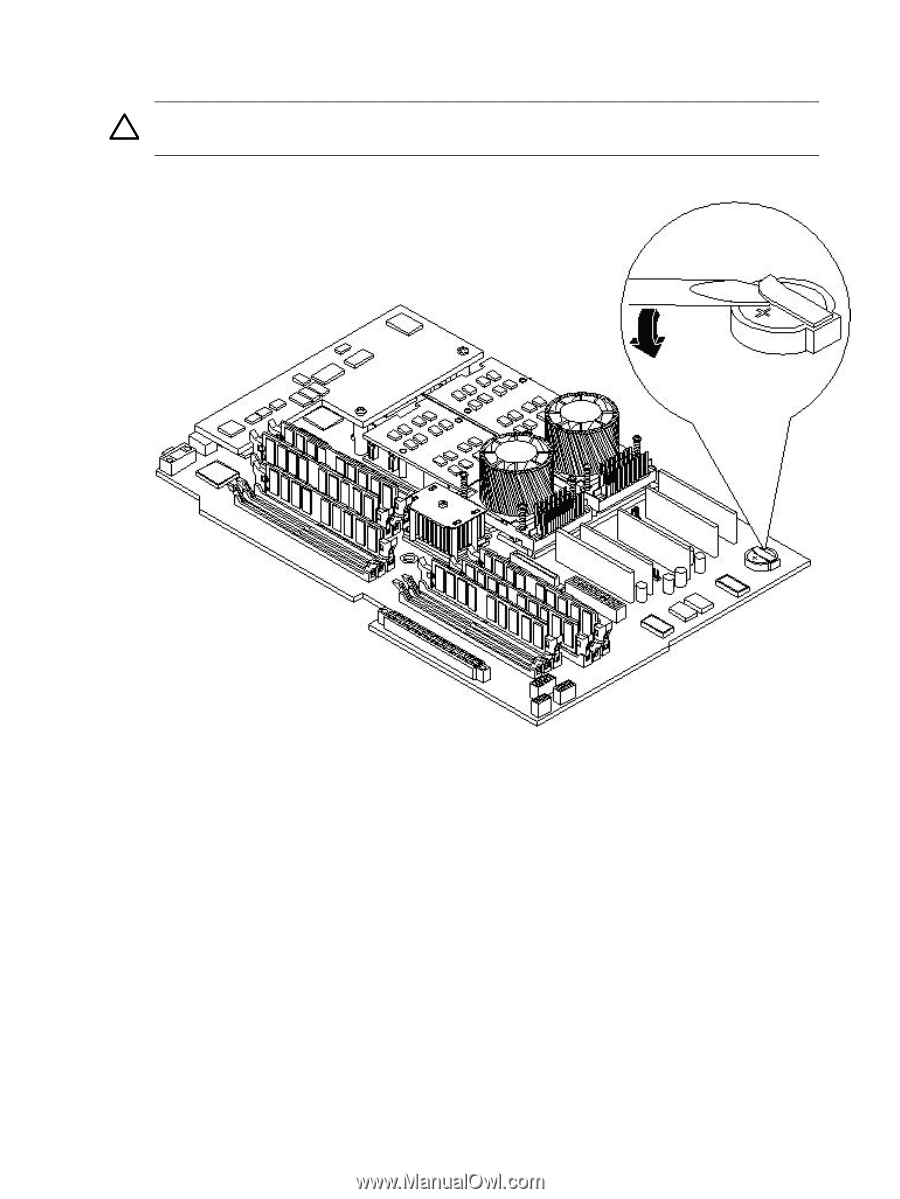
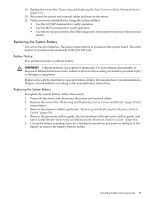
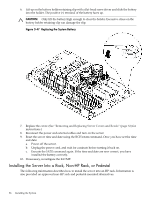
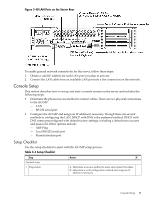
6. Lift up on the battery holder retaining clip with a flat-head screwdriver and slide the battery into the holder. The positive (+) terminal of the battery faces up. CAUTION: Only lift the battery high enough to clear the holder. Excessive stress on the battery holder retaining clip can damage the clip. Figure 3-47 Replacing the System Battery 7. Replace the cover. (See "Removing and Replacing Server Covers and Bezels" (page 52) for instructions.) 8. Reconnect the power and external cables and turn on the server. 9. Reset the server time and date using the BCH DATE command. Once you have set the time and date: a. Power off the server. b. Unplug the power cord, and wait for a minute before turning it back on. c. Execute the DATE command again. If the time and date are now correct, you have installed the battery correctly. 10. If necessary, reconfigure the iLO MP. Installing the Server Into a Rack, Non-HP Rack, or Pedestal The following information describes how to install the server into an HP rack. Information is also provided on approved non-HP rack and pedestal-mounted alternatives. 86 Installing the System
-
 1
1 -
2
-
3
-
4
-
5
-
6
-
7
-
8
-
9
-
10
-
11
-
12
-
13
-
14
-
15
-
16
-
17
-
18
-
19
-
20
-
21
-
22
-
23
-
24
-
25
-
26
-
27
-
28
-
29
-
30
-
31
-
32
-
33
-
34
-
35
-
36
-
37
-
38
-
39
-
40
-
41
-
42
-
43
-
44
-
45
-
46
-
47
-
48
-
49
-
50
-
51
-
52
-
53
-
54
-
55
-
56
-
57
-
58
-
59
-
60
-
61
-
62
-
63
-
64
-
65
-
66
-
67
-
68
-
69
-
70
-
71
-
72
-
73
-
74
-
75
-
76
-
77
-
78
-
79
-
80
-
 81
81 -
 82
82 -
 83
83 -
 84
84 -
 85
85 -
 86
86 -
 87
87 -
 88
88 -
 89
89 -
 90
90 -
 91
91 -
92
-
93
-
94
-
95
-
96
-
97
-
98
-
99
-
100
-
101
-
102
-
103
-
104
-
105
-
106
-
107
-
108
-
109
-
110
-
111
-
112
-
113
-
114
-
115
-
116
-
117
-
118
-
119
-
120
-
121
-
122
-
123
-
124
-
125
-
126
-
127
-
128
-
129
-
130
-
131
-
132
-
133
-
134
-
135
-
136
-
137
-
138
-
139
-
140
-
141
-
142
-
143
-
144
-
145
-
146
-
147
-
148
-
149
-
150
-
151
-
152
-
153
-
154
-
155
-
156
-
157
-
158
-
159
-
160
-
161
-
162
-
163
-
164
-
165
-
166
-
167
-
168
-
169
-
170
-
171
-
172
-
173
-
174
-
175
-
176
-
177
-
178
-
179
-
180
-
181
-
182
-
183
-
184
-
185
-
186
-
187
-
188
-
189
-
190
-
191
-
192
-
193
-
194
-
195
-
196
-
197
-
198
-
199
-
200
-
201
-
202
-
203
-
204
-
205
-
206
-
207
-
208
-
209
-
210
 |
 |