Samsung SF-565PR Win 2000/xp/2003/vista/2008/win 7(32,64bit) ( 20.6 - Page 148
Tools, Options, Recognition, Show tips during recognition
 |
UPC - 635753610277
View all Samsung SF-565PR manuals
Add to My Manuals
Save this manual to your list of manuals |
Page 148 highlights
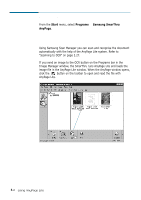
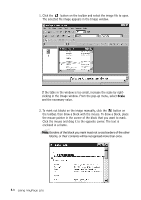
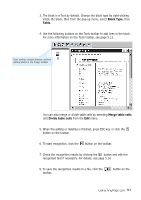
5. You can rotate, invert, or clean the image, using the menu, or the buttons on the toolbar. See page 5.12. 6. To analyse the image, click the button on the toolbar. AnyPage Lite analyses the open page (or the selected pages or all pages depending on the button mode.) and marks blocks as texts, pictures, and tables on this particular image. For details on the button mode, see page 5.11. The number in the upper left corner of the block indicates the sequence as they appear in the output text. The block type is identified with colour; green (text), red (picture), brown (table). To change the colour; select Options from the Tools menu. In the Options dialogue box, select the General tab and change the colour. If you are not satisfied with the result, edit the blocks using the buttons on the toolbar. See page 5.13. Note: You can skip this step. When you click the button without analysing the image, AnyPage Lite automatically analyses the image and then starts recognition. 7. To start recognition, click the button on the toolbar. The system recognises the open page (or selected pages or all pages depending on the button mode). During recognition, AnyPage Lite highlights the recognised part in the Image window. The system may display a warning message (for example; Resolution is too low). These messages help you to check parameters, and can be disabled or not display them if you wish (From the Tools menu, select Options ¡ Recognition ¡ Show tips during recognition). Using AnyPage Lite 5.5
-
 1
1 -
2
-
3
-
4
-
5
-
6
-
7
-
8
-
9
-
10
-
11
-
12
-
13
-
14
-
15
-
16
-
17
-
18
-
19
-
20
-
21
-
22
-
23
-
24
-
25
-
26
-
27
-
28
-
29
-
30
-
31
-
32
-
33
-
34
-
35
-
36
-
37
-
38
-
39
-
40
-
41
-
42
-
43
-
44
-
45
-
46
-
47
-
48
-
49
-
50
-
51
-
52
-
53
-
54
-
55
-
56
-
57
-
58
-
59
-
60
-
61
-
62
-
63
-
64
-
65
-
66
-
67
-
68
-
69
-
70
-
71
-
72
-
73
-
74
-
75
-
76
-
77
-
78
-
79
-
80
-
81
-
82
-
83
-
84
-
85
-
86
-
87
-
88
-
89
-
90
-
91
-
92
-
93
-
94
-
95
-
96
-
97
-
98
-
99
-
100
-
101
-
102
-
103
-
104
-
105
-
106
-
107
-
108
-
109
-
110
-
111
-
112
-
113
-
114
-
115
-
116
-
117
-
118
-
119
-
120
-
121
-
122
-
123
-
124
-
125
-
126
-
127
-
128
-
129
-
130
-
131
-
132
-
133
-
134
-
135
-
136
-
137
-
138
-
139
-
140
-
141
-
142
-
 143
143 -
 144
144 -
 145
145 -
 146
146 -
 147
147 -
 148
148 -
 149
149 -
 150
150 -
 151
151 -
 152
152 -
 153
153 -
154
-
155
-
156
-
157
-
158
-
159
-
160
-
161
-
162
-
163
-
164
-
165
 |
 |