Samsung SF-565PR Win 2000/xp/2003/vista/2008/win 7(32,64bit) ( 20.6 - Page 75
Uploading a Project, Enter, Tools, Publisher, Upload
 |
UPC - 635753610277
View all Samsung SF-565PR manuals
Add to My Manuals
Save this manual to your list of manuals |
Page 75 highlights
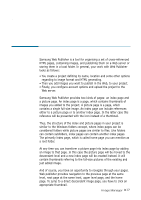
3. Click the Add new account button in the Upload Options window. An empty box will appear in the Account name field. : Explore account. : Delete account. : Add a new account. : Save accounts list. : Exit. 4. Enter a name of the account and press Enter. Then fill another fields in the same way. 5. To save the changes, click the Save button. The Upload Options window also allows you to edit and delete the FTP account. To edit, double-click the field you want to change. To delete an existing account, select the desired account and then click the Delete button. To exit from the Upload Options window, click the Exit button. If any changes were made, and you did not save them, a confirmation dialogue box, offering you to save changes will appear. Uploading a Project 1. In the Image Manager, click the Tools menu and then click Web Publisher. 2. Choose an account where you want to upload a project from the dropdown list in the Web Publisher window. 3. Click the Publish menu and then click Upload. This will launch the upload process. 3.20 Image Manager
-
 1
1 -
2
-
3
-
4
-
5
-
6
-
7
-
8
-
9
-
10
-
11
-
12
-
13
-
14
-
15
-
16
-
17
-
18
-
19
-
20
-
21
-
22
-
23
-
24
-
25
-
26
-
27
-
28
-
29
-
30
-
31
-
32
-
33
-
34
-
35
-
36
-
37
-
38
-
39
-
40
-
41
-
42
-
43
-
44
-
45
-
46
-
47
-
48
-
49
-
50
-
51
-
52
-
53
-
54
-
55
-
56
-
57
-
58
-
59
-
60
-
61
-
62
-
63
-
64
-
65
-
66
-
67
-
68
-
69
-
 70
70 -
 71
71 -
 72
72 -
 73
73 -
 74
74 -
 75
75 -
 76
76 -
 77
77 -
 78
78 -
 79
79 -
 80
80 -
81
-
82
-
83
-
84
-
85
-
86
-
87
-
88
-
89
-
90
-
91
-
92
-
93
-
94
-
95
-
96
-
97
-
98
-
99
-
100
-
101
-
102
-
103
-
104
-
105
-
106
-
107
-
108
-
109
-
110
-
111
-
112
-
113
-
114
-
115
-
116
-
117
-
118
-
119
-
120
-
121
-
122
-
123
-
124
-
125
-
126
-
127
-
128
-
129
-
130
-
131
-
132
-
133
-
134
-
135
-
136
-
137
-
138
-
139
-
140
-
141
-
142
-
143
-
144
-
145
-
146
-
147
-
148
-
149
-
150
-
151
-
152
-
153
-
154
-
155
-
156
-
157
-
158
-
159
-
160
-
161
-
162
-
163
-
164
-
165
 |
 |