Samsung SF-565PR Win 2000/xp/2003/vista/2008/win 7(32,64bit) ( 20.6 - Page 39
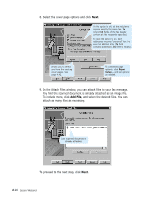
Select Project Location, yourprojectname_files, s will be displayed and navigated.
 |
UPC - 635753610277
View all Samsung SF-565PR manuals
Add to My Manuals
Save this manual to your list of manuals |
Page 39 highlights
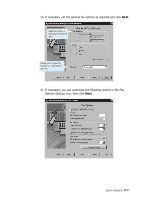
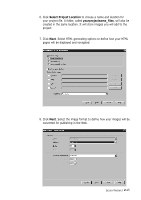
6. Click Select Project Location to choose a name and location for your project file. A folder, called yourprojectname_files, will also be created in the same location. It will store images you will add to the project. 7. Click Next. Select HTML generating options to define how your HTML pages will be displayed and navigated. 8. Click Next. Select the image format to define how your images will be converted for publishing in the Web. Scan Wizard 2.25
-
 1
1 -
2
-
3
-
4
-
5
-
6
-
7
-
8
-
9
-
10
-
11
-
12
-
13
-
14
-
15
-
16
-
17
-
18
-
19
-
20
-
21
-
22
-
23
-
24
-
25
-
26
-
27
-
28
-
29
-
30
-
31
-
32
-
33
-
 34
34 -
 35
35 -
 36
36 -
 37
37 -
 38
38 -
 39
39 -
 40
40 -
 41
41 -
 42
42 -
 43
43 -
 44
44 -
45
-
46
-
47
-
48
-
49
-
50
-
51
-
52
-
53
-
54
-
55
-
56
-
57
-
58
-
59
-
60
-
61
-
62
-
63
-
64
-
65
-
66
-
67
-
68
-
69
-
70
-
71
-
72
-
73
-
74
-
75
-
76
-
77
-
78
-
79
-
80
-
81
-
82
-
83
-
84
-
85
-
86
-
87
-
88
-
89
-
90
-
91
-
92
-
93
-
94
-
95
-
96
-
97
-
98
-
99
-
100
-
101
-
102
-
103
-
104
-
105
-
106
-
107
-
108
-
109
-
110
-
111
-
112
-
113
-
114
-
115
-
116
-
117
-
118
-
119
-
120
-
121
-
122
-
123
-
124
-
125
-
126
-
127
-
128
-
129
-
130
-
131
-
132
-
133
-
134
-
135
-
136
-
137
-
138
-
139
-
140
-
141
-
142
-
143
-
144
-
145
-
146
-
147
-
148
-
149
-
150
-
151
-
152
-
153
-
154
-
155
-
156
-
157
-
158
-
159
-
160
-
161
-
162
-
163
-
164
-
165
 |
 |

2
.25
Scan Wizard
6. Click
Select Project Location
to choose a name and location for
your project file. A folder, called
yourprojectname_files
, will also be
created in the same location. It will store images you will add to the
project.
7. Click
Next
. Select HTML generating options to define how your HTML
pages will be displayed and navigated.
8. Click
Next
. Select the image format to define how your images will be
converted for publishing in the Web.