Samsung SF-565PR Win 2000/xp/2003/vista/2008/win 7(32,64bit) ( 20.6 - Page 22
Selecting Scan Options, Options, Scan Options - scanner software
 |
UPC - 635753610277
View all Samsung SF-565PR manuals
Add to My Manuals
Save this manual to your list of manuals |
Page 22 highlights
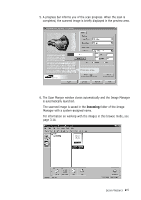
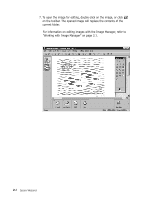
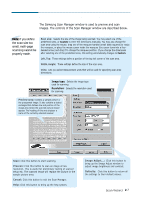
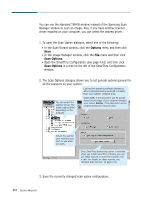
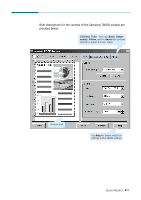
Selecting Scan Options You can use the standard TWAIN window instead of the Samsung Scan Manager window to scan an image. Also, if you have another scanner driver installed on your computer, you can select the desired driver. 1. To open the Scan Option dialogue, select one of the following: • In the Scan Wizard window, click the Options menu and then click Scan. • In the Image Manager window, click the File menu and then click Scan Options. • Open the SmarThru Configuration (see page 4.61) and then click Scan Options in a tree on the left of the SmarThru Configuration window. 2. The Scan Options dialogue allows you to set general options general for all the scanners on your system. Controls the scanning software behaviour, when a document being scanned is smaller than your scanner viewport area. You can select the scanner driver. The model names differ depending on the products. Select Left, if the document will be placed along the left edge of your scanner viewport area. Select Center, if the document will be centred across the viewport area. Select the scanner user interface you wish to use when you scan. Once SmarThru Networking option is selected when you install SmarThru software, you can use these options to share the scanner over a LAN. For details on these options, see "Remote Scan Service" on page 2.34. 3. Save the currently changed scan option configuration. 2.8 Scan Wizard
-
 1
1 -
2
-
3
-
4
-
5
-
6
-
7
-
8
-
9
-
10
-
11
-
12
-
13
-
14
-
15
-
16
-
 17
17 -
 18
18 -
 19
19 -
 20
20 -
 21
21 -
 22
22 -
 23
23 -
 24
24 -
 25
25 -
 26
26 -
 27
27 -
28
-
29
-
30
-
31
-
32
-
33
-
34
-
35
-
36
-
37
-
38
-
39
-
40
-
41
-
42
-
43
-
44
-
45
-
46
-
47
-
48
-
49
-
50
-
51
-
52
-
53
-
54
-
55
-
56
-
57
-
58
-
59
-
60
-
61
-
62
-
63
-
64
-
65
-
66
-
67
-
68
-
69
-
70
-
71
-
72
-
73
-
74
-
75
-
76
-
77
-
78
-
79
-
80
-
81
-
82
-
83
-
84
-
85
-
86
-
87
-
88
-
89
-
90
-
91
-
92
-
93
-
94
-
95
-
96
-
97
-
98
-
99
-
100
-
101
-
102
-
103
-
104
-
105
-
106
-
107
-
108
-
109
-
110
-
111
-
112
-
113
-
114
-
115
-
116
-
117
-
118
-
119
-
120
-
121
-
122
-
123
-
124
-
125
-
126
-
127
-
128
-
129
-
130
-
131
-
132
-
133
-
134
-
135
-
136
-
137
-
138
-
139
-
140
-
141
-
142
-
143
-
144
-
145
-
146
-
147
-
148
-
149
-
150
-
151
-
152
-
153
-
154
-
155
-
156
-
157
-
158
-
159
-
160
-
161
-
162
-
163
-
164
-
165
 |
 |