Samsung SF-565PR Win 2000/xp/2003/vista/2008/win 7(32,64bit) ( 20.6 - Page 85
Fax Gate, Enable Fax Gate, and then select
 |
UPC - 635753610277
View all Samsung SF-565PR manuals
Add to My Manuals
Save this manual to your list of manuals |
Page 85 highlights
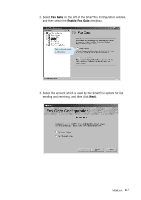
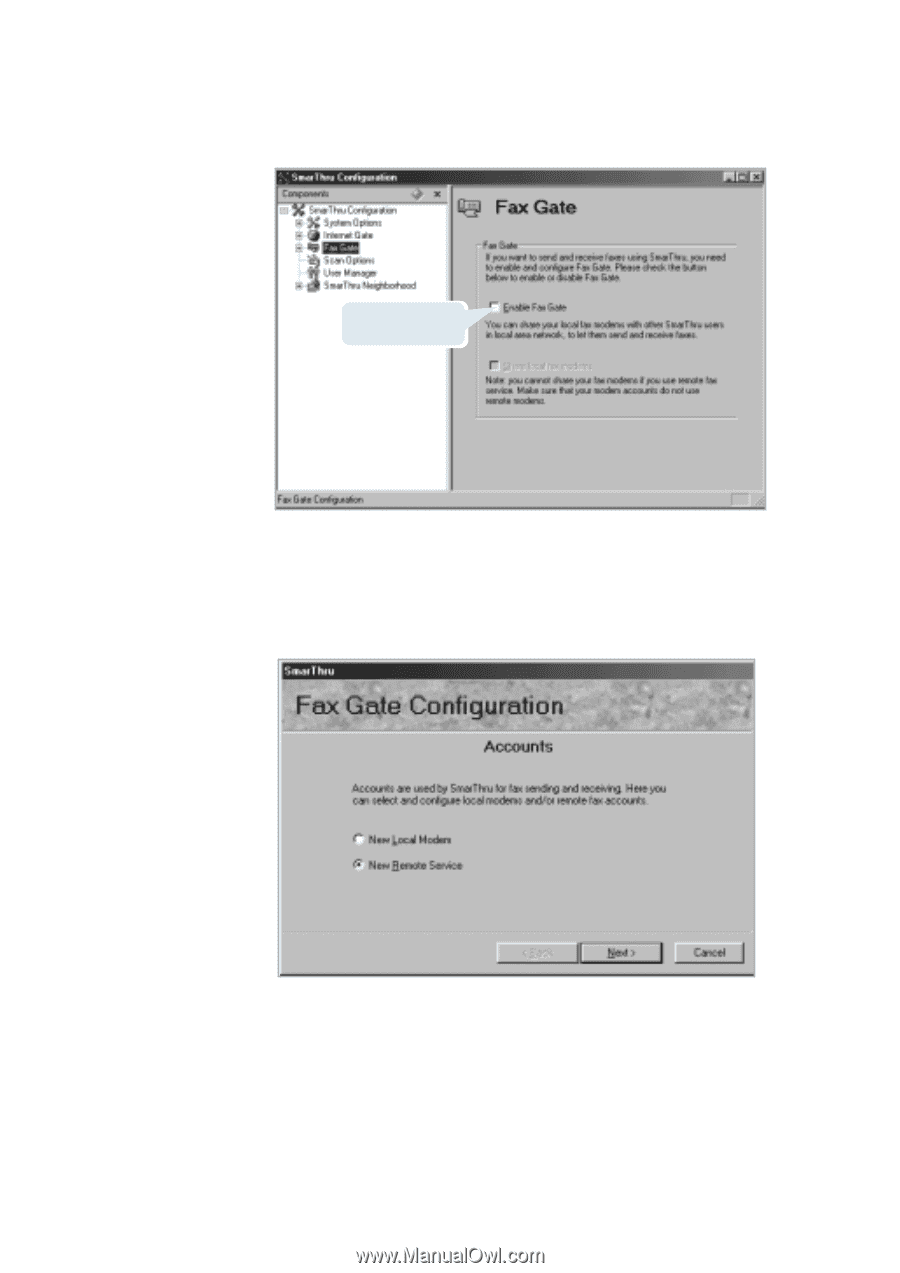
2. Select Fax Gate on the left of the SmarThru Configuration window, and then select the Enable Fax Gate checkbox. Put a check mark in this box. 3. Select the account which is used by the SmarThru system for fax sending and receiving, and then click Next. Mailbox 4.7
-
 1
1 -
2
-
3
-
4
-
5
-
6
-
7
-
8
-
9
-
10
-
11
-
12
-
13
-
14
-
15
-
16
-
17
-
18
-
19
-
20
-
21
-
22
-
23
-
24
-
25
-
26
-
27
-
28
-
29
-
30
-
31
-
32
-
33
-
34
-
35
-
36
-
37
-
38
-
39
-
40
-
41
-
42
-
43
-
44
-
45
-
46
-
47
-
48
-
49
-
50
-
51
-
52
-
53
-
54
-
55
-
56
-
57
-
58
-
59
-
60
-
61
-
62
-
63
-
64
-
65
-
66
-
67
-
68
-
69
-
70
-
71
-
72
-
73
-
74
-
75
-
76
-
77
-
78
-
79
-
 80
80 -
 81
81 -
 82
82 -
 83
83 -
 84
84 -
 85
85 -
 86
86 -
 87
87 -
 88
88 -
 89
89 -
 90
90 -
91
-
92
-
93
-
94
-
95
-
96
-
97
-
98
-
99
-
100
-
101
-
102
-
103
-
104
-
105
-
106
-
107
-
108
-
109
-
110
-
111
-
112
-
113
-
114
-
115
-
116
-
117
-
118
-
119
-
120
-
121
-
122
-
123
-
124
-
125
-
126
-
127
-
128
-
129
-
130
-
131
-
132
-
133
-
134
-
135
-
136
-
137
-
138
-
139
-
140
-
141
-
142
-
143
-
144
-
145
-
146
-
147
-
148
-
149
-
150
-
151
-
152
-
153
-
154
-
155
-
156
-
157
-
158
-
159
-
160
-
161
-
162
-
163
-
164
-
165
 |
 |
4
.7
Mailbox
2. Select
Fax Gate
on the left of the SmarThru Configuration window,
and then select the
Enable Fax Gate
checkbox.
3. Select the account which is used by the SmarThru system for fax
sending and receiving, and then click
Next
.
Put a check mark
in this box.